Redirect Flow
Redirect Flow (also known as Pay by Bank) is a browser-based authentication method where customers are redirected directly to their bank and then back to your application once they have authorised. Despite the browser-based name, it works on mobile as well as desktop: on a phone, the bank's website opens in the browser, or the bank's app opens directly where the bank supports it. It works the same way for a Blink Payments payment and for a Blink Data account access consent: only what the customer approves at the bank differs.
Overview
In Redirect Flow, the customer:
- Starts a payment, or a request to share account information, on your website/app
- Selects their bank (you provide the UI)
- Gets redirected to their bank's website or mobile app
- Authenticates and authorises the payment or the account access
- Gets redirected back to your website/app
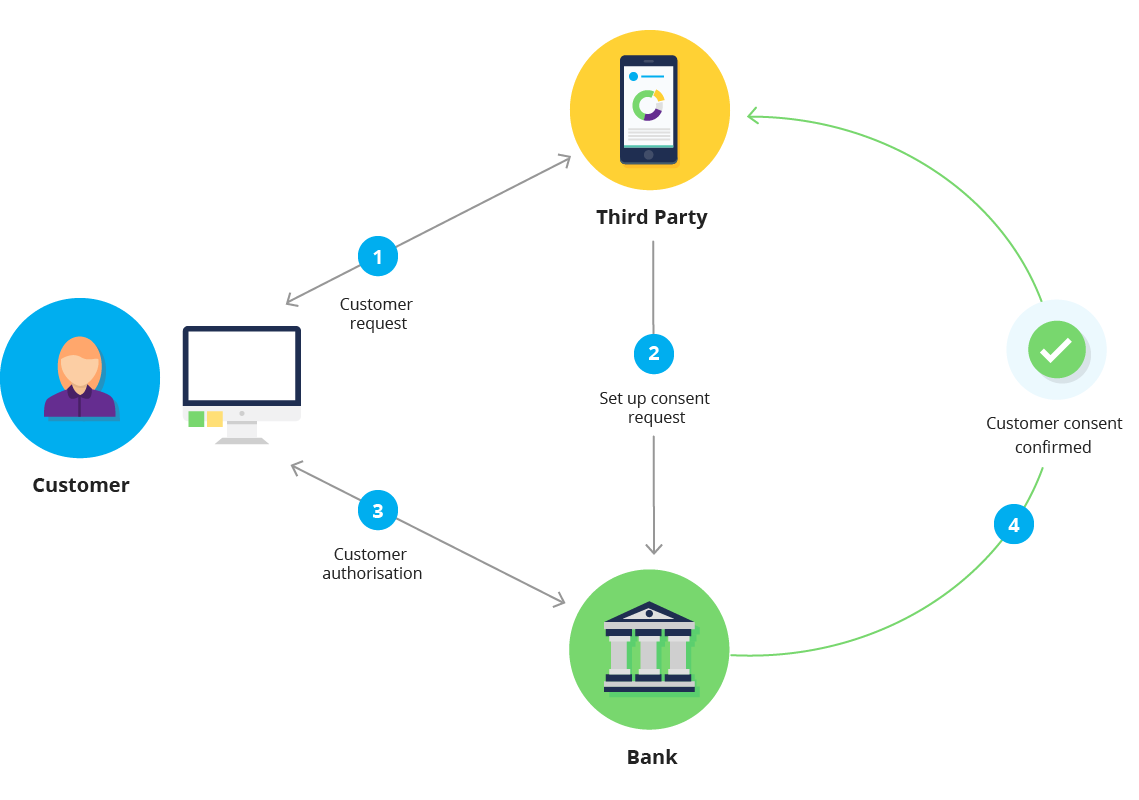
When to Use Redirect Flow
Use Redirect Flow when you need full control over the bank selection UI, custom branding throughout the flow, or specific UX patterns for your use case.
For most integrations, Gateway Flow is recommended—it handles bank selection, device optimisation, and compliance automatically.
Bank Support
Redirect Flow Behaviour by Bank
| Bank | Desktop | Mobile |
|---|---|---|
| ANZ | Bank website (shows QR code) | Opens the ANZ app |
| ASB | Bank website (shows QR code) | Opens the ASB app |
| BNZ | Bank website | Bank website |
| Kiwibank | Bank website | Bank website |
| NZHL | Bank website | Bank website |
| Westpac | Bank website | Opens the Westpac app |
Mobile Experience
On mobile, ANZ, ASB and Westpac open the customer's banking app to authorise (ANZ needs a current version of goMoney). That is not the same as returning the customer to your app afterwards: by default the bank sends the customer back to your redirect_uri in the browser. Returning straight to your app is a separate, Blink Payments-only option described under Return Parameters.
Integration Steps
Step 1: Build Bank Selection UI
Create a UI for customers to select their bank:
<div class="bank-selector">
  <h2>Select Your Bank</h2>

  <button class="bank-button" data-bank="ANZ">
    <img src="/images/banks/anz-logo.png" alt="ANZ" />
    <span>ANZ</span>
  </button>

  <button class="bank-button" data-bank="ASB">
    <img src="/images/banks/asb-logo.png" alt="ASB" />
    <span>ASB</span>
  </button>

  <button class="bank-button" data-bank="BNZ">
    <img src="/images/banks/bnz-logo.png" alt="BNZ" />
    <span>BNZ</span>
  </button>

  <button class="bank-button" data-bank="Kiwibank">
    <img src="/images/banks/kiwibank-logo.png" alt="Kiwibank" />
    <span>Kiwibank</span>
  </button>

  <button class="bank-button" data-bank="NZHL">
    <img src="/images/banks/nzhl-logo.png" alt="NZHL" />
    <span>NZHL</span>
  </button>

  <button class="bank-button" data-bank="Westpac">
    <img src="/images/banks/westpac-logo.png" alt="Westpac" />
    <span>Westpac New Zealand</span>
  </button>
</div>

<script>
  document.querySelectorAll('.bank-button').forEach((button) => {
    button.addEventListener('click', async (e) => {
      const bank = e.currentTarget.dataset.bank;
      await createConsent(bank);
    });
  });
</script>
Bank Identifiers:
- ANZ:
"ANZ" - ASB:
"ASB" - BNZ:
"BNZ" - Kiwibank:
"Kiwibank" - NZHL:
"NZHL" - Westpac:
"Westpac"
The same identifiers are used by both products. Which banks are available to your application for payments and for account information is set out in Bank Coverage.
Step 2: Create Consent with Redirect Flow
When the customer selects a bank, create a consent specifying redirect flow. The flow object, with the bank and your redirect_uri, is the same for every consent type on both products.
Blink Payments — Single Consent (PayNow):
POST /payments/v1/single-consents HTTP/1.1
Host: sandbox.debit.blinkpay.co.nz
Authorization: Bearer {access_token}
Content-Type: application/json

{
  "flow": {
    "detail": {
      "type": "redirect",
      "bank": "ANZ",
      "redirect_uri": "https://www.yourwebsite.com/payment/callback"
    }
  },
  "amount": {
    "currency": "NZD",
    "total": "75.00"
  },
  "pcr": {
    "particulars": "Invoice",
    "code": "12345",
    "reference": "Payment"
  }
}
Blink Payments — Quick Payment:
POST /payments/v1/quick-payments HTTP/1.1
Host: sandbox.debit.blinkpay.co.nz
Authorization: Bearer {access_token}
Content-Type: application/json

{
  "flow": {
    "detail": {
      "type": "redirect",
      "bank": "ANZ",
      "redirect_uri": "https://www.yourwebsite.com/payment/callback"
    }
  },
  "amount": {
    "currency": "NZD",
    "total": "75.00"
  },
  "pcr": {
    "particulars": "Invoice",
    "code": "12345",
    "reference": "Payment"
  }
}
Blink Payments — Enduring Consent (AutoPay):
POST /payments/v1/enduring-consents HTTP/1.1
Host: sandbox.debit.blinkpay.co.nz
Authorization: Bearer {access_token}
Content-Type: application/json

{
  "flow": {
    "detail": {
      "type": "redirect",
      "bank": "ANZ",
      "redirect_uri": "https://www.yourwebsite.com/payment/callback"
    }
  },
  "maximum_amount_period": {
    "currency": "NZD",
    "total": "500.00"
  },
  "period": "monthly",
  "from_timestamp": "2024-12-16T00:00:00Z"
}
Blink Data — Account Access Consent:
POST /v1/consents HTTP/1.1
Host: sandbox.data.blinkpay.co.nz
Authorization: Bearer {access_token}
Content-Type: application/json

{
  "flow": {
    "detail": {
      "type": "redirect",
      "bank": "ANZ",
      "redirect_uri": "https://www.yourwebsite.com/accounts/callback"
    }
  },
  "permissions": [
    "ReadAccounts",
    "ReadBalances",
    "ReadTransactions"
  ],
  "expiration_date_time": "2026-12-31T23:59:59+13:00",
  "start_date_time": "2026-01-01T00:00:00+13:00",
  "end_date_time": "2026-12-31T23:59:59+13:00"
}
Four fields carry the substance of a Blink Data consent, and none of them has a payment equivalent. permissions lists the information types the customer is being asked to share: ReadAccounts (account numbers, names and types), ReadBalances, ReadTransactions (history with payee details), ReadStatements and ReadParty (the account holder's name and contact details). Request only what your application needs; not every bank supports every permission, and the Data API's metadata endpoint tells you which. expiration_date_time sets how long access lasts; leave it out for an open-ended consent. start_date_time and end_date_time bound the transaction history the customer is sharing, independently of how long the consent itself lasts.
Response (both products):
{
  "consent_id": "8f7e6d5c-4b3a-2c1b-0a09-8f7e6d5c4b3a",
  "redirect_uri": "https://api-nomatls.apicentre.middleware.co.nz/middleware-nz-ais/open-banking-nz/v2.3/consents/..."
}
A quick payment returns quick_payment_id in place of consent_id; it is the same value as cid on the return URL.
Bank-Specific URLs
The redirect_uri returned by BlinkPay is the bank's authorisation URL. It's different for each bank, and for each product, and will redirect the customer to their bank's platform.
Step 3: Redirect Customer to Bank
Your backend should securely pass the redirect_uri to your frontend, which then immediately redirects the customer to the bank's authorisation URL.
Step 4: Customer Authorisation at Bank
The customer is now at their bank's platform, where they sign in with their banking credentials, review what they are approving, choose the account, and confirm. For a payment they see the amount and payee, and choose the account the money comes from. For account access they see the permissions requested and the period of access, and choose the accounts the consent covers. They can usually select more than one, which is why GET /v1/accounts can return several accounts.
On desktop, every bank opens its internet banking website; ANZ and ASB show a QR code there for the customer to scan with their banking app. On mobile, ANZ, ASB and Westpac open their banking app, while BNZ, Kiwibank and NZHL use their website on all devices.
Step 5: Handle Return Callback
After authorisation, or when the customer cancels, declines or runs out of time, the customer is redirected back to your redirect_uri with the parameters described in Return Parameters:
https://www.yourwebsite.com/order/12345/complete?cid=8f7e6d5c-4b3a-2c1b-0a09-8f7e6d5c4b3a
Return Parameters
BlinkPay appends these query parameters to your redirect_uri. They are the same for Blink Payments and Blink Data.
| Parameter | When | Meaning |
|---|---|---|
cid | Always | The consent ID. For a quick payment this is also the quick_payment_id. |
status | Only when the outcome is not success | cancelled or rejected (the customer or bank declined), timeout (completing the authorisation timed out) or error (a technical failure). Treat all four as not authorised. |
error | With status | A customer-safe message you can display. Its wording changes without notice. |
error_description | Sometimes, with status | Further detail from the bank, when available. |
There is no success value: a return with cid and no status means the customer finished at the bank, not that the consent was authorised or a payment made. Branch on status, never on the text of error, and treat a status value you don't recognise as a non-success outcome. Whatever the parameters say, confirm the outcome with a server-side GET before you act on it: the return URL is not proof of payment, it can be forged, and it may never arrive if the customer closes the browser. For a quick payment the parameters report only the consent's outcome, because the debit is submitted after this return (see Step 6).
The gateway flow returns the same parameters, with one extra status value, pending, and without error_description.
Blink Payments only: returning straight to your app. With redirect_to_app, the bank returns the customer straight to your app with its own code and state instead of cid; see App-to-App Flow.
Step 6: Verify and Continue
Always verify the outcome on your backend by calling the GET endpoint for the consent. A redirect flow consent on either product moves from AwaitingAuthorisation to Authorised or Rejected. What happens next depends on the consent type.
Blink Payments, quick payment: don't wait for Authorised, and don't call POST /payments. Call GET /payments/v1/quick-payments/{quick_payment_id} (the cid) as soon as the customer returns; that call completes the payment, and calling it again is safe. If it returns a 4xx or 5xx, retry the GET rather than treating the payment as failed. Then keep reading the quick payment until the consent is Consumed or Rejected, and take the payment's outcome from payments[0].status.
Blink Payments, single and enduring consents: fetch GET /payments/v1/single-consents/{consent_id} (or the enduring-consents equivalent) on the payments host, and continue only when it is Authorised. Then create the payment: for a single consent send only the consent_id; for an enduring consent include the amount and PCR. Consumed means the consented action is complete: the payment has been made, or an enduring consent's period has ended. Always read the payment's own status as well, because a single consent whose payment the bank rejected after accepting it is also Consumed.
Polling: don't poll while the customer is at their bank; wait for them to return, then read the consent and, if it isn't terminal yet, poll every second. Once a payment exists, read it every second until it is AcceptedSettlementCompleted or Rejected, for a minute or two at most. Stop at a terminal state, and run a periodic sweep for any consents or payments you lost track of.
Blink Data: fetch GET /v1/consents/{consent_id} on the Data host. Authorised means the customer approved: call the account endpoints with the consent_id, starting with GET /v1/accounts?consent_id={consent_id}. Rejected means they didn't; show a clear message and let them try again.
Mobile App Integration
For mobile apps, open the bank page in an in-app browser: SFSafariViewController or ASWebAuthenticationSession on iOS, Chrome Custom Tabs on Android. Use a custom URL scheme or a universal link / App Link as your redirect_uri, and test opening the banking apps on real devices.
For complete implementation guidance, see the Mobile Integration Guide.
Registering Your App's Return Link
A custom scheme such as myapp://callback (it needs a host part; myapp:callback is rejected) or a universal link / Android App Link can be your redirect_uri. Register it yourself in the BlinkPay portal under Settings > API Settings, in the Whitelisted Redirect URLs for each environment. Banks don't need to whitelist it. Contact BlinkPay support only if you want app-to-app return (redirect_to_app, Blink Payments only). See Register Your Return Link.
iFrames and Embedded WebViews Not Supported
iFrames cannot be used, because banks' anti-framing policies block them, and embedded WebViews (WKWebView, Android WebView) are not supported. Use an in-app browser; see Mobile Integration.
Troubleshooting
For common issues and solutions, see the Troubleshooting Guide.
Quick checks:
- Redirect loop? Ensure callback handling doesn't re-initiate payment
- Bank page not loading? Check bank is operational and customer has online banking enabled
- Deep link not working? Ensure banking app is installed and up to date
- Consent not authorised? Customer may have cancelled or session timed out—check the specific status
Best Practices
Bank Selection UI: Show every bank available to your application, with official logos. Make buttons touch-friendly, show loading states during redirect, and always provide a cancel option.
Redirect Handling: Always validate consent status on your backend—never trust query parameters alone. Handle both outcomes (Authorised and Rejected) and provide clear retry options. Status values are case-sensitive.
Mobile: Use an in-app browser (Custom Tabs, SFSafariViewController or ASWebAuthenticationSession), never an embedded WebView. Test on real devices, and if the banking app doesn't open, let the customer continue on the bank's website.
Testing
Test in sandbox with the mock bank "PNZ", username user01 and password password, on both products. Before going live, test with real banks across multiple devices and browsers, using small amounts ($0.01) for payments and your own accounts for account access.