Gateway Flow
The Gateway Flow is the strongly recommended integration method for most use cases. BlinkPay hosts an interface that handles bank selection and customer authentication, significantly reducing your integration complexity.
This flow works for both Blink Payments (PayNow and AutoPay payments) and Blink Data (account information access), giving customers one consistent experience whichever product your application uses. For Blink Payments integrations the Gateway can also present card payment as an option alongside bank accounts, where that has been enabled for your account.
Strongly Recommended
Use Gateway Flow unless you have specific requirements for complete UX control. It's the fastest to implement, handles all compliance requirements automatically, and adapts as banks add new features.
What BlinkPay Gateway Handles
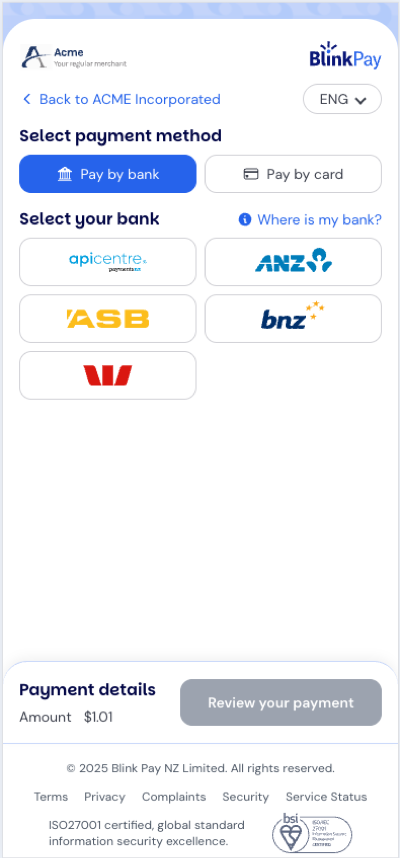
The Gateway manages the complete consent authorisation experience, whether the customer is approving a payment or granting access to their account information. It presents a bank selection interface, automatically chooses the optimal authentication flow based on the customer's device, collects any required identifiers for decoupled flow, and handles the redirect orchestration between your site, the gateway, and the bank. For Blink Payments integrations, the gateway can also render a secure card payment form when card payments are enabled.
All interactions comply with Payments NZ industry guidelines, and the gateway gracefully handles errors including timeouts, rejections, and bank-specific issues.
Why Use Gateway Flow?
Gateway Flow is the fastest path to integration. You don't need to build bank selection UI, implement compliance workflows, or handle bank-specific authentication logic. The gateway optimises the experience for each bank and device type, and automatically enables new features as banks add capabilities—no code changes required on your end.
How Gateway Flow Works
The Gateway handles both Redirect and Decoupled authentication flows under the hood—customers select their preferred method during the consent process, and the gateway manages the technical details automatically.
Payments and Account Access Through the Gateway
The gateway journey is the same for both products: your application creates a consent, sends the customer to the gateway, and verifies the outcome afterwards. What the customer is approving, and what your application can do once they have, differs.
| Blink Payments | Blink Data | |
|---|---|---|
| What the customer approves | A payment, or a standing permission to take payments up to a limit | Sharing specific account information, for a period you set |
| Create the consent | POST /payments/v1/single-consents, /quick-payments or /enduring-consents on the payments host | POST /v1/consents on the Data host |
| What defines the consent | amount and pcr, or maximum_amount_period and period | permissions, expiration_date_time, and optional start_date_time / end_date_time for transaction history |
What Authorised lets you do | Create the payment (single and enduring) or confirm it was made (quick payment) | Call the account, balance, transaction, statement and party endpoints with the consent_id until the consent expires or is revoked |
What Consumed means | The consented action is complete: the payment has been made, or an enduring consent's period has ended | The consented action is complete: the access period has ended (expiration_date_time has passed). Reading data never consumes a Data consent |
The flow object, the redirect_uri the gateway returns, the return callback and the status checks below are identical for both. Where a step differs, both versions are shown.
User Experience in Gateway
After selecting their bank, customers choose how to approve the consent. The gateway works out which options the customer's bank supports on their device and presents them; the customer picks one, and you don't need to handle any of this in your integration. For reference, the options are:
- Internet banking website (the redirect flow): opens the bank's site. On mobile, for ANZ, ASB and Westpac it becomes "Open in {bank} app" and opens the customer's banking app (ANZ needs a current version of goMoney); BNZ, Kiwibank and NZHL use their website on mobile too.
- Send to {bank} app (the decoupled flow): the customer enters an identifier such as their mobile number and approves the request in their banking app.
Faster Experience for Repeat Customers
To enhance the consent experience for repeat customers, provide your customer's previous consent_id in the gateway request. When BlinkPay provides this to the bank, the customer can be identified without re-entering their phone number, email, or banking username. They simply approve the new consent directly in their mobile banking app.
Provide the last successful Consent ID (status Authorised or Consumed) in Gateway Flow requests to activate this feature.
Consent Timeout
Gateway consents timeout after 15 minutes of inactivity if the customer doesn't begin the authorisation process. Once they've chosen a bank and been sent to it, that bank's own authorisation window applies instead — currently between about four and ten minutes, depending on the bank and flow.
Integration Steps
Step 1: Create Consent with Gateway Flow
When creating a consent, specify gateway as the flow type. The flow object is the same for every consent type on both products; the rest of the body describes what is being approved.
Blink Payments — Single Consent (PayNow):
POST /payments/v1/single-consents HTTP/1.1
Host: sandbox.debit.blinkpay.co.nz
Authorization: Bearer {access_token}
Content-Type: application/json

{
  "flow": {
    "detail": {
      "type": "gateway",
      "redirect_uri": "https://www.yourwebsite.com/payment/callback",
      "flow_hint": {
        "type": "redirect"
      }
    }
  },
  "amount": {
    "currency": "NZD",
    "total": "45.00"
  },
  "pcr": {
    "particulars": "Invoice 123",
    "code": "INV123",
    "reference": "Payment"
  }
}
Blink Payments — Quick Payment:
POST /payments/v1/quick-payments HTTP/1.1
Host: sandbox.debit.blinkpay.co.nz
Authorization: Bearer {access_token}
Content-Type: application/json

{
  "flow": {
    "detail": {
      "type": "gateway",
      "redirect_uri": "https://www.yourwebsite.com/payment/callback",
      "flow_hint": {
        "type": "redirect"
      }
    }
  },
  "amount": {
    "currency": "NZD",
    "total": "45.00"
  },
  "pcr": {
    "particulars": "Invoice 123",
    "code": "INV123",
    "reference": "Payment"
  }
}
Blink Payments — Enduring Consent (AutoPay):
POST /payments/v1/enduring-consents HTTP/1.1
Host: sandbox.debit.blinkpay.co.nz
Authorization: Bearer {access_token}
Content-Type: application/json

{
  "flow": {
    "detail": {
      "type": "gateway",
      "redirect_uri": "https://www.yourwebsite.com/payment/callback",
      "flow_hint": {
        "type": "redirect"
      }
    }
  },
  "maximum_amount_period": {
    "currency": "NZD",
    "total": "500.00"
  },
  "period": "monthly",
  "from_timestamp": "2024-12-16T00:00:00Z",
  "expiry_timestamp": "2025-12-16T00:00:00Z"
}
Blink Data — Account Access Consent:
POST /v1/consents HTTP/1.1
Host: sandbox.data.blinkpay.co.nz
Authorization: Bearer {access_token}
Content-Type: application/json

{
  "flow": {
    "detail": {
      "type": "gateway",
      "redirect_uri": "https://www.yourwebsite.com/accounts/callback"
    },
    "flow_hint": {
      "type": "redirect",
      "bank": "PNZ"
    }
  },
  "permissions": [
    "ReadAccounts",
    "ReadBalances",
    "ReadTransactions"
  ],
  "expiration_date_time": "2026-12-31T23:59:59+13:00",
  "start_date_time": "2026-01-01T00:00:00+13:00",
  "end_date_time": "2026-12-31T23:59:59+13:00"
}
Four fields carry the substance of a Blink Data consent, and none of them has a payment equivalent. permissions lists the information types the customer is being asked to share: ReadAccounts (account numbers, names and types), ReadBalances, ReadTransactions (history with payee details), ReadStatements and ReadParty (the account holder's name and contact details). Request only what your application needs; not every bank supports every permission, and the Data API's metadata endpoint tells you which. expiration_date_time sets how long access lasts; leave it out for an open-ended consent. start_date_time and end_date_time bound the transaction history the customer is sharing, independently of how long the consent itself lasts.
Response (Blink Payments):
{
  "consent_id": "3a3b7f7d-f8e6-4c3e-b2a1-5f9c8d7e6a5b",
  "redirect_uri": "https://secure.blinkpay.co.nz/gateway/pay?id=3a3b7f7d-f8e6-4c3e-b2a1-5f9c8d7e6a5b"
}
Blink Data: the response has the same two fields; the gateway URL carries the consent ID as ?id=<consent_id>.
Blink Payments: a quick payment returns quick_payment_id in place of consent_id; it is the same value as cid on the return URL.
Both products return the gateway URL in redirect_uri. The exact URL differs between products and environments, so always use the value returned rather than building one.
Step 2: Redirect Customer to Gateway
Your backend should securely pass the redirect_uri to your frontend, which then redirects the customer to the gateway:
<!-- Redirect button -->
<a href="{{ redirect_uri }}" class="btn-continue"> Continue to your bank </a>

<!-- Or automatic redirect -->
<script>
  window.location.href = '{{ redirect_uri }}';
</script>
Step 3: Customer Experience at Gateway
When redirected to the Gateway, customers see what they are being asked to approve, select their bank, choose an authentication method, and complete authorisation at their bank. For a payment that is the amount and payee; for account access it is the permissions requested and how long they last, which the bank restates on its own consent screen. At the bank, the customer also chooses the account: the one a payment comes from, or for account access one or more accounts to share. For Blink Payments integrations with card payments enabled, the gateway also presents a card payment option.
Step 4: Handle Return Callback
After authorisation (or cancellation), the customer is redirected back to your redirect_uri with the same parameters whichever product created the consent:
https://www.yourwebsite.com/callback?cid=3a3b7f7d-f8e6-4c3e-b2a1-5f9c8d7e6a5b
Return Parameters
The parameters are the redirect flow's return parameters: cid always, and status with a display-only error when the outcome is not success. The gateway adds one status value, pending (the outcome is not yet known, so poll the consent), and does not pass on the bank's error_description.
Always Verify via API
There is no success value: a return with cid and no status is not confirmation. Branch on status, never on the text of error, and treat a status value you don't recognise as a non-success outcome. Then confirm the outcome with a server-side GET before acting on it: the return URL is not proof of payment, it can be forged, and it may never arrive.
When the customer takes the redirect option, a Blink Payments consent can also use redirect_to_app, where the bank returns the customer straight to your app with code and state instead of cid; see Return Parameters in the redirect flow.
Step 5: Verify Consent Status
Always verify the consent status on your backend by calling the GET endpoint for the consent before proceeding. This is the only reliable way to determine the outcome.
Blink Payments:
GET /payments/v1/single-consents/{consent_id} HTTP/1.1
Host: sandbox.debit.blinkpay.co.nz
Authorization: Bearer {access_token}
Use /payments/v1/enduring-consents/{consent_id} for an enduring consent, or /payments/v1/quick-payments/{quick_payment_id} for a quick payment, which also reports the payment itself.
For a bank quick payment, call GET /payments/v1/quick-payments/{quick_payment_id} as soon as the customer returns; the gateway normally does this for you, and calling it again is safe. That call completes the payment, so don't wait to see Authorised and don't call POST /payments. If it returns a 4xx or 5xx, retry the GET and read the outcome from consent.payments[0].status.
Don't poll while the customer is at the gateway or their bank: wait for them to return. Once they are back, read the consent straight away and, if it isn't terminal yet, poll every second. Read a payment every second until it is AcceptedSettlementCompleted or Rejected, for a minute or two at most, and stop at a terminal state.
Blink Data:
GET /v1/consents/{consent_id} HTTP/1.1
Host: sandbox.data.blinkpay.co.nz
Authorization: Bearer {access_token}
A gateway consent on either product moves from GatewayAwaitingSubmission to AwaitingAuthorisation when the customer picks a bank, then to Authorised or Rejected. GatewayTimeout means the customer never chose a bank within the gateway's window. For a Data consent, Authorised means the customer approved: call the account endpoints with its consent_id, for example GET /v1/accounts?consent_id={consent_id}. Rejected or GatewayTimeout means they didn't; show a clear message and let them try again.
Flow Hints
The flow_hint parameter tells Gateway which authentication method to optimise for. Where it goes differs by product: in a Blink Payments request it sits inside flow.detail, and in a Blink Data request it sits directly under flow, next to detail.
Redirect Flow Hint
{
  "flow_hint": {
    "type": "redirect",
    "bank": "PNZ"
  }
}
Best for desktop users and browser-based checkout flows. The gateway offers redirect-based authentication, opening the bank website, or on mobile the banking app for banks that support it. A hint that names a bank pre-selects that bank, so the customer skips bank selection.
Blink Data: every flow hint must name a bank; a hint without one is rejected with 400 BDT260. A hint naming a bank your organisation isn't set up for is ignored, and the customer chooses a bank in the gateway as usual.
Decoupled Flow Hint
{
  "flow_hint": {
    "type": "decoupled",
    "bank": "BNZ",
    "identifier_type": "consent_id",
    "identifier_value": "5c2f9a4e-8b7d-4e3a-9f1c-2d6b8e4a7c31"
  }
}
Best for returning customers with previous consents or when customers prefer app authorisation. The gateway can pre-fill bank selection and the customer authorises on their mobile device. For Kiwibank and NZHL the gateway preselects the bank's website on every device, with "Send to {bank} app" available as a switch; a decoupled flow hint for one of those banks preselects the app option instead.
Smart Flow Selection
If you don't specify a flow hint, Gateway will intelligently select the best option based on device type and customer history.
Gateway Features
The gateway provides a polished, accessible bank selection interface with visual logos and search capability. It's fully responsive and WCAG 2.1 AA compliant.
Beyond bank selection, it chooses between the redirect and decoupled flows for the customer's bank and device, and on mobile it opens the customer's banking app where the bank supports it.
Blink Payments only: the gateway shows a confirmation screen before sending the customer to the bank, with who they are paying, the amount and the particulars, code and reference (for AutoPay, the agreement details). It knows each bank's payment limit and warns the customer when the amount is over it, so they can choose another bank, and it tells ANZ customers when Voice ID is needed for a payment over $10,000.
Blink Data: the customer sees the permissions your application is requesting and how long access lasts. There are no payment limits.
Automatic Flow Optimisation
The gateway preselects an authentication option for each bank; where the bank offers both, the customer can switch:
| Bank | Mobile Device | Desktop Device |
|---|---|---|
| ANZ | Open in ANZ app | Send to ANZ app (the website option shows a QR code) |
| ASB | Open in ASB app | Send to ASB app (the website option shows a QR code) |
| BNZ | Send to BNZ app | Customer chooses: website or Send to BNZ app |
| Kiwibank, NZHL | Internet banking website (the customer can switch to Send to app, with their mobile number) | Internet banking website (the customer can switch to Send to app) |
| Westpac | Open in Westpac app | Customer chooses: website or Send to Westpac app |
A decoupled flow_hint for the chosen bank generally preselects "Send to app" instead; ANZ on mobile still opens the app. Every bank's "Send to app" option takes the identifiers listed under Decoupled Flow Identifiers; for Kiwibank and NZHL that is a mobile number or a previous consent ID.
Error Handling
Advanced Configuration
Custom Branding
You can display your brand logo on the Gateway. Configure co-branding options in the BlinkPay Client Portal.
Tracking Your Own References
To tie a consent to your order, store the consent_id (or quick_payment_id) against the order on your server before sending the customer to the gateway. You can also add your own query string to the redirect_uri, such as ?order=123: query strings are ignored when the URI is checked against your whitelist, and they come back with the customer. For a payment, the PCR fields (particulars, code and reference) travel with the payment itself.
Neither product's consent takes a metadata object of your own. A Blink Payments consent carries your references in the PCR fields; a Blink Data consent has no equivalent, so keep the link between the consent and your records on your server.
Gateway URLs
The gateway URL is returned in the redirect_uri field of the consent response—always use the URL provided by the API rather than hardcoding.
Testing
Use sandbox to test the complete customer journey without real banking credentials. Select "PNZ" as the mock bank.
Troubleshooting
For common issues and solutions, see the Troubleshooting Guide.
Quick checks:
- Gateway not loading? Verify your
redirect_uriis correct and check for ad blockers - Customer redirected back immediately? Check consent status—may be
RejectedorGatewayTimeout - Wrong redirect location? Ensure URL is fully qualified (includes https://) and whitelisted
Best Practices
Redirect URIs: Use HTTPS for web return URLs (production rejects http:// and localhost; a mobile app may use a custom scheme), include order/transaction IDs for tracking, and handle both success and failure scenarios. Never trust query parameters alone—always verify consent status on your backend. If you use multiple subdomains, consider registering a wildcard entry (e.g., https://*.example.com/callback) rather than individual URIs. See Redirect URI Whitelisting for details.
User Experience: Show loading states while creating consents, provide clear instructions before redirect, and offer "Try again" options for failures. Don't use iFrames (not supported) or popups (may be blocked).