**Always Verify via API**
There is no success value: a return with `cid` and no `status` is not confirmation. Branch on `status`, never on the text of `error`, and treat a `status` value you don't recognise as a non-success outcome. Then confirm the outcome with a server-side GET before acting on it: the return URL is not proof of payment, it can be forged, and it may never arrive.
When the customer takes the redirect option, a Blink Payments consent can also use `redirect_to_app`, where the bank returns the customer straight to your app with `code` and `state` instead of `cid`; see [Return Parameters](/docs/shared/flows/redirect-flow#return-parameters) in the redirect flow.
### Step 5: Verify Consent Status
Always verify the consent status on your backend by calling the GET endpoint for the consent before proceeding. This is the only reliable way to determine the outcome.
**Blink Payments:**
```http
GET /payments/v1/single-consents/{consent_id} HTTP/1.1
Host: sandbox.debit.blinkpay.co.nz
Authorization: Bearer {access_token}
```
Use `/payments/v1/enduring-consents/{consent_id}` for an enduring consent, or `/payments/v1/quick-payments/{quick_payment_id}` for a quick payment, which also reports the payment itself.
For a bank quick payment, call `GET /payments/v1/quick-payments/{quick_payment_id}` as soon as the customer returns; the gateway normally does this for you, and calling it again is safe. That call completes the payment, so don't wait to see `Authorised` and don't call `POST /payments`. If it returns a 4xx or 5xx, retry the GET and read the outcome from `consent.payments[0].status`.
Don't poll while the customer is at the gateway or their bank: wait for them to return. Once they are back, read the consent straight away and, if it isn't terminal yet, poll every second. Read a payment every second until it is `AcceptedSettlementCompleted` or `Rejected`, for a minute or two at most, and stop at a terminal state.
**Blink Data:**
```http
GET /v1/consents/{consent_id} HTTP/1.1
Host: sandbox.data.blinkpay.co.nz
Authorization: Bearer {access_token}
```
A gateway consent on either product moves from `GatewayAwaitingSubmission` to `AwaitingAuthorisation` when the customer picks a bank, then to `Authorised` or `Rejected`. `GatewayTimeout` means the customer never chose a bank within the gateway's window. For a Data consent, `Authorised` means the customer approved: call the account endpoints with its `consent_id`, for example `GET /v1/accounts?consent_id={consent_id}`. `Rejected` or `GatewayTimeout` means they didn't; show a clear message and let them try again.
## Flow Hints
The `flow_hint` parameter tells Gateway which authentication method to optimise for. Where it goes differs by product: in a Blink Payments request it sits inside `flow.detail`, and in a Blink Data request it sits directly under `flow`, next to `detail`.
### Redirect Flow Hint
```json
{
"flow_hint": {
"type": "redirect",
"bank": "PNZ"
}
}
```
Best for desktop users and browser-based checkout flows. The gateway offers redirect-based authentication, opening the bank website, or on mobile the banking app for banks that support it. A hint that names a bank pre-selects that bank, so the customer skips bank selection.
**Blink Data:** every flow hint must name a `bank`; a hint without one is rejected with 400 `BDT260`. A hint naming a bank your organisation isn't set up for is ignored, and the customer chooses a bank in the gateway as usual.
### Decoupled Flow Hint
```json
{
"flow_hint": {
"type": "decoupled",
"bank": "BNZ",
"identifier_type": "consent_id",
"identifier_value": "5c2f9a4e-8b7d-4e3a-9f1c-2d6b8e4a7c31"
}
}
```
Best for returning customers with previous consents or when customers prefer app authorisation. The gateway can pre-fill bank selection and the customer authorises on their mobile device. For Kiwibank and NZHL the gateway preselects the bank's website on every device, with "Send to {bank} app" available as a switch; a decoupled flow hint for one of those banks preselects the app option instead.
**Smart Flow Selection**
If you don't specify a flow hint, Gateway will intelligently select the best option based on device type and customer history.
## Gateway Features
The gateway provides a polished, accessible bank selection interface with visual logos and search capability. It's fully responsive and WCAG 2.1 AA compliant.
Beyond bank selection, it chooses between the redirect and decoupled flows for the customer's bank and device, and on mobile it opens the customer's banking app where the bank supports it.
**Blink Payments only:** the gateway shows a confirmation screen before sending the customer to the bank, with who they are paying, the amount and the particulars, code and reference (for AutoPay, the agreement details). It knows each bank's payment limit and warns the customer when the amount is over it, so they can choose another bank, and it tells ANZ customers when Voice ID is needed for a payment over $10,000.
**Blink Data:** the customer sees the permissions your application is requesting and how long access lasts. There are no payment limits.
### Automatic Flow Optimisation
The gateway preselects an authentication option for each bank; where the bank offers both, the customer can switch:
| Bank | Mobile Device | Desktop Device |
| ---------------------- | -------------------------------- | ---------------------------------------------------- |
| **ANZ** | Open in ANZ app | Send to ANZ app (the website option shows a QR code) |
| **ASB** | Open in ASB app | Send to ASB app (the website option shows a QR code) |
| **BNZ** | Send to BNZ app | Customer chooses: website or Send to BNZ app |
| **Kiwibank**, **NZHL** | Internet banking website (the customer can switch to Send to app, with their mobile number) | Internet banking website (the customer can switch to Send to app) |
| **Westpac** | Open in Westpac app | Customer chooses: website or Send to Westpac app |
A decoupled `flow_hint` for the chosen bank generally preselects "Send to app" instead; ANZ on mobile still opens the app. Every bank's "Send to app" option takes the identifiers listed under [Decoupled Flow Identifiers](/docs/shared/bank-coverage#decoupled-flow-identifiers); for Kiwibank and NZHL that is a mobile number or a previous consent ID.
### Error Handling
## Advanced Configuration
### Custom Branding
You can display your brand logo on the Gateway. Configure co-branding options in the [BlinkPay Client Portal](https://merchants.blinkpay.co.nz/).
### Tracking Your Own References
To tie a consent to your order, store the `consent_id` (or `quick_payment_id`) against the order on your server before sending the customer to the gateway. You can also add your own query string to the `redirect_uri`, such as `?order=123`: query strings are ignored when the URI is checked against your whitelist, and they come back with the customer. For a payment, the PCR fields (particulars, code and reference) travel with the payment itself.
Neither product's consent takes a metadata object of your own. A Blink Payments consent carries your references in the PCR fields; a Blink Data consent has no equivalent, so keep the link between the consent and your records on your server.
## Gateway URLs
The gateway URL is returned in the `redirect_uri` field of the consent response—always use the URL provided by the API rather than hardcoding.
**Testing**
Use sandbox to test the complete customer journey without real banking credentials. Select "PNZ" as the mock bank.
## Troubleshooting
For common issues and solutions, see the [Troubleshooting Guide](/docs/shared/help/troubleshooting).
**Quick checks:**
- Gateway not loading? Verify your `redirect_uri` is correct and check for ad blockers
- Customer redirected back immediately? Check consent status—may be `Rejected` or `GatewayTimeout`
- Wrong redirect location? Ensure URL is fully qualified (includes https://) and whitelisted
## Best Practices
**Redirect URIs:** Use HTTPS for web return URLs (production rejects `http://` and `localhost`; a mobile app may use a custom scheme), include order/transaction IDs for tracking, and handle both success and failure scenarios. Never trust query parameters alone—always verify consent status on your backend. If you use multiple subdomains, consider registering a wildcard entry (e.g., `https://*.example.com/callback`) rather than individual URIs. See [Redirect URI Whitelisting](/docs/shared/authentication#redirect-uri-whitelisting) for details.
**User Experience:** Show loading states while creating consents, provide clear instructions before redirect, and offer "Try again" options for failures. Don't use iFrames (not supported) or popups (may be blocked).
# Redirect Flow (https://merchants.blinkpay.co.nz/docs/shared/flows/redirect-flow.md)
---
title: Redirect Flow
description: Learn about direct bank redirect integration with BlinkPay
---
# Redirect Flow
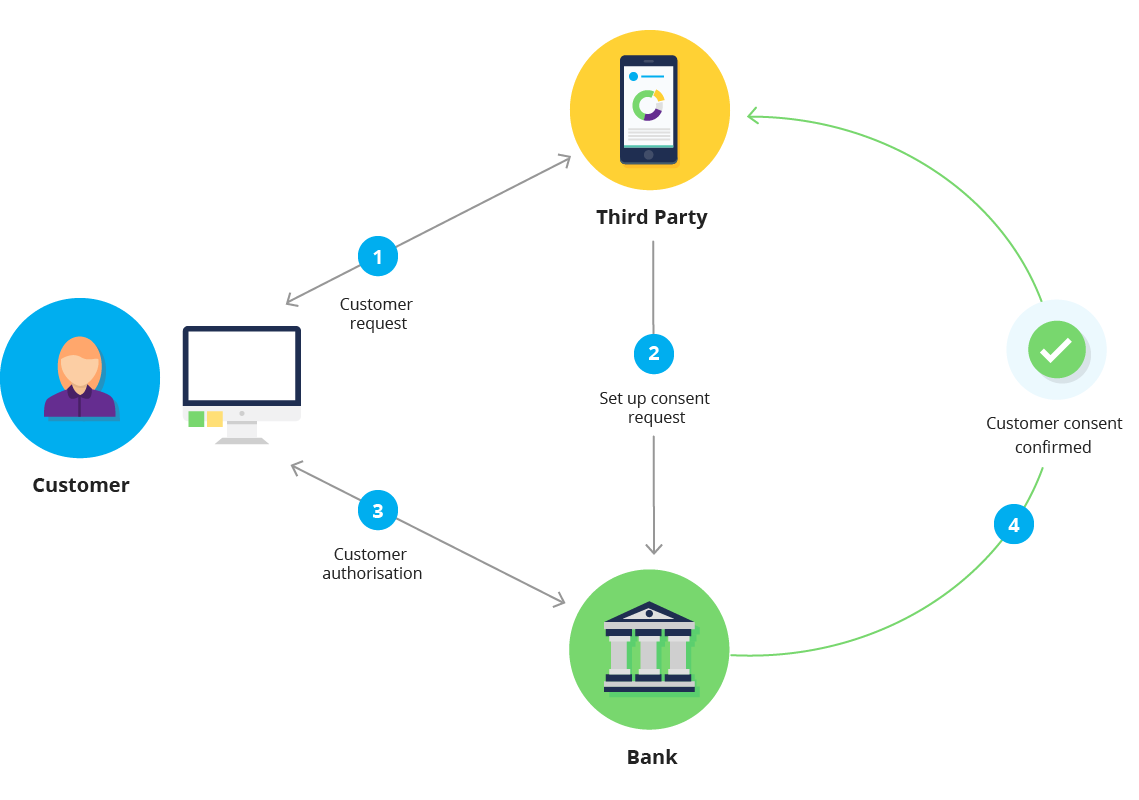
Redirect Flow (also known as Pay by Bank) is a browser-based authentication method where customers are redirected directly to their bank and then back to your application once they have authorised. Despite the browser-based name, it works on mobile as well as desktop: on a phone, the bank's website opens in the browser, or the bank's app opens directly where the bank supports it. It works the same way for a Blink Payments payment and for a Blink Data account access consent: only what the customer approves at the bank differs.
## Overview
In Redirect Flow, the customer:
1. Starts a payment, or a request to share account information, on your website/app
2. Selects their bank (you provide the UI)
3. Gets redirected to their bank's website or mobile app
4. Authenticates and authorises the payment or the account access
5. Gets redirected back to your website/app
## When to Use Redirect Flow
Use Redirect Flow when you need full control over the bank selection UI, custom branding throughout the flow, or specific UX patterns for your use case.
For most integrations, [Gateway Flow](/docs/shared/flows/gateway-flow) is recommended—it handles bank selection, device optimisation, and compliance automatically.
## Bank Support
### Redirect Flow Behaviour by Bank
| Bank | Desktop | Mobile |
| ------------ | ---------------------------- | --------------------- |
| **ANZ** | Bank website (shows QR code) | Opens the ANZ app |
| **ASB** | Bank website (shows QR code) | Opens the ASB app |
| **BNZ** | Bank website | Bank website |
| **Kiwibank** | Bank website | Bank website |
| **NZHL** | Bank website | Bank website |
| **Westpac** | Bank website | Opens the Westpac app |
**Mobile Experience**
On mobile, ANZ, ASB and Westpac open the customer's banking app to authorise (ANZ needs a current version of goMoney). That is not the same as returning the customer to your app afterwards: by default the bank sends the customer back to your `redirect_uri` in the browser. Returning straight to your app is a separate, Blink Payments-only option described under [Return Parameters](#return-parameters).
## Integration Steps
### Step 1: Build Bank Selection UI
Create a UI for customers to select their bank:
```html
Select Your Bank
**Bank-Specific URLs**
The `redirect_uri` returned by BlinkPay is the bank's authorisation URL. It's different for each bank, and for each product, and will redirect the customer to their bank's platform.
### Step 3: Redirect Customer to Bank
Your backend should securely pass the `redirect_uri` to your frontend, which then immediately redirects the customer to the bank's authorisation URL.
### Step 4: Customer Authorisation at Bank
The customer is now at their bank's platform, where they sign in with their banking credentials, review what they are approving, choose the account, and confirm. For a payment they see the amount and payee, and choose the account the money comes from. For account access they see the permissions requested and the period of access, and choose the accounts the consent covers. They can usually select more than one, which is why `GET /v1/accounts` can return several accounts.
On desktop, every bank opens its internet banking website; ANZ and ASB show a QR code there for the customer to scan with their banking app. On mobile, ANZ, ASB and Westpac open their banking app, while BNZ, Kiwibank and NZHL use their website on all devices.
### Step 5: Handle Return Callback
After authorisation, or when the customer cancels, declines or runs out of time, the customer is redirected back to your `redirect_uri` with the parameters described in [Return Parameters](#return-parameters):
```
https://www.yourwebsite.com/order/12345/complete?cid=8f7e6d5c-4b3a-2c1b-0a09-8f7e6d5c4b3a
```
### Return Parameters
BlinkPay appends these query parameters to your `redirect_uri`. They are the same for Blink Payments and Blink Data.
| Parameter | When | Meaning |
| ------------------- | ------------------------------------ | ------------------------------------------------------------------------------------------------------------------------------------------------------------------------------ |
| `cid` | Always | The consent ID. For a quick payment this is also the `quick_payment_id`. |
| `status` | Only when the outcome is not success | `cancelled` or `rejected` (the customer or bank declined), `timeout` (completing the authorisation timed out) or `error` (a technical failure). Treat all four as not authorised. |
| `error` | With `status` | A customer-safe message you can display. Its wording changes without notice. |
| `error_description` | Sometimes, with `status` | Further detail from the bank, when available. |
There is no success value: a return with `cid` and no `status` means the customer finished at the bank, not that the consent was authorised or a payment made. Branch on `status`, never on the text of `error`, and treat a `status` value you don't recognise as a non-success outcome. Whatever the parameters say, confirm the outcome with a server-side GET before you act on it: the return URL is not proof of payment, it can be forged, and it may never arrive if the customer closes the browser. For a quick payment the parameters report only the consent's outcome, because the debit is submitted after this return (see Step 6).
The [gateway flow](/docs/shared/flows/gateway-flow#return-parameters) returns the same parameters, with one extra `status` value, `pending`, and without `error_description`.
**Blink Payments only: returning straight to your app.** With `redirect_to_app`, the bank returns the customer straight to your app with its own `code` and `state` instead of `cid`; see [App-to-App Flow](/docs/shared/flows/app-to-app).
### Step 6: Verify and Continue
Always verify the outcome on your backend by calling the GET endpoint for the consent. A redirect flow consent on either product moves from `AwaitingAuthorisation` to `Authorised` or `Rejected`. What happens next depends on the consent type.
**Blink Payments, quick payment:** don't wait for `Authorised`, and don't call `POST /payments`. Call `GET /payments/v1/quick-payments/{quick_payment_id}` (the `cid`) as soon as the customer returns; that call completes the payment, and calling it again is safe. If it returns a 4xx or 5xx, retry the GET rather than treating the payment as failed. Then keep reading the quick payment until the consent is `Consumed` or `Rejected`, and take the payment's outcome from `payments[0].status`.
**Blink Payments, single and enduring consents:** fetch `GET /payments/v1/single-consents/{consent_id}` (or the enduring-consents equivalent) on the payments host, and continue only when it is `Authorised`. Then create the payment: for a single consent send only the `consent_id`; for an enduring consent include the amount and PCR. `Consumed` means the consented action is complete: the payment has been made, or an enduring consent's period has ended. Always read the payment's own status as well, because a single consent whose payment the bank rejected after accepting it is also `Consumed`.
**Polling:** don't poll while the customer is at their bank; wait for them to return, then read the consent and, if it isn't terminal yet, poll every second. Once a payment exists, read it every second until it is `AcceptedSettlementCompleted` or `Rejected`, for a minute or two at most. Stop at a terminal state, and run a periodic sweep for any consents or payments you lost track of.
**Blink Data:** fetch `GET /v1/consents/{consent_id}` on the Data host. `Authorised` means the customer approved: call the account endpoints with the `consent_id`, starting with `GET /v1/accounts?consent_id={consent_id}`. `Rejected` means they didn't; show a clear message and let them try again.
## Mobile App Integration
For mobile apps, open the bank page in an in-app browser: `SFSafariViewController` or `ASWebAuthenticationSession` on iOS, Chrome Custom Tabs on Android. Use a custom URL scheme or a universal link / App Link as your `redirect_uri`, and test opening the banking apps on real devices.
For complete implementation guidance, see the [Mobile Integration Guide](/docs/shared/flows/mobile-integration).
**Registering Your App's Return Link**
A custom scheme such as `myapp://callback` (it needs a host part; `myapp:callback` is rejected) or a universal link / Android App Link can be your `redirect_uri`. Register it yourself in the BlinkPay portal under **Settings > API Settings**, in the Whitelisted Redirect URLs for each environment. Banks don't need to whitelist it. Contact BlinkPay support only if you want app-to-app return (`redirect_to_app`, Blink Payments only). See [Register Your Return Link](/docs/shared/flows/mobile-integration#register-your-return-link).
**iFrames and Embedded WebViews Not Supported**
iFrames cannot be used, because banks' anti-framing policies block them, and embedded WebViews (`WKWebView`, Android `WebView`) are not supported. Use an in-app browser; see [Mobile Integration](/docs/shared/flows/mobile-integration).
## Troubleshooting
For common issues and solutions, see the [Troubleshooting Guide](/docs/shared/help/troubleshooting).
**Quick checks:**
- Redirect loop? Ensure callback handling doesn't re-initiate payment
- Bank page not loading? Check bank is operational and customer has online banking enabled
- Deep link not working? Ensure banking app is installed and up to date
- Consent not authorised? Customer may have cancelled or session timed out—check the specific status
## Best Practices
**Bank Selection UI:** Show every bank available to your application, with official logos. Make buttons touch-friendly, show loading states during redirect, and always provide a cancel option.
**Redirect Handling:** Always validate consent status on your backend—never trust query parameters alone. Handle both outcomes (`Authorised` and `Rejected`) and provide clear retry options. Status values are case-sensitive.
**Mobile:** Use an in-app browser (Custom Tabs, SFSafariViewController or ASWebAuthenticationSession), never an embedded WebView. Test on real devices, and if the banking app doesn't open, let the customer continue on the bank's website.
## Testing
Test in sandbox with the mock bank "PNZ", username `user01` and password `password`, on both products. Before going live, test with real banks across multiple devices and browsers, using small amounts ($0.01) for payments and your own accounts for account access.
[View going live checklist →](/docs/shared/help/going-live)
# Decoupled Flow (https://merchants.blinkpay.co.nz/docs/shared/flows/decoupled-flow.md)
---
title: Decoupled Flow
description: Learn about mobile authorisation with BlinkPay's Decoupled Flow
---
# Decoupled Flow
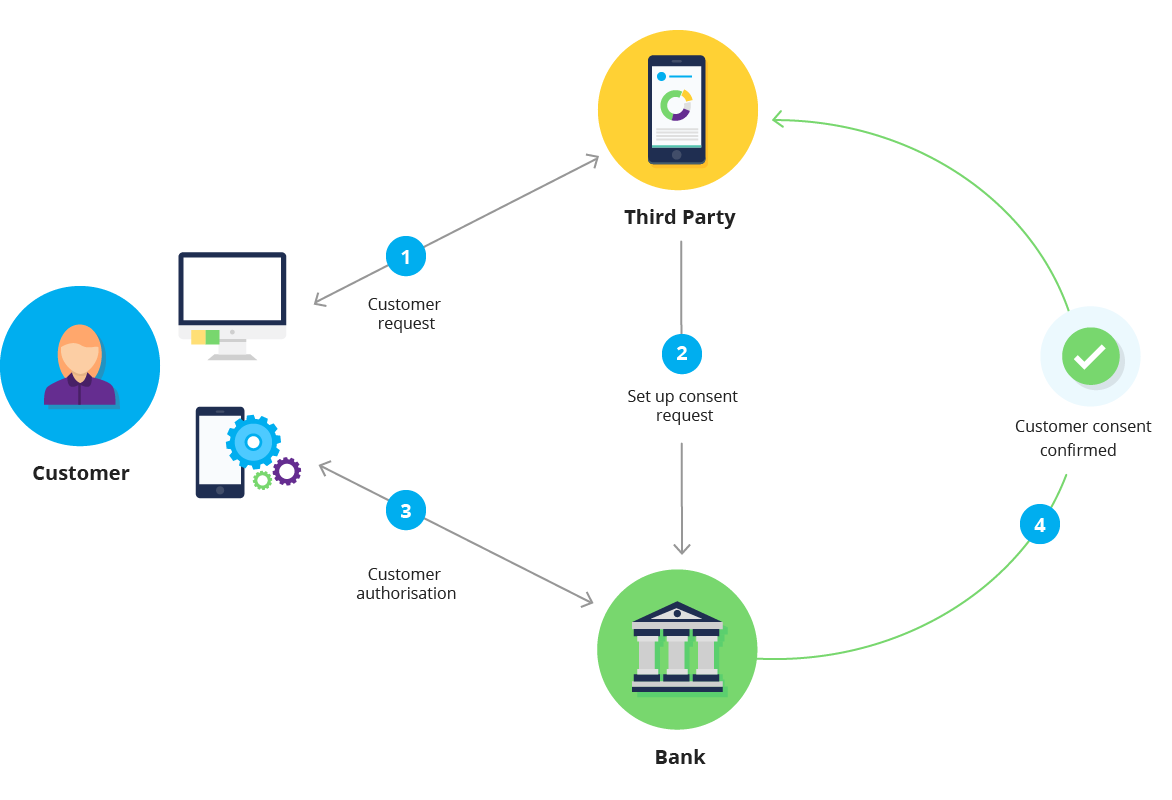
Decoupled Flow (also known as Pay by Mobile) allows customers to authorise on a different device or at a different time using their banking mobile app. The bank sends the request straight to the customer's banking app, using an identifier such as their mobile number. Some banks send a push notification; with others the customer opens the app and goes to its notifications or messages section to approve. It works for a Blink Payments payment and for a Blink Data account access consent alike: the bank sends the same kind of authorisation request to the customer's app, and only what they are approving differs.
## Overview
Decoupled Flow separates the authorisation process from the initial request:
1. Customer starts a payment, or a request to share account information, on your website or app
2. You create a consent with decoupled flow
3. Customer receives an authorisation request on their mobile device
4. Customer authorises using their banking app
5. You poll for authorisation status, then create the payment or start retrieving data
## When to Use Decoupled Flow
Decoupled Flow is best for scenarios where authorisation happens asynchronously—bill payment systems, desktop-initiated transfers where customers prefer mobile authorisation, recurring payment setup, and returning customers with saved payment methods.
For most integrations, [Gateway Flow](/docs/shared/flows/gateway-flow) is recommended as it handles flow selection automatically. If customers are already on mobile, consider the [Redirect Flow](/docs/shared/flows/redirect-flow), which opens the banking app on mobile for banks that support it.
## Bank Support
### Decoupled Flow Support by Bank
| Bank | Identifier | How the Customer Sees the Request |
| ------------ | ---------------------------------------------- | --------------------------------------------------------------------------------------------------------------------------------------------- |
| **ANZ** | Mobile number or consent ID | goMoney notification on iOS; on Android, the customer opens goMoney to approve |
| **ASB** | Mobile number or consent ID | Push notification, if enabled in app settings |
| **BNZ** | Mobile number, email or consent ID | Push notification |
| **Kiwibank** | Mobile number or consent ID | No push notification: the customer opens the app to approve |
| **NZHL** | Mobile number or consent ID | Tell the customer to open their app if no notification arrives |
| **Westpac** | Access Number (banking username) or consent ID | Push notification, if enabled in app settings |
A consent ID here means the ID of a consent your application created earlier for the same customer at the same bank, and which was authorised; see the Using Previous Consents tip under Step 1.
**When There Is No Push Notification**
On your waiting screen, always tell the customer to open their banking app and look for the request if no notification arrives: Kiwibank sends none, ANZ sends none on Android, and customers may have notifications turned off.
## Integration Steps
### Step 1: Collect the Customer's Identifier
Decoupled flow needs an identifier that tells the bank which customer to send the request to. You send it as `identifier_type` and `identifier_value`:
| Bank | Accepted `identifier_type` values |
| ------------ | ------------------------------------------------------------------------- |
| **ANZ** | `mobile_number`, `consent_id` |
| **ASB** | `mobile_number`, `consent_id` |
| **BNZ** | `mobile_number`, `email`, `consent_id` |
| **Kiwibank** | `mobile_number`, `consent_id` |
| **NZHL** | `mobile_number`, `consent_id` |
| **Westpac** | `banking_username` (the customer's Westpac Access Number), `consent_id` |
Send the customer's mobile number as `mobile_number` (Westpac takes `banking_username` instead); use `mobile_number`, not `phone_number`. An identifier type the bank doesn't accept is rejected when you create the consent. An identifier value the bank doesn't recognise, such as a mobile number not registered for its app, is not an error: the consent is created, stays `AwaitingAuthorisation` and becomes `Rejected` when the bank's window ends, exactly as if the customer had ignored the request.
**Using Previous Consents**
For a returning customer, set `identifier_type` to `consent_id` and `identifier_value` to the ID of an earlier consent your application created for that customer at the same bank. It must be `Authorised` or `Consumed`, not revoked, and the customer then enters nothing. If the bank rejects an old consent as an identifier, fall back to the customer's usual identifier.
### Step 2: Create Consent with Decoupled Flow
The `flow` object, with the bank, the identifier and an optional `callback_url`, is the same for every consent type on both products.
**Blink Payments — Single Consent (PayNow):**
```http
POST /payments/v1/single-consents HTTP/1.1
Host: sandbox.debit.blinkpay.co.nz
Authorization: Bearer {access_token}
Content-Type: application/json
{
"flow": {
"detail": {
"type": "decoupled",
"bank": "ANZ",
"identifier_type": "mobile_number",
"identifier_value": "+64212345678",
"callback_url": "https://www.yourwebsite.com/blinkpay/consent-callback"
}
},
"amount": {
"currency": "NZD",
"total": "45.00"
},
"pcr": {
"particulars": "Invoice",
"code": "12345",
"reference": "Payment"
}
}
```
**Blink Payments — Quick Payment:**
```http
POST /payments/v1/quick-payments HTTP/1.1
Host: sandbox.debit.blinkpay.co.nz
Authorization: Bearer {access_token}
Content-Type: application/json
{
"flow": {
"detail": {
"type": "decoupled",
"bank": "ANZ",
"identifier_type": "mobile_number",
"identifier_value": "+64212345678",
"callback_url": "https://www.yourwebsite.com/blinkpay/consent-callback"
}
},
"amount": {
"currency": "NZD",
"total": "45.00"
},
"pcr": {
"particulars": "Invoice",
"code": "12345",
"reference": "Payment"
}
}
```
**Blink Payments — Enduring Consent (AutoPay):**
```http
POST /payments/v1/enduring-consents HTTP/1.1
Host: sandbox.debit.blinkpay.co.nz
Authorization: Bearer {access_token}
Content-Type: application/json
{
"flow": {
"detail": {
"type": "decoupled",
"bank": "Westpac",
"identifier_type": "banking_username",
"identifier_value": "349373893",
"callback_url": "https://www.yourwebsite.com/blinkpay/consent-callback"
}
},
"maximum_amount_period": {
"currency": "NZD",
"total": "500.00"
},
"period": "monthly",
"from_timestamp": "2024-12-16T00:00:00Z"
}
```
**Blink Data — Account Access Consent:**
```http
POST /v1/consents HTTP/1.1
Host: sandbox.data.blinkpay.co.nz
Authorization: Bearer {access_token}
Content-Type: application/json
{
"flow": {
"detail": {
"type": "decoupled",
"bank": "BNZ",
"identifier_type": "mobile_number",
"identifier_value": "+64212345678",
"callback_url": "https://www.yourwebsite.com/blinkpay/consent-callback"
}
},
"permissions": [
"ReadAccounts",
"ReadBalances",
"ReadTransactions"
],
"expiration_date_time": "2026-12-31T23:59:59+13:00",
"start_date_time": "2026-01-01T00:00:00+13:00",
"end_date_time": "2026-12-31T23:59:59+13:00"
}
```
Four fields carry the substance of a Blink Data consent, and none of them has a payment equivalent. `permissions` lists the information types the customer is being asked to share: `ReadAccounts` (account numbers, names and types), `ReadBalances`, `ReadTransactions` (history with payee details), `ReadStatements` and `ReadParty` (the account holder's name and contact details). Request only what your application needs; not every bank supports every permission, and the Data API's metadata endpoint tells you which. `expiration_date_time` sets how long access lasts; leave it out for an open-ended consent. `start_date_time` and `end_date_time` bound the transaction history the customer is sharing, independently of how long the consent itself lasts.
**Response (both products):**
```json
{
"consent_id": "9f8e7d6c-5b4a-3c2b-1a09-8f7e6d5c4b3a"
}
```
A quick payment returns `quick_payment_id` in place of `consent_id`; it is the same value as the `cid` your `callback_url` receives.
**No Redirect URI**
Unlike redirect and gateway flows, decoupled flow does not return a `redirect_uri`. The customer authorises on their mobile device asynchronously.
### Step 3: Show Status to Customer
Display a waiting screen informing the customer that authorisation is pending. Restate what they are about to approve: the amount and reference for a payment, or the information being shared and for how long for account access.
```html
```
### Step 4: Poll for Authorisation Status
Nothing comes back to you in this flow, so poll the consent every 5 seconds until it reaches a terminal state. If you set a `callback_url`, wait for the callback instead and read the consent when it arrives, polling every second if it isn't terminal yet.
Bound your polling by the bank's own window rather than a flat figure. Decoupled windows are set per bank and currently range from about four minutes to ten, so a fixed five-minute cutoff abandons consents at some banks while they're still live. Read the bank's window from `features.decoupled_flow.request_timeout` on the Blink Payments [metadata endpoint](/docs/shared/reference/metadata). The Blink Data metadata endpoint has no timeouts, so for account access consents use the per-bank windows in [Bank Coverage](/docs/shared/bank-coverage). If you do stop polling at a cutoff of your own, reconcile the consent afterwards rather than assuming it failed.
### Step 5: Continue Once Authorised
A decoupled consent on either product moves from `AwaitingAuthorisation` to `Authorised`, or to `Rejected` if the customer declines or the bank's window elapses. Handle `Rejected` and `Revoked` with clear messages and a way to try again.
**Blink Payments, quick payment:** there is nothing to initiate. BlinkPay submits the payment as soon as the customer authorises, so don't call `POST /payments`. Read `GET /payments/v1/quick-payments/{quick_payment_id}` until the consent is `Consumed` or `Rejected`, and take the payment's outcome from `consent.payments[0].status`.
**Blink Payments, single and enduring consents:** once `Authorised`, create the payment with `POST /payments/v1/payments`. For a single consent send only the `consent_id`, because the amount is already set; for an enduring consent include the amount and PCR. Then read the payment every second until it is `AcceptedSettlementCompleted` or `Rejected`. `Consumed` means the consented action is complete: the payment has been made, or an enduring consent's period has ended. Always read the payment's own status as well, because a single consent whose payment the bank rejected after accepting it is also `Consumed`.
**Blink Data:** `Authorised` means the customer approved, and there is nothing further to complete. Call the account endpoints with the `consent_id`, starting with `GET /v1/accounts?consent_id={consent_id}` on the Data host.
## Consent Authorisation Callback
To avoid polling continuously, include a `callback_url` when creating the consent. When the customer authorises, Blink fires an unsigned HTTP `GET` to that URL with the consent ID appended as a query parameter:
```
GET https://www.yourwebsite.com/blinkpay/consent-callback?cid=9f8e7d6c-5b4a-3c2b-1a09-8f7e6d5c4b3a
```
Treat the callback as a "wake-up" signal — it tells you something changed on this consent, but carries no body, no signature, and no status field. Always re-fetch the consent to determine its actual state before acting. Which endpoint you re-fetch from depends on the product:
- **Payments** — `GET /payments/v1/enduring-consents/{consent_id}`, `GET /payments/v1/single-consents/{consent_id}` for a single consent, or `GET /payments/v1/quick-payments/{cid}` for a quick payment (the `cid` is the `quick_payment_id`). For a quick payment, the payment is submitted at authorisation; read its outcome from the quick payment.
- **Data** — `GET /v1/consents/{consent_id}` on the Data API host. There is no `/payments/v1/...` path on the Data API.
The callback fires when the decoupled authorisation reaches its outcome — when the consent is authorised, and also when it is rejected or the bank's approval window times out. It carries no status field, so the ping alone never tells you which of those happened.
Do not treat it as complete coverage of the consent's lifecycle: a consent revoked after it was authorised does not produce one, and delivery is not guaranteed in any case. **Blink Data:** the callback is only sent for consents created with the decoupled flow, never for a gateway consent, even when the customer chooses the decoupled option in the gateway. Polling remains how you detect terminal states.
Delivery is **at-least-once, and not guaranteed**. Blink may retry up to three times when your endpoint returns a 5xx, so the same `cid` can arrive more than once — make handling it repeatedly safe. Equally, a callback that fails because your endpoint is unreachable, slow, or keeps erroring may not arrive at all. Treat polling as the authoritative mechanism and the callback purely as an optimisation that lets you poll sooner.
**The callback is unsigned — don't trust the `cid` blindly**
Anyone who learns your `callback_url` can spoof a ping. Authentication of the state change comes from the follow-up `GET` you make against Blink's API using your own credentials, not from the callback itself. Never act on `cid` alone — always re-fetch.
This callback is the only notification for a decoupled consent; read the consent or payment to learn its state. Fixed Recurring Payment webhooks (Blink Payments only) are a separate mechanism: signed POSTs with a JSON event payload, with a different security model and contract.
## Customer Experience
For ASB, BNZ and Westpac, and ANZ on iOS, customers receive a notification on their mobile device, tap to open their banking app, review the request, choose the account (for account access, one or more), and authorise, then return to your website.
Where no notification arrives (Kiwibank, ANZ on Android, or notifications turned off), customers must open their app themselves and find the request in its notifications or messages section. Tell them so clearly on your waiting screen.
## Troubleshooting
For common issues and solutions, see the [Troubleshooting Guide](/docs/shared/help/troubleshooting).
**Quick checks:**
- No push notification? Check the bank sends one (Kiwibank doesn't; ANZ does on iOS only) and that the customer has notifications enabled
- Authorisation never completes? Verify the identifier is correct (an unregistered mobile number isn't reported as an error; the consent just times out), and check the consent hasn't passed the bank's authorisation window
- Wrong bank or account? Verify the bank and the identifier point to the correct customer
- Multiple pending authorisations? Avoid creating duplicate consents (send an `idempotency-key` when you create one); for Blink Payments, also put a unique reference in the PCR fields
## Best Practices
**Identifiers:** Check mobile numbers look valid before use and store previous consent IDs for returning customers. Never use invalid identifiers or store them insecurely.
**Polling:** Read the consent every 5 seconds (or wait for the callback), then a payment every second until it is `AcceptedSettlementCompleted` or `Rejected`, for a minute or two at most. Stop on a terminal status, and run a periodic sweep for anything you lost track of.
**User Experience:** Show clear, bank-specific instructions—differentiate between banks with and without push notifications. Provide a cancel option and progress indicator.
## Testing
Test in sandbox with `bank: "PNZ"` and the mobile number `+64-259531933`, which auto-approves on both products (in the gateway, choose **Send to PNZ app**). Other numbers are accepted, but the consent is never authorised: it stays `AwaitingAuthorisation` until the authorisation window ends, then becomes `Rejected`. They don't simulate a decline. To test revocation, let the consent auto-approve, then revoke it with the DELETE endpoint. Before going live, test with real banks using your own mobile number to verify push notifications and manual authorisation flows.
# Mobile Integration (https://merchants.blinkpay.co.nz/docs/shared/flows/mobile-integration.md)
---
title: Mobile Integration
description: Guide to integrating BlinkPay in mobile applications
---
# Mobile Integration
BlinkPay supports mobile applications on iOS and Android. This guide covers the architecture a mobile integration needs, how to open the bank's pages from your app, how to bring the customer back to your app, and how to find out the outcome reliably.
**Embedded WebViews and iFrames Not Supported**
Don't show BlinkPay or bank pages in an embedded WebView (`WKWebView` on iOS, `WebView` on Android) or an iframe. Use SFSafariViewController or ASWebAuthenticationSession on iOS and Chrome Custom Tabs on Android, as described in [Opening the Bank Pages](/docs/shared/flows/mobile-integration#opening-the-bank-pages).
## Recommended Approach
Use the Gateway Flow with an in-app browser and a registered return link. The gateway handles bank selection, flow routing and platform detection, and on mobile it opens the customer's banking app where the bank supports it. When the customer has finished, it sends them back to your app through the return link you register (see [Register Your Return Link](/docs/shared/flows/mobile-integration#register-your-return-link)).
## Architecture
A mobile app needs a backend server of your own. Your client ID and client secret live only on that backend, which requests access tokens and makes every BlinkPay API call; they must never be compiled into the app, where anyone can extract them. The backend also decides the amount and the payment reference details (PCR) from its own record of the order, rather than accepting them from the app, because a modified app could send any amount it likes.
The app authenticates to your backend in the same way as the rest of your app does, with your own user sessions or login tokens. It never holds BlinkPay credentials or BlinkPay access tokens. See [Credential and Integration Security](/docs/shared/standards/credential-security) for how to store and rotate the credentials on the backend.
1. The app asks your backend to start a payment (or a Blink Data consent) for an order.
2. Your backend creates the consent or quick payment with the BlinkPay API, stores the returned ID against the order, and returns the `redirect_uri` from the response to the app.
3. The app opens that URL in an in-app browser.
4. The customer authorises at their bank, often in the bank's own app.
5. The customer comes back to your app through your return link, which carries `cid` (the consent ID; for a quick payment, the `quick_payment_id`).
6. The app asks your backend for the outcome, and your backend reads it from the BlinkPay API.
```
Mobile App → Your Backend → BlinkPay API
↓
redirect_uri returned to app
↓
SFSafariViewController / Chrome Custom Tabs → Gateway → Banking App
↓
Return link (cid) → Mobile App → Your Backend → GET the consent
```
## Reference Implementation
The [BlinkPay Flutter Demo](https://github.com/BlinkPay/BlinkPay-Flutter-Demo) is a complete working example. It is a reference implementation: with a little help from an AI assistant it translates readily to other languages and frameworks, so use it as the reference whatever you build in. It uses the gateway flow with single consents (one-off payments) and enduring consents (recurring payments). Its `server/` folder is a small backend proxy that holds the client credentials and obtains the access tokens, so the app contains no BlinkPay secrets. The app opens the gateway with `flutter_custom_tabs` (Chrome Custom Tabs on Android, SFSafariViewController on iOS) and receives the custom-scheme return link `blinkpaydemo://callback` with `app_links`. Its README's [Deep Linking Setup](https://github.com/BlinkPay/BlinkPay-Flutter-Demo#deep-linking-setup) section shows the Android manifest, the iOS `Info.plist` entries and the iOS code that closes the in-app browser.
**Reference Implementation Only**
The Flutter Demo is a reference implementation, not a supported SDK package. It takes shortcuts that keep the demo small and must not be copied into a real app: the app sets the amount and PCR and the proxy passes them through unchecked (your backend must set them); the app authenticates to the proxy with a fixed demo API key built into the app (use your own user sessions); and the consent ID is held only in the app's memory (store it on your backend, so that the outcome can still be found if the app is closed).
## Opening the Bank Pages
Open the gateway, or the bank's authorisation page in the redirect flow, in the platform's in-app browser: SFSafariViewController or ASWebAuthenticationSession on iOS, and Chrome Custom Tabs on Android. These run the page in a real browser that your app cannot read or script, so the customer's banking credentials never pass through your app. Banks' anti-framing policies block their pages from being embedded, and in a real browser the customer can see the bank's genuine address before signing in.
| Platform | In-app browser (examples) | Notes |
| ------------ | ------------------------------------------------------------------------------------------------------------------------------------------------------------------------------------ | ------------------------------------------------------------------------------------------------------------------------------------------------------------------------------------------- |
| iOS | `SFSafariViewController`, or `ASWebAuthenticationSession` | SFSafariViewController does not close itself when your return link arrives; dismiss it yourself |
| Android | Chrome Custom Tabs (AndroidX Browser library) | Falls back to the default browser on devices without a Custom Tabs browser |
| Flutter | `flutter_custom_tabs` (used by the Flutter Demo) | Pair it with a link handler such as `app_links` |
| React Native | `react-native-inappbrowser-reborn` (`InAppBrowser.open`, or `openAuth` for its auth-session mode), or Expo's `expo-web-browser` (`openBrowserAsync`, or `openAuthSessionAsync`) | `open` and `openBrowserAsync` use SFSafariViewController and Custom Tabs; close them with `InAppBrowser.close` or `dismissBrowser` (iOS) when your return link arrives |
These packages are examples, not endorsements; any library that uses the platform's in-app browser works. The auth-session modes (ASWebAuthenticationSession, `openAuth`, `openAuthSessionAsync`) close themselves when the return link arrives, but on iOS they first show a system prompt saying that your app wants to use the website to sign in, which can confuse a customer who is paying rather than signing in. SFSafariViewController and its equivalents show no such prompt.
## Register Your Return Link
Your return link is the `redirect_uri` you send when you create a consent or quick payment with the gateway or redirect flow. On mobile it is a link that opens your app. Two kinds work:
| Kind | Example | Notes |
| ----------------------------------------- | ------------------------------------------- | ------------------------------------------------------------------------------------------------------------------------------------------------------------------------------------------------------------------------- |
| Custom scheme | `myapp://callback` | Simple to set up, and what the Flutter Demo uses. Must include a host part: `myapp:callback` is rejected. Any app can claim the same scheme, which is one more reason to confirm every outcome on your backend |
| Universal link (iOS) / App Link (Android) | `https://app.example.com/blinkpay/return` | An HTTPS link verified as belonging to your app, which needs the `apple-app-site-association` (iOS) and `assetlinks.json` (Android) files hosted on that domain; opens a web page of yours if the app is not installed. Test it on a real device, because these links don't always open the app when they are reached through a redirect rather than a tap |
Register the link yourself in the portal: under **Settings > API Settings**, open the environment's row and add it under **Whitelisted Redirect URLs**. Users with the Administrator or Developer role can do this. Sandbox and production have separate lists, so register the link in each environment you use. Custom schemes are accepted in both environments; production rejects `http://` and `localhost` links, which sandbox allows. Banks do not need to whitelist your return link, and you don't need to contact support for it. Support is needed only for [App-to-App](/docs/shared/flows/app-to-app) returns, where the bank's app opens your app directly.
The `redirect_uri` you send must match a registered link, otherwise the request fails with 400 (`BP214` for Blink Payments, `BDT211` for Blink Data). Query strings are ignored, so you can add your own, such as `?order=123`. See [Redirect URI Whitelisting](/docs/shared/authentication#redirect-uri-whitelisting) for the matching rules.
## Handling the Outcome on Mobile
Your backend must know which consent or quick payment belongs to which order before the customer leaves your app, so store the `quick_payment_id` or consent ID on your backend as soon as you create it and before the app opens the browser. Keeping it only in the app is not enough: the operating system can close your app while the customer is in their bank's app.
When your return link arrives, check that it is your scheme, host and path, and that its `cid` matches the ID you stored for the order the customer is paying for; ignore a stale or unknown one. Branch on its `status` parameter, never on the `error` text, and treat the link as a hint only: it is not proof of payment, because it can be forged or never arrive. [Return Parameters](/docs/shared/flows/redirect-flow#return-parameters) lists what it can carry. Then ask your backend for the outcome, and have the backend GET the consent or quick payment from the BlinkPay API. Close the in-app browser at this point (see the [Platform Checklist](/docs/shared/flows/mobile-integration#platform-checklist)).
The return link often never arrives. Closing SFSafariViewController or a Custom Tab, pressing the back button or switching away from the app fires no redirect, and a customer who approves in their banking app may come back to your app by hand. So whenever your app returns to the foreground while a payment is in progress, ask your backend for the current status rather than waiting for the link.
Reconcile; don't assume failure. If the consent is still `AwaitingAuthorisation`, the customer may still approve in their banking app, so don't revoke it or treat it as failed just because they came back to your app. Poll it through your backend every second until it reaches a final status. A consent that is never authorised ends by itself when the window passes. For Blink Payments, once a payment exists, check it every second until it is `AcceptedSettlementCompleted` or `Rejected`. Stop polling at a final status; polling the same consent or payment hundreds of times does not make it finish sooner and can get your requests rate limited.
**Blink Payments only:** for a quick payment through the gateway or redirect flow, have your backend call `GET /payments/v1/quick-payments/{id}` as soon as the return link arrives or the app resumes; the gateway normally does this for you, and calling it again is safe. For a bank payment that call completes the payment. Run a backend sweep over stored quick payments that never got a return, and read each outcome from `consent.payments[0].status`.
While the outcome is not final, tell the customer that you are checking with their bank rather than showing a failure, and don't let them pay for the same order again until the first attempt has a final status, otherwise they may pay twice. If you stop waiting before it is final, show the order as awaiting confirmation, give the customer a way to check again later, and keep checking on your backend.
## Platform Checklist
- **iOS: dismiss the in-app browser.** SFSafariViewController stays on screen when your return link opens the app. Dismiss it when the link arrives (the Flutter Demo does this in `AppDelegate.swift`); the auth-session modes close themselves.
- **iOS: register the link.** A custom scheme goes in `CFBundleURLTypes` in `Info.plist`; a universal link needs the Associated Domains entitlement and an `apple-app-site-association` file on your domain.
- **Android: register the link.** Add an intent filter with `VIEW`, `DEFAULT` and `BROWSABLE` and your scheme and host to the activity that handles the return, or an `autoVerify` HTTPS filter for an App Link, with the matching `assetlinks.json` file on your domain.
- **Android: launch mode.** The return link must reach the activity that is already running, not start a second copy of it. Keep your framework's default (`singleTop` for Flutter, `singleTask` for React Native) and avoid `singleInstance`.
- **Android: package visibility.** From Android 11, add a `
**Enabled by BlinkPay Support**
App-to-app return must be enabled for your account, for each bank, by BlinkPay support. Contact [support@blinkpay.co.nz](mailto:support@blinkpay.co.nz) to request it.
## Two Kinds of Deep Link
"Deep link" is used for two different things on mobile, and only the second needs this page.
| | Opening the bank's app | Returning to your app (app-to-app) |
| --- | --- | --- |
| What happens | The bank's authorisation page opens in the customer's banking app instead of the browser | After approving, the banking app opens your app directly |
| What you set up | Nothing: it depends on the bank | Send `redirect_to_app: true` when you create the consent, once BlinkPay support has enabled it for your account and the bank |
| Banks | Depends on the bank; see [Bank Coverage](/docs/shared/bank-coverage#mobile-app-deep-linking) | ASB and Westpac; see [Bank Coverage](/docs/shared/bank-coverage#mobile-app-deep-linking) |
`redirect_to_app: true` asks the bank to return the customer straight to your app. Without it, or if the bank doesn't support it or it isn't enabled for your account, the customer first lands on a BlinkPay page in their phone's browser after approving in their banking app. That page then opens your app through your return link, or, if it can't, asks the customer to return to your app themselves. Either way, the in-app browser you opened is still on screen behind the bank's app.
## Supported Banks
ASB and Westpac offer app-to-app return; ANZ, BNZ, Kiwibank and NZHL do not. The per-bank table is in [Bank Coverage](/docs/shared/bank-coverage#mobile-app-deep-linking). For a bank that doesn't offer it, or that has not been enabled for your account, `redirect_to_app` is silently ignored and the customer returns through your normal return link.
## How It Works
App-to-app works with the redirect flow, and with the gateway flow when the customer takes the redirect option. It is not available with the decoupled flow. It works in sandbox and production once enabled for that environment.
1. Your backend creates the consent or quick payment with `redirect_to_app: true` and your app's return link as the `redirect_uri`, and stores the returned ID against the order.
2. Your app opens the returned `redirect_uri` in the in-app browser. On mobile the bank's page opens the customer's banking app.
3. The customer approves in their banking app.
4. The banking app opens your app's return link with the bank's `code` and `state` parameters (or an `error`), not with `cid`.
5. Your app, or your backend on its behalf, passes every query parameter it received, unchanged, to BlinkPay's return endpoint with `redirect=false` added. On success BlinkPay answers `204 No Content`. On a failure it answers with a `302` whose `Location` carries `cid`, `status` and `error`, so handle both.
6. Your app closes the in-app browser and asks your backend for the outcome, and your backend GETs the consent or quick payment by the ID it stored. For a quick payment, retrieving it completes the payment, so make this GET straight away (see [Handling the Outcome on Mobile](/docs/shared/flows/mobile-integration#handling-the-outcome-on-mobile)).
```http
GET /bank/1.0/return?state={state}&code={code}&redirect=false HTTP/1.1
Host: debit.blinkpay.co.nz
```
In sandbox, use `sandbox.debit.blinkpay.co.nz`, the host you created the consent on.
Because the option is silently ignored for a bank that is not enabled, the same return link can also receive a normal return carrying `cid` (and `status` on failure). Handle both: forward `code` and `state` when they are present, and otherwise treat it as a normal return. Either way, the outcome comes from your backend's GET, never from the link itself.
## Getting Started
1. Contact [support@blinkpay.co.nz](mailto:support@blinkpay.co.nz) to request app-to-app return, and say which banks and environments you need.
2. Provide your app's return link for sandbox and for production.
3. Register the same links under **Settings > API Settings** in the Whitelisted Redirect URLs for each environment (see [Register Your Return Link](/docs/shared/flows/mobile-integration#register-your-return-link)).
BlinkPay registers your return link with each participating bank. Approval is at each bank's discretion and timelines vary, so build and test with the standard return (through the browser) in the meantime.
**Plan Your URLs Carefully**
Return links are difficult to change once registered with banks. Make sure your scheme, host and path are final before you request app-to-app return.
## Implementation
Add `redirect_to_app: true` to the flow details when you create the consent:
```http
POST /payments/v1/single-consents HTTP/1.1
Host: sandbox.debit.blinkpay.co.nz
Authorization: Bearer {access_token}
Content-Type: application/json
{
"flow": {
"detail": {
"type": "redirect",
"bank": "ASB",
"redirect_uri": "https://app.example.com/blinkpay/return",
"redirect_to_app": true
}
},
"amount": {
"currency": "NZD",
"total": "50.00"
},
"pcr": {
"particulars": "Order",
"code": "12345",
"reference": "Ref"
}
}
```
With the gateway flow, set `redirect_to_app: true` in the gateway flow details; it applies when the customer takes the redirect option.
Configure your app so that the return link reaches the activity or scene that is already running: on Android, the launch mode advice in the [Platform Checklist](/docs/shared/flows/mobile-integration#platform-checklist) applies, and on iOS, dismiss the in-app browser when the link arrives.
## Error Handling
### Deep Link Failures
If the device cannot open your app from the return link, for example because the app is not installed, a universal link or App Link opens its web page instead. Create a page at that URL explaining that the app couldn't be opened and that the payment may not have completed. The customer's consent is still there to be checked: your backend can GET it by the ID it stored.
# Single Payments (https://merchants.blinkpay.co.nz/docs/debit/guides/single-payments.md)
---
title: Single Payments
description: Implement one-off payment initiation with Quick Payments and Single Consents
---
# Single Payments
BlinkPay offers two methods for single payments:
| Method | API Calls | Use Case |
| ------------------- | ------------------------------ | ------------------------------------ |
| **Quick Payments** | 1 (combined consent + payment) | E-commerce checkout, simple payments |
| **Single Consents** | 2 (consent, then payment) | Invoice payments, pre-authorisation |
For bank payments, both methods result in a Direct Credit payment through New Zealand's BECS network. When using the Gateway flow, [card payments](/docs/debit/guides/card-payments) are also available — card transactions are settled to you by your acquirer bank.
## Quick Payments
Creates the consent and the payment instruction in one API call; there is no separate `POST /payments`, which a quick payment refuses with `422` `BP018`.
**You must retrieve the quick payment to complete it**
Creating a quick payment obtains the customer's consent; it does not debit them. For a bank payment made through the redirect or gateway flow, retrieve the quick payment with `GET /payments/v1/quick-payments/{quick_payment_id}` as soon as the customer returns; the gateway normally does this for you, and calling it again is safe. That call completes the payment. If it returns a `4xx` or `5xx`, retry the `GET` rather than treating the payment as failed, and read the outcome from `consent.payments[0].status`.
In the decoupled flow the payment is submitted as soon as the customer authorises; you still retrieve the quick payment to read the outcome. For a card quick payment the money is taken at the gateway.
### Create Quick Payment
**Request:**
```http
POST /payments/v1/quick-payments HTTP/1.1
Host: sandbox.debit.blinkpay.co.nz
Authorization: Bearer {access_token}
Content-Type: application/json
idempotency-key: 6d2f8a4c-1e3b-4a7d-9c5f-0b8e2d4a6c1f
request-id: 2b7e9c1d-4f6a-4d8b-a3e5-9c1f7b5d3e2a
{
"flow": {
"detail": {
"type": "gateway",
"redirect_uri": "https://www.yourwebsite.com/payment/complete"
}
},
"amount": {
"currency": "NZD",
"total": "50.00"
},
"pcr": {
"particulars": "Online Shop",
"code": "ORDER-123",
"reference": "Customer"
}
}
```
**PCR Field Limits**
Each PCR field (particulars, code, reference) has a maximum length of 12 characters. Requests with longer values are rejected with a `400` validation error.
**Response:**
```json
{
"quick_payment_id": "3a3b7f7d-f8e6-4c3e-b2a1-5f9c8d7e6a5b",
"redirect_uri": "https://sandbox.debit.blinkpay.co.nz/gateway/pay?id=3a3b7f7d..."
}
```
Store `quick_payment_id` against your order before you redirect the customer to `redirect_uri` to complete authorisation; it is the `cid` on your return URL and the ID you retrieve the payment with (see [Which IDs to Store](/docs/debit/concepts/payment-lifecycle#which-ids-to-store)).
**Retrying a create request.** Generate a new UUID for each quick payment and send it again unchanged if you retry after a timeout or `5xx`. Send both `idempotency-key` and `request-id`, and resend both unchanged on retry.
### Check Quick Payment Status
After authorisation this call completes the payment (see above). Make it as soon as the customer returns, then poll it every second until the payment is `AcceptedSettlementCompleted` or `Rejected`, within your [polling window](/docs/debit/concepts/payment-lifecycle#polling).
**Request:**
```http
GET /payments/v1/quick-payments/{quick_payment_id} HTTP/1.1
Host: sandbox.debit.blinkpay.co.nz
Authorization: Bearer {access_token}
```
**Response:**
```json
{
"quick_payment_id": "3a3b7f7d-f8e6-4c3e-b2a1-5f9c8d7e6a5b",
"consent": {
"consent_id": "9f8e7d6c-5b4a-3c2b-1a09-8f7e6d5c4b3a",
"status": "Authorised",
"creation_timestamp": "2025-12-16T10:00:00+13:00",
"status_updated_timestamp": "2025-12-16T10:05:00+13:00",
"detail": {
"type": "single",
"flow": {
"detail": {
"type": "gateway",
"redirect_uri": "https://www.yourwebsite.com/payment/complete"
}
},
"pcr": {
"particulars": "Online Shop",
"code": "ORDER-123",
"reference": "Customer"
},
"amount": {
"total": "50.00",
"currency": "NZD"
}
},
"payments": [
{
"payment_id": "9f8e7d6c-5b4a-3c2b-1a09-8f7e6d5c4b3a",
"type": "single",
"status": "AcceptedSettlementInProcess",
"creation_timestamp": "2025-12-16T10:05:00+13:00",
"status_updated_timestamp": "2025-12-16T10:06:00+13:00",
"detail": {
"consent_id": "9f8e7d6c-5b4a-3c2b-1a09-8f7e6d5c4b3a"
},
"refunds": []
}
]
}
}
```
**Determining the Outcome**
Once the consent reaches `Consumed` or `Rejected`, the outcome is in `consent.payments`. A rejected consent carries exactly one payment record with `status: Rejected`, created at rejection time with its detail (amount, PCR) populated from the consent request:
```json
"payments": [
{
"payment_id": "1c2d3e4f-5a6b-7c8d-9e0f-1a2b3c4d5e6f",
"type": "single",
"status": "Rejected",
"creation_timestamp": "2025-12-16T10:05:00+13:00",
"status_updated_timestamp": "2025-12-16T10:05:00+13:00",
"detail": {
"consent_id": "9f8e7d6c-5b4a-3c2b-1a09-8f7e6d5c4b3a",
"amount": { "total": "50.00", "currency": "NZD" },
"pcr": { "particulars": "Online Shop", "code": "ORDER-123", "reference": "Customer" }
},
"refunds": []
}
]
```
A quick payment has at most one payment, so read `consent.payments[0]`. A consumed consent carries the real payment progressing through the [payment lifecycle](/docs/debit/concepts/payment-lifecycle); `Consumed` does not by itself mean paid, so check `payments[0].status`. A `Rejected` quick payment, whether the customer declined or the authorisation or 60-minute window timed out, always carries its one `Rejected` payment. Only `GatewayTimeout` (a gateway consent abandoned before bank selection) and `Revoked` leave `consent.payments` empty — check `consent.status` for those cases.
If you use the **redirect flow directly** (not the hosted Gateway), the `error` and `status`
parameters on your return URL describe the _consent_ outcome only, not the payment's. Read
`consent.payments[0].status` for the payment outcome rather than inferring it from the redirect.
See [Return Parameters](/docs/shared/flows/redirect-flow#return-parameters).
## Single Consents
Two-step payment process with separate consent and payment creation.
### Step 1: Create Single Consent
**Request:**
```http
POST /payments/v1/single-consents HTTP/1.1
Host: sandbox.debit.blinkpay.co.nz
Authorization: Bearer {access_token}
Content-Type: application/json
idempotency-key: 4a8c2e6f-3b1d-4f9a-8c7e-5d2b0a9f1e3c
request-id: 9e1c5a3f-7b2d-4e8c-b6a4-1f3d5b7c9a2e
{
"flow": {
"detail": {
"type": "gateway",
"redirect_uri": "https://www.yourwebsite.com/payment/callback"
}
},
"amount": {
"currency": "NZD",
"total": "75.00"
},
"pcr": {
"particulars": "Invoice",
"code": "INV-456",
"reference": "Payment"
}
}
```
**Response:**
```json
{
"consent_id": "8f7e6d5c-4b3a-2c1b-0a09-8f7e6d5c4b3a",
"redirect_uri": "https://sandbox.debit.blinkpay.co.nz/gateway/pay?id=8f7e6d5c..."
}
```
Store `consent_id` against your order, then redirect the customer to `redirect_uri` to complete authorisation. Retries of this request follow the same rules as for quick payments: resend the same `idempotency-key` (redirect and decoupled) or `request-id` (gateway) with the same body.
### Step 2: Check Consent Status
Read the consent once the customer has returned to your `redirect_uri`; if it isn't `Authorised` or terminal yet, poll every second. Don't poll while they are still at their bank.
**Request:**
```http
GET /payments/v1/single-consents/{consent_id} HTTP/1.1
Host: sandbox.debit.blinkpay.co.nz
Authorization: Bearer {access_token}
```
**Response:**
```json
{
"consent_id": "8f7e6d5c-4b3a-2c1b-0a09-8f7e6d5c4b3a",
"status": "Authorised",
"creation_timestamp": "2025-12-16T10:00:00+13:00",
"status_updated_timestamp": "2025-12-16T10:05:00+13:00",
"detail": {
"type": "single",
"flow": {
"detail": {
"type": "gateway",
"redirect_uri": "https://www.yourwebsite.com/payment/callback"
}
},
"pcr": {
"particulars": "Invoice",
"code": "INV-456",
"reference": "Payment"
},
"amount": {
"total": "75.00",
"currency": "NZD"
}
},
"payments": []
}
```
### Step 3: Create Payment
Create the payment within 48 hours of the consent becoming `Authorised` (its `status_updated_timestamp`). After that the consent is `Rejected`: `POST /payments/v1/payments` returns `422` with `BP002`, and you need a new consent.
Send only `consent_id`. The amount and PCR always come from the consent, and a request that also carries `amount` or `pcr` is rejected with `400` `BP235`. Send an `idempotency-key` with a fresh UUID for each payment attempt.
**Request:**
```http
POST /payments/v1/payments HTTP/1.1
Host: sandbox.debit.blinkpay.co.nz
Authorization: Bearer {access_token}
Content-Type: application/json
idempotency-key: c3e7a1f9-5d2b-4c8e-9a6f-2b4d8e0c6a1f
{
"consent_id": "8f7e6d5c-4b3a-2c1b-0a09-8f7e6d5c4b3a"
}
```
**Response** (`201 Created`):
```json
{
"payment_id": "9f8e7d6c-5b4a-3c2b-1a09-8f7e6d5c4b3a"
}
```
Store the `payment_id`: you need it to check the payment and to refund it. You can also find it later from the consent: `GET /payments/v1/single-consents/{consent_id}` lists every payment in `payments[]`.
#### When the bank rejects the payment
What you can do next depends on when the bank refuses it:
| What happened | Payment | Consent | Next step |
| -------------------------------------------------------------------------- | ---------- | ------------ | --------------------------------------------------------------------------- |
| The bank refused the payment straight away | `Rejected` | `Authorised` | Handle it as a failed payment. If the customer resolves the cause, you may create another payment on the same consent, with a **new** idempotency key, within the 48 hours |
| The bank accepted the payment and later rejected it | `Rejected` | `Consumed` | The consent is used up (`BP002` on a new attempt). Create a new consent |
| The payment succeeded | `AcceptedSettlementCompleted` | `Consumed` | Done; a new attempt returns `BP002` |
Because of the first case, a single consent can carry more than one payment. `consent.payments` is sorted newest first, so `payments[0]` is always the latest attempt. As with quick payments, `Consumed` does not by itself mean paid: always check the payment's status.
#### If the request times out
If `POST /payments` times out or returns a `5xx`, you don't know whether a payment was created, and it may still settle. Don't create a new consent. Retry the same request with the **same** idempotency key: you get the original payment back if one was created. If you don't have the key any more, `GET /payments/v1/single-consents/{consent_id}` and inspect `payments[0]` before doing anything else:
- `Pending` or `AcceptedSettlementInProcess`: poll that payment; a new `POST` returns `409` `BP703` naming it.
- `AcceptedSettlementCompleted`: the customer has paid.
- `Rejected` with the consent still `Authorised`: you may try again with a new key.
- No payment: nothing was created; retry the `POST`.
Only create a new consent once you know the old one has no payment that may still settle. See [Which IDs to Store](/docs/debit/concepts/payment-lifecycle#which-ids-to-store).
### Step 4: Check Payment Status
**Request:**
```http
GET /payments/v1/payments/{payment_id} HTTP/1.1
Host: sandbox.debit.blinkpay.co.nz
Authorization: Bearer {access_token}
```
**Response:**
```json
{
"payment_id": "9f8e7d6c-5b4a-3c2b-1a09-8f7e6d5c4b3a",
"type": "single",
"status": "AcceptedSettlementCompleted",
"creation_timestamp": "2025-12-16T10:10:00+13:00",
"status_updated_timestamp": "2025-12-16T10:15:00+13:00",
"detail": {
"consent_id": "8f7e6d5c-4b3a-2c1b-0a09-8f7e6d5c4b3a"
},
"refunds": []
}
```
Poll every second until the payment is `AcceptedSettlementCompleted` or `Rejected`, within your [polling window](/docs/debit/concepts/payment-lifecycle#polling). `AcceptedSettlementCompleted` is the only status that means the payment succeeded. BlinkPay does not send receipts to your customers, so send your own confirmation if you need one. To return money later, see [Refunds](/docs/debit/guides/refunds).
### Revoking a Single Consent
To cancel a single consent before it is paid, for example when the customer cancels the order, revoke it:
```http
DELETE /payments/v1/single-consents/{consent_id} HTTP/1.1
Host: sandbox.debit.blinkpay.co.nz
Authorization: Bearer {access_token}
```
**Response:** `204 No Content`. The consent is `Revoked` and can't be paid. It needs the `revoke:single_consent` scope, which also revokes a quick payment through `DELETE /payments/v1/quick-payments/{quick_payment_id}`.
A `409` means a payment on the consent is still in flight: poll it first. Other refusals are listed on the [Error Codes](/docs/debit/error-codes) page.
## Payment Amounts
| Constraint | Value |
| ---------- | ------------------------------------------------------------------------------- |
| Minimum | $0.01 NZD |
| Maximum | Varies by bank — see [Bank Coverage](/docs/shared/bank-coverage#payment-limits) |
| Currency | NZD only |
| Format | A string with a decimal point and one or two decimal places (e.g. `100.00` or `100.5`, not `100`). Send two decimal places |
**Bank-Specific Limits**
Individual banks may have lower limits based on customer account settings. For large payments, inform customers they may need to increase their daily limits.
If BlinkPay has enabled surcharging (fee forwarding) for your account, the customer pays `amount.total` plus a surcharge, and limits apply to that total. See [Surcharging (Fee Forwarding)](/docs/debit/guides/surcharging).
## PCR Fields (Reconciliation)
PCR (Particulars, Code, Reference) fields appear on bank statements for reconciliation. Use them for whatever is most useful to you; the uses below are only examples.
| Field | Required | Length | Example use |
| ------------- | -------- | ------ | ---------------------------------------------- |
| `particulars` | Yes | 1-12 | General description |
| `code` | No | 0-12 | Specific identifier (invoice number, order ID) |
| `reference` | No | 0-12 | Additional reference (customer ID) |
Avoid putting customer personal information (names, addresses, contact details) in PCR fields — they appear on bank statements. Use opaque identifiers such as a customer or order ID instead. See [Payment Reconciliation](/docs/debit/concepts/payment-lifecycle#payment-reconciliation) for full reconciliation guidance.
**Allowed Characters**
PCR fields accept letters, digits, spaces and the characters `- & # ? : _ / , . '`. A value with any other character (for example `@`, `(`, `+` or accented letters) is rejected with a `400` validation error. Westpac also rewrites some characters before sending them to the bank (`&` becomes `and`; `#`, `?`, `:` and `/` are removed) and shortens each field to 12 characters.
## Choosing Between Quick Payments and Single Consents
Quick Payments combine consent and payment into a single API call, ideal for immediate e-commerce payments. Single Consents separate these steps, giving you control over when the payment is initiated — useful for invoice payments or pre-authorisation scenarios.
If you need to accept card payments, use either method with the Gateway flow. See the [Card Payments guide](/docs/debit/guides/card-payments) for details.
For a detailed comparison of all consent types, see [Consent Types](/docs/debit/concepts/consent-types).
# Recurring Payments (https://merchants.blinkpay.co.nz/docs/debit/guides/recurring-payments.md)
---
title: Recurring Payments
description: Implement subscription billing and instalment plans with Enduring Consents
---
# Recurring Payments
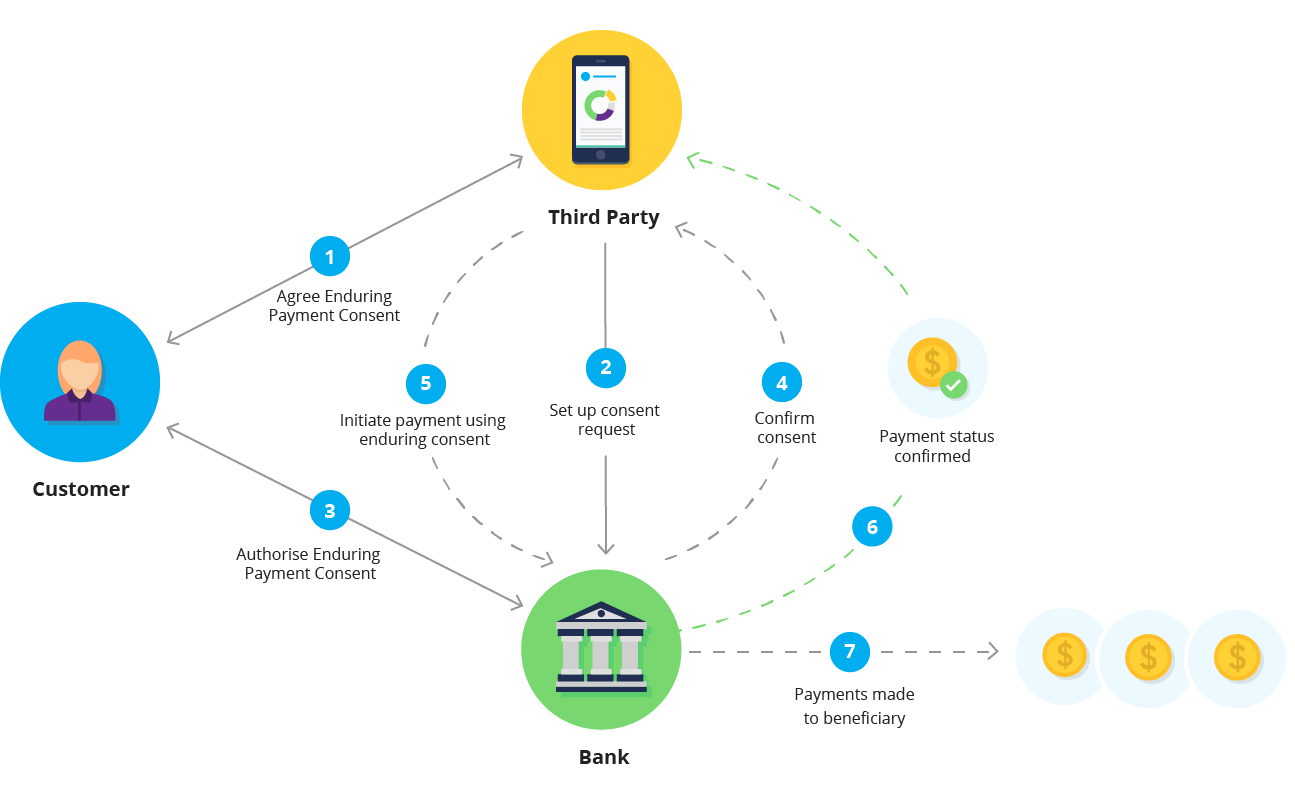
AutoPay uses **enduring consents** for recurring payments. Enduring consents authorise multiple payments over time within predefined limits. Once authorised, payments can be initiated on a regular schedule without requiring authorisation for each payment.
## Choosing Your Approach
BlinkPay offers two ways to handle recurring payments:
| Approach | Description | Best For |
| ------------------------------------------------------------------ | ---------------------------------------------------------------------------------------------- | ----------------------------------------------------------- |
| **Variable Recurring** | You initiate each payment via API, controlling timing and amount | Usage-based billing, variable subscriptions, instalments |
| **[Fixed Recurring](/docs/debit/guides/fixed-recurring-payments)** | BlinkPay automatically executes payments on schedule (requires an authorised enduring consent) | Fixed-fee subscriptions, charity donations, loan repayments |
**Which should I use?**
- **Variable Recurring (this page)**: Use when payment amounts change, you need custom timing logic, or you want full control over when payments are taken.
- **[Fixed Recurring](/docs/debit/guides/fixed-recurring-payments)**: Use when the same amount is charged on a regular schedule and you want BlinkPay to handle the automation.
This page covers **Variable Recurring Payments** where you control payment initiation. For automated fixed-amount payments, see [Fixed Recurring Payments](/docs/debit/guides/fixed-recurring-payments).
## How Enduring Consents Work
## Important Limitations
**Consent Immutability**
Once an Enduring Payment Consent is submitted, its parameters (amount ranges, expiry date, etc.) cannot be changed. A new consent must be issued to modify any parameters.
**Account Closure**
If a customer's bank account is closed, all Enduring Payment Consents linked to that account are no longer valid for use.
## Creating an Enduring Consent
**Request:**
```http
POST /payments/v1/enduring-consents HTTP/1.1
Host: sandbox.debit.blinkpay.co.nz
Authorization: Bearer {access_token}
Content-Type: application/json
idempotency-key: 1f5b9d3a-7c2e-4a6b-8d4f-3e9a1c7b5d2f
request-id: 7a3d1f9b-5e2c-4b8a-9f6d-4c2e8a0b6d1f
{
"flow": {
"detail": {
"type": "gateway",
"redirect_uri": "https://www.blinkpay.co.nz/sample-return"
}
},
"maximum_amount_period": {
"total": "5001.00",
"currency": "NZD"
},
"maximum_amount_payment": {
"total": "5001.00",
"currency": "NZD"
},
"period": "fortnightly",
"from_timestamp": "2025-10-15T13:21:00+12:00",
"expiry_timestamp": "2026-10-15T13:21:00+12:00"
}
```
**Response:**
```json
{
"consent_id": "8f7e6d5c-4b3a-2c1b-0a09-8f7e6d5c4b3a",
"redirect_uri": "https://sandbox.debit.blinkpay.co.nz/gateway/pay?id=8f7e6d5c..."
}
```
Store `consent_id` against the customer, then redirect them to `redirect_uri` to complete authorisation. If the create request times out, send it again unchanged, with the same `idempotency-key` (redirect and decoupled) or `request-id` (gateway).
## Consent Parameters
### Required Fields
| Field | Type | Description |
| ----------------------- | ------ | ----------------------------------- |
| `flow` | object | Authentication flow configuration |
| `maximum_amount_period` | object | Maximum total amount per period |
| `period` | string | Billing period type |
| `from_timestamp` | string | Period calculation start (ISO 8601) |
### Optional Fields
| Field | Type | Description |
| ------------------------ | ------ | ------------------------------------------ |
| `expiry_timestamp` | string | When consent expires (null for indefinite) |
| `maximum_amount_payment` | object | Maximum amount per single payment |
### Date Validation Rules
| Rule | Description |
| ------------------ | -------------------------------------------------------------------------- |
| `from_timestamp` | Required. May be in the past or the future — it anchors the consent period |
| `expiry_timestamp` | Must not be in the past (or `null` for indefinite) |
| Order | `from_timestamp` must not be after `expiry_timestamp` |
### Period Types
| Period | Description |
| ------------- | --------------------------------------------- |
| `daily` | Every day |
| `weekly` | Every 7 days |
| `fortnightly` | Every 14 days |
| `monthly` | Every month, counted from the `from_timestamp` date |
| `annual` | Every year, counted from the `from_timestamp` date |
**Period Limits Reset**
The `maximum_amount_period` limit resets at the start of each period. Periods are counted from the date of `from_timestamp`, not from the authorisation date and not from the first of the month. A monthly consent with a `from_timestamp` on 15 March has periods 15 March to 14 April, 15 April to 14 May, and so on. A period that starts on the 31st ends early in a shorter month and returns to the 31st afterwards.
### Expiry and Renewal
A consent with an `expiry_timestamp` can't be used after that time: it is `Consumed`, and a payment against it is refused with `422` `BP003`.
Sending no `expiry_timestamp` gives a consent with no end date; it stays valid until revoked.
Consents can't be extended or edited. To continue after a consent expires, or to change its amounts or period, create a new consent and have the customer authorise it, ideally before the old one runs out.
## Creating Payments
Once an enduring consent is authorised, create payments against it:
**Request:**
```http
POST /payments/v1/payments HTTP/1.1
Host: sandbox.debit.blinkpay.co.nz
Authorization: Bearer {access_token}
Content-Type: application/json
idempotency-key: e2a6c0f4-8b3d-4e1a-9c7f-6b4d2a8e0c3b
{
"consent_id": "8f7e6d5c-4b3a-2c1b-0a09-8f7e6d5c4b3a",
"amount": {
"total": "99.00",
"currency": "NZD"
},
"pcr": {
"particulars": "Subscription",
"code": "Month 1",
"reference": "Service"
}
}
```
**PCR Field Limits**
Each PCR field (particulars, code, reference) has a maximum length of 12 characters. Requests with longer values are rejected with a `400` validation error.
**Response** (`201 Created`):
```json
{
"payment_id": "9f8e7d6c-5b4a-3c2b-1a09-8f7e6d5c4b3a"
}
```
Store the `payment_id` and poll `GET /payments/v1/payments/{payment_id}` every second until it is `AcceptedSettlementCompleted` or `Rejected`, within your [polling window](/docs/debit/concepts/payment-lifecycle#polling). Payments on one consent run one at a time: while a payment is still in progress, a new `POST` on the same consent is refused with `409`.
**Always send an idempotency key**
Send a fresh UUID in `idempotency-key` for each payment you intend to make, and reuse it only to retry that same payment. Without one, a retry can charge the customer twice.
### Payment Amount Rules
| Rule | Description |
| ------------------- | ----------------------------------------------------------------- |
| Minimum | $0.01 NZD |
| Maximum per payment | Must not exceed `maximum_amount_payment` (if set) |
| Period maximum | A single payment must not exceed `maximum_amount_period` |
| Period total | Sum of payments in period must not exceed `maximum_amount_period` |
| Consent status | Consent must be `Authorised` |
A payment outside these rules is refused with a `400` or `422` and a `code` saying why; the [Error Codes Reference](/docs/debit/error-codes#payment-errors) lists them. Keep a running total per period in your own system.
On a surcharged consent, the period limit the customer's bank applies is the raised `maximum_amount_period`; see [Surcharging](#surcharging).
### Retrying a Payment
You start every payment on an enduring consent, so retries are your decision. Handle failures generically:
- **No clear answer** (timeout, network error or `5xx`): retry with the **same** idempotency key. You get the original payment back if it was created, and a `409` if the first request is still in progress, which you can retry after a few seconds.
- **`409`**: another request on this consent is in progress. Read the `code` and `message`: they name the payment to poll, or tell you to retry.
- **`400` or `422`**: the request can't succeed as sent. Read the `code`: the amount is outside the consent's limits, the period's allowance is used up, or the consent is revoked or expired. Adjust the amount, wait for the next period, or ask the customer to authorise a new consent.
- **Payment `Rejected`**: the bank declined it, for example for insufficient funds; there is no reason field. Don't retry automatically: tell the customer, and when you do try again use a **new** key.
The codes are in the [Error Codes Reference](/docs/debit/error-codes).
### Detecting Revocation
Customers can revoke an enduring consent in their banking app at any time. BlinkPay checks with the bank when the consent is read or a payment is attempted, so a revocation made at the bank shows as `Revoked` on the next `GET /payments/v1/enduring-consents/{consent_id}`, and a `POST /payments` on a revoked consent returns `422` `BP015`. Read the consent before each payment run, and handle `BP015` by stopping payments on that consent. If the consent has an active [Fixed Recurring Payment](/docs/debit/guides/fixed-recurring-payments), the schedule is cancelled and its `fixed-recurring-payment-cancelled` webhook fires. See [Notifications](/docs/debit/concepts/payment-lifecycle#notifications-and-webhooks).
## Surcharging
Surcharging, also called fee forwarding, passes BlinkPay's transaction fee for each payment on to your customer. BlinkPay can enable surcharging on enduring consents for your merchant account on request, once your BlinkPay invoices are paid by direct debit. This is separate from surcharging on one-off payments, described in [Surcharging (Fee Forwarding)](/docs/debit/guides/surcharging): having one enabled does not enable the other.
**Which payments are surcharged.** A payment is surcharged only if surcharging on enduring consents was enabled when its consent was created and is still enabled when the payment is made. Consents created before it was enabled are never surcharged. If it is switched off later, payments on existing consents stop being surcharged, even though the customer authorised the raised amounts.
**At consent creation**, the consent's maximum amounts are raised by the surcharge, and the customer's bank is asked to authorise the raised amounts. `maximum_amount_payment` is raised by its own surcharge, and `maximum_amount_period` by the same proportion, or by its own surcharge when you don't send `maximum_amount_payment`. The raised `maximum_amount_payment` (or, if you don't send one, the raised `maximum_amount_period`) is checked against the payment limits. If it is over your account's payment limit, the consent is rejected with `BP277`. If it is over the bank's limit, the consent is rejected with `BP229`, or `BP287` when you don't send `maximum_amount_payment` (bank limits are listed under [Payment Limits](/docs/shared/bank-coverage#payment-limits)); for gateway consents this is checked once the customer chooses their bank. So a consent that is just under a limit can be rejected once surcharging is enabled.
**Each payment** is surcharged at the current rate, up to what the consent's raised amounts allow, so a surcharge may be reduced or not charged. The customer is debited the payment's `amount.total` plus its surcharge. Each payment's `amount.total` must still be within the `maximum_amount_payment` you sent. The period limit the customer's bank applies is the raised `maximum_amount_period`, so if surcharges are reduced or switched off, a period's payments can total slightly more than the `maximum_amount_period` you sent.
**How much is recovered.** If rates rise after the consent is created, the surcharge is capped at what the consent allows. Otherwise, with a percentage-only fee, each payment is surcharged in full, less a few cents of rounding. When the fee includes a fixed amount or a cap, a payment smaller than `maximum_amount_payment`, or any payment on a consent without it, may be surcharged less. To recover the full surcharge, set `maximum_amount_payment` to the largest payment you expect to take.
**In responses**, a surcharged consent's `maximum_amount_payment` and `maximum_amount_period` carry `surcharge` and `total_charge`, the raised amount the customer authorises. For example, a $50.00 / $200.00 consent at an illustrative 4% surcharge:
```json
"maximum_amount_payment": {
"total": "50.00",
"surcharge": "2.00",
"total_charge": "52.00",
"currency": "NZD"
},
"maximum_amount_period": {
"total": "200.00",
"surcharge": "8.00",
"total_charge": "208.00",
"currency": "NZD"
}
```
Each surcharged payment carries `detail.amount.surcharge` and `detail.amount.total_charge`, the amount debited.
## Checking Consent Status
**Request:**
```http
GET /payments/v1/enduring-consents/{consent_id} HTTP/1.1
Host: sandbox.debit.blinkpay.co.nz
Authorization: Bearer {access_token}
```
**Response:**
```json
{
"consent_id": "8f7e6d5c-4b3a-2c1b-0a09-8f7e6d5c4b3a",
"status": "Authorised",
"creation_timestamp": "2025-10-15T10:00:00+12:00",
"status_updated_timestamp": "2025-10-15T10:05:00+12:00",
"detail": {
"type": "enduring",
"flow": {
"detail": {
"type": "gateway",
"redirect_uri": "https://www.blinkpay.co.nz/sample-return"
}
},
"maximum_amount_period": {
"total": "5001.00",
"currency": "NZD"
},
"maximum_amount_payment": {
"total": "5001.00",
"currency": "NZD"
},
"period": "fortnightly",
"from_timestamp": "2025-10-15T13:21:00+12:00",
"expiry_timestamp": "2026-10-15T13:21:00+12:00"
},
"payments": []
}
```
## Revoking a Consent
To cancel a customer's consent, for example when they cancel their subscription, revoke it:
**Request:**
```http
DELETE /payments/v1/enduring-consents/{consent_id} HTTP/1.1
Host: sandbox.debit.blinkpay.co.nz
Authorization: Bearer {access_token}
```
**Response:** `204 No Content`
**Immediate Effect**
Once revoked, the consent cannot be used for any further payments. A new consent must be created if the customer wants to resume.
## Use Cases
### Monthly Subscription
| Parameter | Value |
| ------------------------ | ------------------------- |
| `period` | `monthly` |
| `maximum_amount_period` | Fixed subscription amount |
| `maximum_amount_payment` | Same as period amount |
| `expiry_timestamp` | `null` (indefinite, where the bank allows it; see [Expiry and Renewal](#expiry-and-renewal)) |
### Instalment Plan
| Parameter | Value |
| ----------------------- | --------------------------- |
| `period` | `monthly` |
| `maximum_amount_period` | Monthly instalment amount |
| `expiry_timestamp` | Date after final instalment |
### Variable Usage Billing
| Parameter | Value |
| ------------------------ | ------------------------------ |
| `period` | `monthly` |
| `maximum_amount_period` | Maximum expected monthly usage |
| `maximum_amount_payment` | Maximum single charge |
## Choosing Enduring Consents
Enduring Consents differ from Quick Payments and Single Consents in that they authorise multiple payments over time within defined limits. A single authorisation allows you to initiate payments repeatedly without customer intervention for each transaction.
For a detailed comparison of all consent types, see [Consent Types](/docs/debit/concepts/consent-types).
# Fixed Recurring Payments (https://merchants.blinkpay.co.nz/docs/debit/guides/fixed-recurring-payments.md)
---
title: Fixed Recurring Payments
description: Automate scheduled payments with Fixed Recurring Payment schedules
---
# Fixed Recurring Payments
Fixed Recurring Payments automate scheduled payments against an authorised enduring consent. Once set up, payments execute automatically on a recurring basis without further merchant or customer intervention.
**When to Use Fixed Recurring**
Fixed Recurring is ideal when:
- The payment amount stays the same each period (e.g., $29.99/month)
- You want BlinkPay to handle payment execution automatically
- You don't need custom timing logic
**Common use cases:** Fixed-fee subscriptions, charity donations, membership dues, loan repayments, gym memberships.
For variable amounts or custom timing, use [Variable Recurring Payments](/docs/debit/guides/recurring-payments) instead.
## FRP and FPE
Two concepts to keep straight:
- **Fixed Recurring Payment (FRP)** — the schedule itself. One per recurring arrangement, tied to one authorised enduring consent. It holds the amount, PCR, start date, next payment date, retry strategy and status. It has no frequency or end date of its own: the frequency is the consent's `period`, and the schedule ends when it is cancelled or when the consent is revoked or reaches its `expiry_timestamp`. Think of it as **similar to a direct debit mandate**.
- **Fixed Payment Execution (FPE)** — one occurrence of an FRP firing on a specific date. Many FPEs per FRP. Created by the scheduler ahead of its scheduled date, and links to the actual payment row created at the bank when it executes. Think of it as **one individual debit under that mandate**.
Each FPE has its own status, retry behaviour, and webhook events, so you get granular visibility into every individual debit. Throughout this guide, "schedule" or "FRP" refers to the recurring rule and "FPE" refers to an individual scheduled execution.
## How Fixed Recurring Payments Work
**One-Time Setup:**
1. Create an Enduring Consent and have the customer authorise it
2. Create a Fixed Recurring Payment schedule linked to that consent
**Automated Payments:**
BlinkPay automatically initiates payments at 9am NZ time on each scheduled date. Payments continue until the schedule is cancelled or the underlying consent is revoked or expires.
## Prerequisites
Before creating a Fixed Recurring Payment schedule, you must first have an authorised enduring consent. See [Recurring Payments](/docs/debit/guides/recurring-payments) for how to create and authorise an enduring consent.
**Requirements:**
- An enduring consent in `Authorised` status
- Payment amount must not exceed the consent's `maximum_amount_payment` or `maximum_amount_period`
- `start_date` must be today or in the future (NZ timezone); omit it to default to the later of today and the consent's activation date
- For `daily` consents, `start_date` cannot be today if the request is submitted after 21:45 NZ — set it to tomorrow instead
- Only one active schedule allowed per consent
The consent's `from_timestamp` and `expiry_timestamp` are converted to NZ time before their dates are compared with `start_date`, so a timestamp sent in another offset may fall on a different NZ date.
**One Schedule Per Consent**
Each enduring consent can have only one active Fixed Recurring Payment schedule at a time. To change the schedule, cancel the existing one and create a new schedule.
## API Endpoints
| Method | Path | Description |
| -------- | -------------------------------------------------------------------- | --------------- |
| `POST` | `/payments/v1/fixed-recurring-payments` | Create schedule |
| `GET` | `/payments/v1/fixed-recurring-payments/{fixed_recurring_payment_id}` | Get schedule |
| `DELETE` | `/payments/v1/fixed-recurring-payments/{fixed_recurring_payment_id}` | Cancel schedule |
## Creating a Schedule
**Request:**
```http
POST /payments/v1/fixed-recurring-payments HTTP/1.1
Host: sandbox.debit.blinkpay.co.nz
Authorization: Bearer {access_token}
Content-Type: application/json
idempotency-key: b5d9f3a7-2c6e-4b1d-8f4a-0e7c3a9d5b2f
{
"consent_id": "8f7e6d5c-4b3a-2c1b-0a09-8f7e6d5c4b3a",
"start_date": "2026-01-14",
"amount": {
"total": "99.00",
"currency": "NZD"
},
"pcr": {
"particulars": "Subscription",
"code": "Monthly",
"reference": "Service"
},
"retry_strategy": "same_day"
}
```
### Request Fields
| Field | Required | Description |
| ---------------- | -------- | ---------------------------------------------------------------------------------------------------- |
| `consent_id` | yes | An authorised enduring consent. |
| `amount` | yes | Per-payment amount. Must not exceed the consent's `maximum_amount_payment` or `maximum_amount_period`. |
| `pcr` | yes | Particulars, Code, and Reference shown on the customer's bank statement. Each field max 12 characters. |
| `start_date` | no | First scheduled payment date (NZ timezone). Must be today or in the future. Defaults to the later of today and the consent's activation date (its `from_timestamp`, NZ timezone) if omitted. For `daily` consents, cannot be today when the request is submitted after 21:45 NZ. |
| `retry_strategy` | no | `none` (default) or `same_day` — see [Retry Strategies](#retry-strategies). |
**PCR Field Limits**
Each PCR field (particulars, code, reference) has a maximum length of 12 characters. Requests with longer values are rejected with a `400` validation error — values are never truncated.
**Response:**
```json
{
"fixed_recurring_payment_id": "9f8e7d6c-5b4a-3c2b-1a09-8f7e6d5c4b3a"
}
```
**Retrying the create request.** Send an `idempotency-key` (a UUID) and reuse it if the request times out: the same key and body return the original `fixed_recurring_payment_id`. A consent can have only one active schedule (`409` `BP705`).
## Surcharging
If BlinkPay has enabled surcharging on enduring consents for your merchant account, instalments are surcharged by the same rules as any other payment on the consent; see [Surcharging](/docs/debit/guides/recurring-payments#surcharging). The schedule's `amount` is the amount before the surcharge.
An instalment whose `amount` equals the consent's `maximum_amount_payment` is surcharged in full, less a few cents of rounding, unless rates have risen since the consent was created, in which case the surcharge is capped at what the consent allows. Smaller instalments follow the rules on that page.
## Checking Schedule Status
**Request:**
```http
GET /payments/v1/fixed-recurring-payments/{fixed_recurring_payment_id} HTTP/1.1
Host: sandbox.debit.blinkpay.co.nz
Authorization: Bearer {access_token}
```
**Response:**
```json
{
"fixed_recurring_payment_id": "9f8e7d6c-5b4a-3c2b-1a09-8f7e6d5c4b3a",
"consent_id": "8f7e6d5c-4b3a-2c1b-0a09-8f7e6d5c4b3a",
"status": "active",
"start_date": "2025-12-17",
"next_payment_date": "2026-01-17",
"amount": {
"total": "99.00",
"currency": "NZD"
},
"pcr": {
"particulars": "Subscription",
"code": "Monthly",
"reference": "Service"
},
"retry_strategy": "same_day",
"creation_timestamp": "2025-12-17T09:00:00+13:00"
}
```
### Response Fields
| Field | Description |
| ---------------------------- | -------------------------------------------------------------------------------------------------------- |
| `fixed_recurring_payment_id` | Unique identifier for the schedule. |
| `consent_id` | The underlying enduring consent. |
| `status` | `active` or `cancelled`. |
| `start_date` | The first scheduled payment date. Taken from the create request; defaults to the later of today and the consent's activation date (NZ timezone) if not supplied. |
| `next_payment_date` | Next scheduled payment date. |
| `amount` | Per-payment amount, as supplied at creation. |
| `pcr` | Particulars, Code, and Reference shown on the customer's bank statement. |
| `retry_strategy` | `none` or `same_day` — see [Retry Strategies](#retry-strategies). |
| `creation_timestamp` | When the schedule was created (ISO 8601). |
| `status_updated_timestamp` | When the status was last updated (ISO 8601). |
## Cancelling a Schedule
**Request:**
```http
DELETE /payments/v1/fixed-recurring-payments/{fixed_recurring_payment_id} HTTP/1.1
Host: sandbox.debit.blinkpay.co.nz
Authorization: Bearer {access_token}
```
**Response:** `204 No Content`
**Cancellation Does Not Revoke Consent**
Cancelling a Fixed Recurring Payment schedule does NOT revoke the underlying enduring consent. The consent remains active and can be used for manual payments or a new schedule.
## Manual Payments Alongside a Schedule
You can make your own payments with `POST /payments/v1/payments` on a consent that has an active schedule, for example to collect a one-off charge. They share the consent with the schedule's instalments, which has three effects:
- Manual payments and instalments count towards the same `maximum_amount_period`, so a manual payment can leave too little for the next instalment in that period.
- Only one payment runs on a consent at a time. A manual payment sent while an instalment is in progress is refused with `409` `BP703`, which names the payment to poll.
- At ANZ and Westpac, the next instalment waits until a full period has passed since the latest payment on the consent, including a manual one, so a manual payment can push the next instalment back.
See [Recurring Payments](/docs/debit/guides/recurring-payments#creating-payments) for how to make and retry manual payments.
## Payment Schedule
### Timing
| Event | Timing |
| ------------------- | -------------------------------------------------------------------------------------------- |
| First payment | Initiated at the first scheduler tick at or after 09:00 NZ time on `start_date`; at some banks, if the consent's `from_timestamp` is later that day, the first payment waits until the consent is active. |
| Subsequent payments | Anchored to the FRP's `start_date`, advanced by the period count (not chained off the previous FPE). Initiated at the first tick from 09:00 NZ time on the scheduled date, except at banks with their own payment spacing rules — see Bank-specific timing below. |
| Operating window | Ticks every 15 minutes from 09:00 NZ time (`Pacific/Auckland`) with the last tick at 21:45; the retry window closes at 22:00 |
The operating window governs when payment attempts and `same_day` retries start — it does not delay webhook events, which fire whenever an FPE actually resolves, at any hour. If an FPE's scheduled date passes before the scheduler processes it (for example, a schedule created later in the day with today's `start_date`), it is **not skipped** and its `scheduledDate` is **not rewritten** — it processes at the next scheduler tick. Periods always roll forward.
**Daily schedules only:** a `daily` FRP is rejected at creation if its first payment could not run on `start_date` — either the request is submitted after the day's last scheduler tick (21:45 NZ), or the consent does not become active until after that tick on that date. Set `start_date` to the following day and retry. Doesn't apply to other periods.
Once an FPE has been submitted to the bank, its outcome is resolved 24/7 — the operating window only governs when first attempts and retries start, not when in-flight payments settle. An FPE submitted at 21:40 that the bank confirms at 23:00 reaches its terminal status that night and fires the corresponding webhook.
#### Bank-specific timing
ANZ measures a consent's period between payments to the second, so ANZ instalments are initiated at around the same time of day as the previous payment rather than at 09:00. Blink applies the spacing; the scheduled date is unchanged. ASB, BNZ, Kiwibank and Westpac use calendar period boundaries, so their instalments are initiated at the first tick from 09:00.
### Period Types
The payment frequency is determined by the underlying enduring consent's `period`:
| Period | Nth date calculation (`N` = number of periods elapsed) |
| ------------- | ------------------------------------------------------ |
| `daily` | `start_date` + N days |
| `weekly` | `start_date` + N weeks |
| `fortnightly` | `start_date` + (N × 2) weeks |
| `monthly` | `start_date` + N months |
| `annual` | `start_date` + N years |
**Period Alignment**
The schedule is anchored to the FRP's `start_date`. For example, a monthly schedule starting on 14 January fires on 14 January, 14 February, 14 March, and so on.
**Month-End Behaviour**
For `monthly` schedules, each scheduled date is calculated from the FRP's `start_date` anchor, not from the previous scheduled date. When the anchor day doesn't exist in a given month (e.g. the 31st of a 30-day month), the schedule falls back to the last day of that month for that period only and resumes the original anchor day in the next month where it exists.
For example, a schedule starting on 31 January fires on 31 Jan → 28 Feb (or 29 in leap years) → 31 Mar → 30 Apr → 31 May → 30 Jun → 31 Jul. This matches the NZ Open Banking Payment Initiation period definition for monthly anchoring.
## Retry Strategies
| Strategy | Behaviour |
| ---------- | ------------------------------------------------------------------------------------ |
| `none` | No retries — the schedule advances to the next period on failure. |
| `same_day` | Retries hourly within the same calendar day, then advances to the next period. |
### Retry Strategy: `none` (Default)
On failure the FPE is marked failed, the `fixed-recurring-payment-failed` webhook fires, and the schedule advances to its next scheduled date. No retries are attempted.
### Retry Strategy: `same_day`
On failure, the FPE is retried roughly hourly through the day, up to 22:00 NZ time. If it still hasn't succeeded by then, the FPE is marked failed and the schedule advances. Retries do not carry over to the next day.
BlinkPay's retries can't double-charge; don't add your own retries of a failed instalment on top; if you want to collect a missed amount yourself, make a manual payment and follow the [retry rules for manual payments](/docs/debit/guides/recurring-payments#retrying-a-payment).
Some bank rejections cannot be cleared by retrying within the same period and are not retried — the FPE is marked failed immediately and the schedule advances to its next scheduled date. This covers cases like the consent's per-payment or per-period cap being exceeded and the consent's frequency or total-count limit being reached. If the bank's rejection shows the consent itself has been revoked or is no longer authorised, the schedule is cancelled instead — the `fixed-recurring-payment-cancelled` webhook fires rather than `failed` (see [Auto-Cancellation](#auto-cancellation)). Transient infrastructure failures (bank 5xx, network errors) still follow the hourly retry budget.
## Schedule Status
| Status | Description |
| ----------- | ------------------------------------------------------- |
| `active` | Schedule is running and will execute payments |
| `cancelled` | Schedule has been cancelled (manually or automatically) |
## Auto-Cancellation
Schedules are automatically cancelled when the underlying consent becomes unusable. The timing depends on how the consent ended:
- **Merchant calls `DELETE /enduring-consents/{id}`** — the FRP is cancelled synchronously as part of the revoke transaction, and the `fixed-recurring-payment-cancelled` webhook fires immediately.
- **Customer revokes from their bank, or the consent reaches its `expiry_timestamp`** — the schedule is cancelled no later than its next payment date, and the `fixed-recurring-payment-cancelled` webhook fires then. This webhook is the only push notice of a bank-side revocation.
## FPE Tracking
Each FPE is recorded as a standard payment. Query the parent enduring consent to retrieve every FPE that has run against it:
**Request:**
```http
GET /payments/v1/enduring-consents/{consent_id} HTTP/1.1
Host: sandbox.debit.blinkpay.co.nz
Authorization: Bearer {access_token}
```
The response includes a `payments` array containing every FPE made against the consent, each with its own status, timestamp, and amount.
## Webhooks
Rather than polling each FPE for an outcome, register a webhook subscription and Blink will deliver a signed event each time an FPE completes, fails, or is cancelled. Webhooks are the recommended pattern for FRP — payment timing is determined by Blink rather than the merchant, so push notification fits the workflow.
**Scope:** Webhooks fire for FRP events only. PayNow, quick payments, and one-off enduring payments use polling — see the [payment lifecycle](/docs/debit/concepts/payment-lifecycle#checking-payment-status) for those. Decoupled-flow consent authorisation uses a separate unsigned [callback mechanism](/docs/shared/flows/decoupled-flow#consent-authorisation-callback).
### Subscription management
Webhook subscriptions are managed via the API. Each subscription is merchant-wide and can be filtered to specific event types. You can register multiple subscriptions (for example, to route different events to different URLs).
| Method | Path | Description |
| -------- | ------------------------------------- | ---------------------------- |
| `POST` | `/payments/v1/subscriptions` | Create a subscription |
| `GET` | `/payments/v1/subscriptions` | List subscriptions |
| `DELETE` | `/payments/v1/subscriptions/{id}` | Delete a subscription |
**Create a subscription:**
**Request:**
```http
POST /payments/v1/subscriptions HTTP/1.1
Host: sandbox.debit.blinkpay.co.nz
Authorization: Bearer {access_token}
Content-Type: application/json
{
"callback_url": "https://yourapp.example.com/webhooks/blinkpay",
"event_types": [
"urn:nz:co:blinkpay:debit:events:fixed-recurring-payment-completed",
"urn:nz:co:blinkpay:debit:events:fixed-recurring-payment-failed",
"urn:nz:co:blinkpay:debit:events:fixed-recurring-payment-cancelled"
]
}
```
**Response:**
```json
{
"subscription_id": "9f8e7d6c-5b4a-3c2b-1a09-8f7e6d5c4b3a",
"callback_url": "https://yourapp.example.com/webhooks/blinkpay",
"event_types": [
"urn:nz:co:blinkpay:debit:events:fixed-recurring-payment-completed",
"urn:nz:co:blinkpay:debit:events:fixed-recurring-payment-failed",
"urn:nz:co:blinkpay:debit:events:fixed-recurring-payment-cancelled"
],
"secret": "whsec_a1b2c3d4e5f6",
"creation_timestamp": "2026-01-14T09:00:00+13:00"
}
```
| Field | Description |
| -------------------- | ---------------------------------------------------------------------------------------------------- |
| `subscription_id` | Unique identifier for the subscription. |
| `secret` | Signing secret (`whsec_…` prefix). **Store immediately** — returned only on create. |
| `callback_url` | HTTPS URL BlinkPay POSTs event payloads to. |
| `event_types` | The event types this subscription receives. |
| `creation_timestamp` | When the subscription was created (ISO 8601). |
Sandbox and production are separate environments with separate subscriptions and separate secrets. There is no pause or disable; to stop deliveries, delete the subscription.
### Events
All three events share a single payload schema. The event type identifies which lifecycle moment fired.
| Event type | Fires when |
| --------------------------------------------------------------------- | ------------------------------------------------------------------------------------------- |
| `urn:nz:co:blinkpay:debit:events:fixed-recurring-payment-completed` | An FPE has been accepted by the bank. |
| `urn:nz:co:blinkpay:debit:events:fixed-recurring-payment-failed` | An FPE has failed terminally and the schedule has advanced to the next period. |
| `urn:nz:co:blinkpay:debit:events:fixed-recurring-payment-cancelled` | The schedule has been cancelled — either via the API or because the underlying consent was revoked or expired. |
A `failed` event means the bank declined the instalment or did not respond; the API does not say which. The payment carries no rejection reason, so `GET /payments/v1/payments/{payment_id}` shows only that it is `Rejected`, and a `failed` event without a `payment_id` means no payment record was created.
**Mental model:** `failed` means "this debit didn't go through, but the schedule is still active and will try again next period" — typically prompt the customer to update payment details, but don't terminate their subscription. `cancelled` means "the schedule itself is gone, no more debits will happen" — typically revert the customer to a non-active state and prompt re-authorisation if you want them back.
### Payload
| Field | Type | Notes |
| ------------ | --------------------------------- | -------------------------------------------------------------------- |
| `event_type` | string (URN) | One of the three event types above. |
| `event_id` | UUID | Stable across delivery retries — use this to dedupe. |
| `timestamp` | ISO 8601 with offset | When the event was generated. |
| `frp_id` | UUID | The schedule the event relates to. |
| `consent_id` | UUID | The underlying enduring consent. |
| `payment_id` | UUID, conditional | The specific FPE. Always present on `completed`. Present on `failed` when a payment record was created (i.e. the failure occurred after the bank submission was attempted). Omitted on `cancelled` — schedule cancellation is not tied to a specific payment. |
**Example:**
```json
{
"consent_id": "aaaaaaaa-bbbb-cccc-dddd-eeeeeeeeeeee",
"event_id": "12345678-1234-1234-1234-123456789012",
"event_type": "urn:nz:co:blinkpay:debit:events:fixed-recurring-payment-completed",
"frp_id": "11111111-2222-2222-2222-333333333333",
"payment_id": "87654321-4321-4321-4321-210987654321",
"timestamp": "2025-01-01T12:00:00+13:00"
}
```
Check for the key's presence (not its value) when reading `payment_id`. Use `frp_id` and `consent_id` as your primary correlation keys — both are present on every event.
Payloads contain identifiers only — no customer name, account number, amount, or PCR fields. To retrieve those, call `GET /payments/v1/payments/{payment_id}` or the consent endpoint with your normal API credentials.
### Delivery headers
Each delivery includes:
- `X-Signature` — Unix timestamp and HMAC-SHA256 signature, separated by a comma. See [Signature verification](#signature-verification) below.
- `X-Idempotency-Key` — UUID that is stable across delivery retries of the same event. Use this (or `event_id` from the body) to dedupe.
```
X-Signature: t=1739545800,v1=5257a869e7ecebeda32affa62cdca3fa51cad7e77a0e56ff536d0ce8e108d8bd
X-Idempotency-Key: 7b9c8e2a-4d1f-4a3b-9e5c-6f8a2b4d3e1c
Content-Type: application/json
```
### Signature verification
To verify:
1. Parse `t` and `v1` from the header.
2. Build the signed string by concatenating the timestamp, a literal dot, and the **raw request body bytes** — for example `1739545800.{...body...}`. Do not re-serialise the JSON; whitespace and key order matter.
3. Compute `HMAC-SHA256(signed_string, your_signing_secret)` and hex-encode the result in lowercase. The signed string and the secret are both treated as UTF-8 bytes; use the full secret including the `whsec_` prefix as the HMAC key.
4. Compare against `v1` using a constant-time comparison.
5. Reject the request if `t` is older than 5 minutes (allowing ±60 seconds of clock skew).
**Worked example:**
| Input | Value |
| -------------- | --------------------------------------------------------------------------------------------------------------------------- |
| Secret | `whsec_test_secret` |
| Timestamp (`t`) | `1739545800` |
| Raw body | `{"event_id":"abc"}` |
| Signed string | `1739545800.{"event_id":"abc"}` |
| Expected `v1` | `6fc0de6006119436f09db0d062c6d181b7e10778533152586b5a03c0b93b73bc` |
If your implementation produces a different `v1` for the same inputs, re-check the body bytes (no re-serialisation), the secret encoding (UTF-8, prefix included), and the hex case (lowercase).
**Use the raw body, not a re-serialised object**
Most web frameworks parse JSON before your handler runs. Re-serialising the parsed object will not reproduce the bytes that were signed. Capture the raw body bytes before parsing.
### Delivery semantics
| Aspect | Behaviour |
| ------------------ | -------------------------------------------------------------------------------------------------------------------- |
| Success criteria | Any `2xx` response. `3xx`, `4xx`, and `5xx` are all treated as failures. |
| Timeout | 10 seconds per attempt. |
| Retries | Up to 4 attempts (initial + 3) with short exponential backoff. 5xx and network errors retry; 4xx fails fast. |
| Ordering | Best-effort — a later event can land before an earlier one's final retry. |
| Dedupe | Use `event_id` from the body. It is stable across retries. |
| Failure visibility | After the final attempt the event is dropped. There is no dead-letter queue, replay endpoint, or failure alert. |
Respond `2xx` as soon as the event is accepted and queue it for processing — don't do slow work inside the 10-second window. The receiver must be reachable over public TLS; we don't follow `3xx` redirects, so an `http → https` rewrite at your edge will fail silently.
### Testing webhooks in sandbox
Webhook events are emitted by real FRP execution against the sandbox, so producing each event means driving the underlying behaviour. Authorise the underlying enduring consent using PNZ auto-approve (see the [Testing Guide](/docs/debit/testing) for credentials), then:
| Event | How to produce it in sandbox |
| ----------- | -------------------------------------------------------------------------------------------- |
| `completed` | Create an FRP with a small amount and `start_date` of today (before 09:00 NZ), then wait. |
| `cancelled` | Call `DELETE /payments/v1/fixed-recurring-payments/{id}` — the cleanest deterministic trigger. |
| `failed` | Not currently triggerable on demand in sandbox. |
# Gateway Integration (https://merchants.blinkpay.co.nz/docs/debit/guides/gateway-integration.md)
---
title: Gateway Integration
description: Integrate BlinkPay's hosted payment gateway for simplified bank selection and authentication
---
# Gateway Integration
This guide shows how to implement the Gateway Flow for payment integrations (PayNow and AutoPay). For a conceptual overview of how Gateway Flow works, see [Gateway Flow](/docs/shared/flows/gateway-flow).
**Strongly Recommended**
Gateway Flow is the fastest way to integrate BlinkPay payments. It handles bank selection, authentication flows, and compliance automatically.
## Quick Start
This guide covers the payment-specific steps. The full request bodies for each consent type are on [Gateway Flow](/docs/shared/flows/gateway-flow), and the client libraries that wrap these calls are listed on [SDKs](/docs/debit/sdks/overview). You'll learn how to:
- Create payment consents with Gateway Flow
- Handle customer redirects and callbacks
- Process one-off and recurring payments
- Implement complete e-commerce and subscription flows
## Integration Steps
### Step 1: Create Consent with Gateway Flow
Specify the `gateway` flow type when creating a consent:
**For Single Payments (Quick Payment):**
Specify the `gateway` flow type with your redirect URI and flow hint.
**For Single Consents:**
Create a single consent with the `gateway` flow type and redirect the customer to the returned redirect URI.
**For Recurring Payments (Enduring Consent):**
Create an enduring consent with the `gateway` flow type, maximum amount period, and redirect the customer to the returned redirect URI.
### Step 2: Redirect Customer to Gateway
Your backend should securely pass the `redirect_uri` to your frontend, which then redirects the customer to the gateway. The Gateway will:
1. Display available banks
2. Allow customer to select their bank
3. Let customer choose authentication method (redirect or decoupled)
4. Handle the authentication flow
5. Return the customer to your `redirect_uri` with the consent ID as `cid` (plus `status` and `error` when the outcome isn't a success)
**HTML Example:**
```html
Continue to Payment
```
### Step 3: Handle the Callback
When the customer completes authentication, they'll be redirected back to your `redirect_uri`:
```
https://yourapp.com/payment/callback?cid={consent_id}
```
`cid` is always present; for a quick payment it is the `quick_payment_id`. When the outcome isn't a success, the gateway adds `status` (`cancelled`, `rejected`, `timeout`, `error`, or `pending` while the outcome is still unknown) and, usually, a display-only `error` message. There is no success value. Branch on `status`, never on `error`. The full table is in [Return Parameters](/docs/shared/flows/redirect-flow#return-parameters).
### Step 4: Verify and Process Payment
Always verify the outcome via the API before you act on it: the redirect URL does not indicate the final result and is not proof of payment.
For a quick payment, call `GET /payments/v1/quick-payments/{quick_payment_id}` as soon as the customer returns; the gateway normally does this for you, and calling it again is safe. For a bank payment this call completes the payment, so don't delay it. Read the outcome from `consent.payments[0].status`.
For a single or enduring consent, retrieve the consent and, once it is `Authorised`, create the payment with `POST /payments/v1/payments`. For a single consent send only the `consent_id`; for an enduring consent include the amount and PCR. See [Single Payments](/docs/debit/guides/single-payments) and [Recurring Payments](/docs/debit/guides/recurring-payments).
## Configuration
### Redirect URI Requirements
Your redirect URI must:
- Be registered in the BlinkPay portal under **Settings > API Settings** (Whitelisted Redirect URLs), separately for sandbox and production
- Not use `http://` or `localhost` in production (both are allowed in sandbox); a mobile app's custom scheme such as `myapp://callback` is allowed in both
- Handle both success and failure scenarios
- Accept the `cid`, `status` and `error` query parameters
**How Redirect URIs Are Matched**
It must match an entry under **Whitelisted Redirect URLs** (400 `BP214` otherwise); see [Redirect URI Whitelisting](/docs/shared/authentication#redirect-uri-whitelisting) for the matching rules.
### Timeout Handling
Every timer on both products is listed in [Timeouts and Deadlines](/docs/shared/bank-coverage#timeouts-and-deadlines).
A Gateway consent is bound by two successive windows — the Gateway session cutoff while the customer is still choosing a bank, then that bank's own authorisation window. Both are covered in [Authorisation timeouts](/docs/debit/concepts/consent-lifecycle#authorisation-timeouts).
Either way the customer returns to your `redirect_uri`, so always verify the outcome via the API and prompt the customer to retry with a new consent if the consent didn't reach `Authorised`.
### Mobile Considerations
The Gateway is responsive and works in mobile browsers. On a phone it opens the customer's banking app where the bank supports it, and offers "Send to app" (the decoupled flow) where the bank supports it. When the customer finishes, the gateway sends them to your `redirect_uri`; to land back in your app, use a custom scheme or universal link registered as a redirect URI.
**Mobile Apps**
In a native app, open the gateway in an in-app browser (`SFSafariViewController` or `ASWebAuthenticationSession` on iOS, Chrome Custom Tabs on Android), not an embedded WebView, which is not supported. See the [Mobile Integration Guide](/docs/shared/flows/mobile-integration) for registering your return link, handling the outcome when the customer dismisses the browser, and platform requirements. App-to-app return (`redirect_to_app`), where the bank returns straight to your app, needs BlinkPay support to enable it; see [App-to-App Flow](/docs/shared/flows/app-to-app).
# Card Payments (https://merchants.blinkpay.co.nz/docs/debit/guides/card-payments.md)
---
title: Card Payments
description: Accept credit and debit card payments through the BlinkPay Gateway
---
# Card Payments
BlinkPay supports credit and debit card payments alongside account-to-account (A2A) bank transfers through a single API integration. Card payments are available through the [Gateway Flow](/docs/shared/flows/gateway-flow) for one-off payments (both Quick Payments and Single Consents).
## Overview
When card payments are enabled for your merchant account, the BlinkPay Gateway automatically presents card as a payment option alongside bank accounts. The card payment form securely tokenises card details so that card data never passes through BlinkPay or your systems.
**High-level flow:**
1. Create a one-off payment (Quick Payment or Single Consent) using the Gateway flow
2. Customer is redirected to the BlinkPay-hosted gateway and presented with payment options (bank accounts and/or card)
3. Customer selects card, completes card details in the card payment form, and authorises
4. The card transaction is processed. For a Quick Payment the money is taken at this point; for a Single Consent it is reserved until you create the payment
5. Customer is redirected back to your `redirect_uri`
6. Poll for final payment status
7. Response includes `card_network` field identifying the card type used
## Prerequisites
In addition to a standard Blink Payments merchant account with the [Gateway flow](/docs/shared/flows/gateway-flow) configured, card payments require your own acquirer — i.e. a merchant facility with your bank for card payment settlement. See [Onboarding](#onboarding) for details on getting set up.
## Checking Card Payment Capability
Use the metadata endpoint to confirm card payments are enabled for your account and to discover which card types and networks are available.
```http
GET /payments/v1/meta HTTP/1.1
Host: sandbox.debit.blinkpay.co.nz
Authorization: Bearer {access_token}
```
The response is a JSON array with one entry per bank. When card payments are enabled for your account, the array also contains an entry named `Card` (bank entries are shortened here):
```json
[
{
"name": "ASB",
"features": {}
},
{
"name": "Card",
"features": {
"card_payment": {
"enabled": true,
"allowed_card_payment_types": [
"APPLEPAY",
"CLICKTOPAY",
"GOOGLEPAY",
"PANENTRY"
],
"allowed_card_networks": ["VISA", "MASTERCARD"]
}
}
}
]
```
If the `Card` entry is present, your account can accept card payments (its `card_payment.enabled` is always `true`); if card payments are not enabled, there is no `Card` entry. The `allowed_card_payment_types` and `allowed_card_networks` arrays define which options are available to your customers.
For more details on the metadata endpoint, see [Metadata](/docs/shared/reference/metadata).
## Creating a Card Payment
Card payments use the same endpoints as A2A payments — either Quick Payments or Single Consents with the Gateway flow. No additional request fields are needed; the gateway automatically presents card as a payment option based on your merchant configuration.
### Quick Payment Example
```http
POST /payments/v1/quick-payments HTTP/1.1
Host: sandbox.debit.blinkpay.co.nz
Authorization: Bearer {access_token}
Content-Type: application/json
idempotency-key: d8b2f6a0-4c9e-4d3b-a1f7-5e3c9b7d1a4f
request-id: 0c6a4e2f-9d1b-4f7c-8e5a-3b1d7f9c5e2a
{
"flow": {
"detail": {
"type": "gateway",
"redirect_uri": "https://www.yourwebsite.com/payment/callback"
}
},
"amount": {
"currency": "NZD",
"total": "49.99"
},
"pcr": {
"particulars": "Order1234",
"code": "ONLINE",
"reference": "INV-5678"
}
}
```
**Response:**
```json
{
"quick_payment_id": "a1b2c3d4-e5f6-7890-abcd-ef1234567890",
"redirect_uri": "https://gateway.blinkpay.co.nz/redirect/a1b2c3d4-..."
}
```
Redirect the customer to the `redirect_uri`. The gateway presents all available payment methods — bank accounts and card — based on your configuration.
The two-step Single Consent flow also supports card payments. Create a single consent with `flow.detail.type: "gateway"`, redirect the customer, and create the payment after authorisation — see [Single Payments](/docs/debit/guides/single-payments) for the full two-step flow.
On a card, authorising at the gateway reserves the money on the customer's card without handing it over; creating the payment is what actually takes it. No payment exists until you do, so poll the consent rather than a payment while you wait.
**Create the payment promptly.** A reservation you never turn into a payment is released after **5 days**: the money returns to your customer and the consent becomes `Revoked`, so a new consent is needed to charge them.
### Pre-selecting Card Payment (Optional)
By default, the gateway presents all available payment methods and the customer chooses. If you want to pre-select the card payment option, you can optionally include a `flow_hint`:
```json
{
"flow": {
"detail": {
"type": "gateway",
"redirect_uri": "https://www.yourwebsite.com/payment/callback",
"flow_hint": {
"type": "redirect",
"bank": "Card"
}
}
},
"amount": {
"currency": "NZD",
"total": "49.99"
},
"pcr": {
"particulars": "Order1234",
"code": "ONLINE",
"reference": "INV-5678"
}
}
```
### Customer Return
After the customer completes or cancels payment, they are redirected to your `redirect_uri`. The return URL always carries `cid`, the consent ID (for a quick payment, also the `quick_payment_id`). On anything other than success it also carries `status` and, usually, a display-only `error`; branch on `status`, never on `error`. The full list is in [Return Parameters](/docs/shared/flows/redirect-flow#return-parameters). The return URL is not proof of payment: always confirm the outcome with a `GET` from your server.
## Supported Card Payment Types
The following card payment types may be enabled for your merchant account. Available types are returned in the metadata response under `allowed_card_payment_types`.
| Type | Status | Description |
| ------------ | ----------- | ------------------------------------------------------------------------------------------------------- |
| `PANENTRY` | Available | Traditional card entry — customer manually enters card number, expiry, and CVV in the card payment form |
| `GOOGLEPAY` | Available | Google Pay digital wallet. Tokenised payment via Chrome or Android devices |
| `CLICKTOPAY` | Available | Mastercard Click to Pay. Browser-based digital wallet with stored card credentials |
| `APPLEPAY` | Coming Soon | Apple Pay digital wallet |
## Supported Card Networks
| Network | Description |
| ------------ | ----------------------------------------------------------------------- |
| `VISA` | Visa credit and debit cards |
| `MASTERCARD` | Mastercard credit and debit cards |
| `AMEX` | American Express cards. Requires a separate acquiring account with Amex |
Visa and Mastercard are enabled by default. Amex can be enabled if you have an acquiring relationship with American Express.
The networks enabled for your account are returned in `allowed_card_networks` in the metadata response.
## Polling for Payment Status
After the customer returns from the gateway, poll for the final payment status. The process is the same as for A2A payments — see [Single Payments](/docs/debit/guides/single-payments) for the full polling guide.
```http
GET /payments/v1/quick-payments/{quick_payment_id} HTTP/1.1
Host: sandbox.debit.blinkpay.co.nz
Authorization: Bearer {access_token}
```
**Card payment response example:**
```json
{
"quick_payment_id": "a1b2c3d4-e5f6-7890-abcd-ef1234567890",
"consent": {
"status": "Consumed",
"card_network": "VISA",
"payments": [
{
"status": "AcceptedSettlementCompleted",
"accepted_reason": "card_network_accepted",
"detail": {
"consent_id": "a1b2c3d4-e5f6-7890-abcd-ef1234567890",
"amount": {
"currency": "NZD",
"total": "49.99"
}
}
}
]
}
}
```
(Other fields are omitted for brevity.) The payment's amount is in `payments[].detail.amount`; on a surcharged payment it also carries `surcharge` and `total_charge` (see [Surcharging](/docs/debit/guides/surcharging)).
A card quick payment has usually finished by the time the customer returns, so the first `GET` normally shows the outcome. If it doesn't, poll every second until the consent is terminal and the payment is `AcceptedSettlementCompleted` or `Rejected`, within your [polling window](/docs/debit/concepts/payment-lifecycle#polling). `AcceptedSettlementCompleted` is the only status that means the payment succeeded. If the customer declines, the consent is rejected and `consent.payments` contains a single payment record with `status: Rejected`, the same as for A2A quick payments.
On a card payment, `AcceptedSettlementCompleted` with `accepted_reason: card_network_accepted` means the card processor has accepted the charge. It does not mean the funds are in your bank account: your acquirer settles card funds to you on its own schedule.
A card quick payment still pending 24 hours after authorisation is cancelled and marked `Rejected`; the customer's hold is released, though their bank can take a few days to show it.
### Deadlines for Uncaptured Card Payments
| Payment | Deadline | Result |
| ---------------------------------------- | ------------------------------- | ------------------------------------------- |
| Single consent (reservation, two steps) | 5 days without a payment | Reservation released, consent `Revoked` |
| Quick payment (charge never captured) | 24 hours after authorisation | Authorisation cancelled, payment `Rejected` |
Every timer on both products is listed in [Timeouts and Deadlines](/docs/shared/bank-coverage#timeouts-and-deadlines).
### Chargebacks
Unlike bank payments, card payments can be charged back by the customer's card issuer. The BlinkPay API has no chargeback endpoint or status, so a chargeback does not change the payment shown by the API.
## Identifying Card Payments in Responses
Two response fields distinguish card payments from bank A2A payments:
| Field | Location | Card Payment Value |
| ----------------- | ---------------------------- | --------------------------------------------------------------------------------------- |
| `card_network` | `consent` object | One of the network values above, such as `VISA` or `MASTERCARD`. Null for bank payments |
| `accepted_reason` | `consent.payments[]` entries | `card_network_accepted` for card payments. `source_bank_payment_sent` for bank payments |
```javascript
// Example: checking payment type
if (response.consent.payments[0].accepted_reason === 'card_network_accepted') {
const network = response.consent.card_network; // e.g. "VISA" or "MASTERCARD"
console.log(`Card payment received via ${network}`);
} else {
console.log('Bank payment received');
}
```
## Refunds
Refund a card payment with `POST /payments/v1/refunds`, using a `full_refund` or `partial_refund` (an `account_number` refund is for bank payments only). Card refunds must be made within 60 days of the payment completing. Request bodies, statuses, polling, idempotency and the full list of refund errors are in the [Refunds guide](/docs/debit/guides/refunds). You do not choose how a card refund is done — BlinkPay checks with the card processor and picks:
| Request | Payment state | What the customer sees |
| ------- | ------------- | ---------------------- |
| `full_refund` | The charge has not gone out yet | No charge at all — it is cancelled |
| `full_refund` | The charge has gone out | The original charge, then a refund |
| `partial_refund` | Either | The original charge, then a refund |
If the charge has not gone out yet, cancelling it is cleaner for everyone: the money never leaves your account and nothing appears on your customer's statement. Their bank may still show a pending amount until it releases the reservation on its own. Once the charge has gone out — or when you are returning only part of a payment — the money has already moved, so it comes back as a separate refund that usually reaches your customer within a few business days.
You cannot choose the first, or rely on getting it. Whether the charge has gone out is read from the card processor at the moment you ask, and if that cannot be established BlinkPay sends a refund, which is always valid. So there are only two things you ever need to tell a customer: either they will never see the charge, or they will see it followed by a refund a few business days later.
### Refunding a payment that is still going through
A payment you have created but whose charge has not completed yet has nothing to send back, and a refund against it returns `BP053`. Keep polling it: once it reaches `AcceptedSettlementCompleted` the money has been taken and you can refund it normally. Do not create the payment again — the consent has already been used, and a second attempt returns `BP002`. If it stays pending, contact [support@blinkpay.co.nz](mailto:support@blinkpay.co.nz).
### After a partial refund
Once a payment has been partly refunded, a `full_refund` against it is refused with `BP039`, because it would claim more than the balance left. Send the remainder as another `partial_refund` instead. A payment with any refund against it is never cancelled outright either, because cancelling is all-or-nothing and cannot return just the remainder.
Refunds must be enabled for your merchant account, and card refunds are granted separately from bank refunds — contact [support@blinkpay.co.nz](mailto:support@blinkpay.co.nz) if you receive `BP047` or `BP049`.
## Onboarding
Card payments are typically configured during your initial BlinkPay onboarding. You need your own acquirer (i.e. a merchant facility with your bank) to use card payments — BlinkPay requires your acquirer merchant ID, Merchant Category Code (MCC), and acquirer bank name to complete the setup.
If card payments were not set up during your initial onboarding, contact [support@blinkpay.co.nz](mailto:support@blinkpay.co.nz) and the team will guide you through the process. Once configured, verify enablement by calling `GET /payments/v1/meta` and confirming that the `Card` entry appears.
## Error Codes and Troubleshooting
Card-specific error codes, such as `BP020` and `BP050`–`BP054`, are listed in the [Error Codes Reference](/docs/debit/error-codes). For general troubleshooting, see the [Troubleshooting Guide](/docs/shared/help/troubleshooting).
## Testing
**Sandbox Test Card Numbers:**
| Network | Card Number | Expiry | CVV |
| ---------- | --------------------- | ------ | --- |
| Visa | `4000 0000 0000 2503` | Any | Any |
| Mastercard | `5200 0000 0000 2151` | Any | Any |
For full card payment test scenarios, see the [Testing Guide](/docs/debit/testing).
## Next Steps
- [Gateway Flow](/docs/shared/flows/gateway-flow) — Integration details for the Gateway Flow
- [Going Live](/docs/shared/help/going-live) — Production checklist when testing is complete
# Refunds (https://merchants.blinkpay.co.nz/docs/debit/guides/refunds.md)
---
title: Refunds
description: Refund bank and card payments with the Refunds API, check refund status, and retry safely
---
# Refunds
The Refunds API lets you return money for a payment your customer has already made. One endpoint, `POST /payments/v1/refunds`, handles every refund, but what it does depends on how the customer paid. For a card payment, BlinkPay sends the money back through the card network. For a bank (account-to-account) payment, BlinkPay does not move any money: it gives you the account number the customer paid from, and you pay them back yourself.
Refunds must be enabled for your merchant account, and card refunds are enabled separately from bank refunds. If a refund returns `BP047` or `BP049`, contact [support@blinkpay.co.nz](mailto:support@blinkpay.co.nz) to have them enabled.
| Endpoint | Scope | Purpose |
| ---------------------------------------- | --------------- | -------------------------------------------- |
| `POST /payments/v1/refunds` | `create:refund` | Create a refund |
| `GET /payments/v1/refunds/{refund_id}` | `view:refund` | Check a refund's status |
| `GET /payments/v1/payments/{payment_id}` | `view:payment` | See every refund on a payment in `refunds[]` |
## Refund Types by Payment Method
Each refund has a `type`. Which types you can use depends on the payment method:
| Refund type | Bank (account-to-account) payment | Card payment |
| ---------------- | ----------------------------------------------------------------------------------------------------------------------------- | --------------------------------------------------------------------------------------------------------------- |
| `account_number` | Supported. No money moves: the refund is `completed` at once and carries the payer's account number, so you can pay them back | Not supported (`BP013`) |
| `full_refund` | Not supported (`BP048`) | Supported. Returns the whole payment through the card network, or cancels the charge if it has not gone out yet |
| `partial_refund` | Not supported (`BP048`) | Supported. Returns the amount you specify through the card network |
Refunds are not limited by consent type: a payment made under a quick payment, a single consent or an enduring consent can be refunded in the same way. The payment must have reached `AcceptedSettlementCompleted` first; until then a refund returns `BP012`. A refund can never take the total refunded for a payment above the amount charged for it (`BP039`).
Card refunds must be made within **60 days** of the payment completing; after that the API refuses them with `BP045` and you need to contact BlinkPay support. `account_number` refunds have no time limit.
### Surcharged Payments
On a [surcharged](/docs/debit/guides/surcharging) payment the customer was charged `total_charge`, your price plus the surcharge, and you can refund up to that total, surcharge included. On a card payment, a `full_refund` returns the whole of `total_charge` and `partial_refund` amounts can add up to it. On a bank payment you pay the customer back yourself, so a full refund means paying back `total_charge`.
## Creating a Refund
Always send an `idempotency-key` header with a UUID you generate for this refund. See [Idempotency and Retries](#idempotency-and-retries) for why it matters more here than anywhere else.
### Account number refund (bank payments)
The request carries only the payment ID and the type.
```http
POST /payments/v1/refunds HTTP/1.1
Host: sandbox.debit.blinkpay.co.nz
Authorization: Bearer {access_token}
Content-Type: application/json
idempotency-key: 0f8a2c4e-6b1d-4f3a-8e9c-7d5b3a1f2e4c
{
"type": "account_number",
"payment_id": "7c1e4b2a-9d3f-4e8a-b6c5-2f1a0d9e8c7b"
}
```
Asking again for the same payment returns the existing refund rather than a new one.
### Full refund (card payments)
`pcr` is required. It is stored with the refund for your records.
```http
POST /payments/v1/refunds HTTP/1.1
Host: sandbox.debit.blinkpay.co.nz
Authorization: Bearer {access_token}
Content-Type: application/json
idempotency-key: 3b9d1e7f-2a4c-4d8b-9f6e-1c5a7b3d9e2f
{
"type": "full_refund",
"payment_id": "a4f2c8e1-5b7d-4a9c-8e3f-6d1b2c9a7e5f",
"pcr": {
"particulars": "Refund",
"code": "ORDER1234",
"reference": "Returned"
}
}
```
### Partial refund (card payments)
`amount` and `pcr` are both required. The amount uses the same format as payment amounts (a string with one or two decimal places, greater than zero) and its currency must match the payment's.
```http
POST /payments/v1/refunds HTTP/1.1
Host: sandbox.debit.blinkpay.co.nz
Authorization: Bearer {access_token}
Content-Type: application/json
idempotency-key: 8e4a6c2b-1d3f-4b5e-a7c9-2f0d8b6e4a1c
{
"type": "partial_refund",
"payment_id": "a4f2c8e1-5b7d-4a9c-8e3f-6d1b2c9a7e5f",
"amount": {
"currency": "NZD",
"total": "10.00"
},
"pcr": {
"particulars": "Refund",
"code": "ORDER1234",
"reference": "1 item"
}
}
```
**Response** (`201 Created`) for every type:
```json
{
"refund_id": "5e2d8f1c-3b4a-4c6d-9e7f-0a1b2c3d4e5f"
}
```
A `201` means the refund was accepted, not that the money has been returned. Check its status as described below.
## Refund Statuses
| Status | Meaning |
| ------------ | ------------------------------------------------------------------------------------------------------------------------------------------------------------------------------------------------------ |
| `processing` | A card refund has been sent to the card processor and is not yet confirmed. Keep polling. |
| `completed` | For an `account_number` refund: the account number is available and no money has moved. For a card refund: the card processor has accepted the refund, or the charge was cancelled before it went out. |
| `failed` | The card processor refused the refund. No money moved, and the amount is available to refund again with a new idempotency key. |
`completed` and `failed` are terminal. On a card refund, `completed` means the refund has left your side; it usually reaches the customer within a few business days.
## Checking Refund Status
```http
GET /payments/v1/refunds/{refund_id} HTTP/1.1
Host: sandbox.debit.blinkpay.co.nz
Authorization: Bearer {access_token}
```
**Response for an account number refund:**
```json
{
"refund_id": "5e2d8f1c-3b4a-4c6d-9e7f-0a1b2c3d4e5f",
"status": "completed",
"creation_timestamp": "2026-10-07T10:15:00+13:00",
"status_updated_timestamp": "2026-10-07T10:15:00+13:00",
"account_number": "12-3456-7890123-00",
"detail": {
"type": "account_number",
"payment_id": "7c1e4b2a-9d3f-4e8a-b6c5-2f1a0d9e8c7b"
}
}
```
Pay the customer back to `account_number` from your own bank account. The account number is personal information: store it only as long as you need it and keep it out of logs.
For a card refund, `account_number` is `N/A` and `detail` repeats the request, including `amount` for a partial refund. A card refund is usually `completed` within seconds, but a refund can stay `processing` for days, so don't wait on it: initiate it, then check its status later, in the Client Portal or with this endpoint from a daily sweep. The same refunds also appear in the `refunds` array of `GET /payments/v1/payments/{payment_id}`.
## Worked Example: Card Payment, Partial Refund, Poll
1. A customer pays $49.99 by card through a gateway quick payment. `GET /payments/v1/quick-payments/{quick_payment_id}` shows `consent.payments[0].status` as `AcceptedSettlementCompleted` with `payment_id` `a4f2c8e1-5b7d-4a9c-8e3f-6d1b2c9a7e5f`. Store the `payment_id` against the order.
2. The customer returns one item. Generate a new UUID, store it against the return, and send the [partial refund](#partial-refund-card-payments) request above for `10.00` with that UUID as the `idempotency-key`.
3. BlinkPay responds `201` with a `refund_id`. Store it.
4. Call `GET /payments/v1/refunds/{refund_id}` later, for example from a daily sweep. It shows `processing` until the card processor confirms it, then `completed`.
5. If the request in step 2 timed out, send it again with the **same** key. You get the original `refund_id` back and the customer is not refunded twice.
6. To return the remaining $39.99 later, send another `partial_refund` for `39.99` with a new key. A `full_refund` at this point would be refused with `BP039`, because it always claims the whole payment.
For a bank payment the flow is shorter: send an `account_number` refund, read `account_number` from the `completed` refund, and make the payment to the customer yourself.
## Card Refunds: Cancel or Refund
For a card `full_refund`, BlinkPay checks with the card processor and chooses how to return the money. If the charge has not gone out yet and no refund has been attempted on the payment, it is cancelled and the customer sees no charge, although their bank may show a pending amount until it releases it. Otherwise the money comes back as a separate refund after the original charge. A `partial_refund` is always a separate refund. You cannot choose between the two; see [Card Payments](/docs/debit/guides/card-payments#refunds) for what the customer sees.
A cancellation made in your card processor's portal appears as a `completed` `full_refund` on the payment. Other refunds made outside BlinkPay don't appear in the API.
## Idempotency and Retries
Send an `idempotency-key` header (a UUID) with every refund and keep it until you know the outcome.
| Situation | What happens | What to do |
| ------------------------------------------------------------------ | ---------------------------------------------------------------------------------- | ----------------------------------------------------------------- |
| Same key, same body, first request finished | The original `201` and `refund_id` are returned; nothing new is refunded | Use the returned `refund_id` |
| Same key, same body, first request still in progress | `409` `BP711` | Wait a few seconds and retry with the same key |
| Same key, different body | `409` `BP702` | Use a new key for a different refund |
| No response (timeout, network error, `5xx`) | Unknown | Retry with the same key |
| Refund `failed` | The key stays tied to the failed refund; reusing it returns the failed `refund_id` | Retry with a **new** key |
| `409` `BP715` (a card charge settled while it was being cancelled) | Nothing was refunded | Retry with a **new** key; the retry is sent as a refund |
**Without a key**, a retried `partial_refund` refunds the customer twice, up to the amount charged.
A `502` (`BP903` to `BP908`) means the card processor's answer did not arrive, so the refund may or may not have gone through. Check the payment's `refunds[]` before doing anything else, and if you retry, use the same key.
## Errors
A refund that can't be made is refused with a `422` and a `code` saying why: refunds aren't enabled for your account, the refund type doesn't match the payment method, the payment hasn't completed, the amount is more than is left to refund, or a card payment is over 60 days old. Show the reason to your operator and don't retry unchanged. The codes are listed under [Refund Errors](/docs/debit/error-codes#refund-errors).
## Best Practices
Store the `payment_id` against every order when the payment completes, because you need it to refund; you can also find it later from the consent, whose `payments[]` lists every payment with its `payment_id`. Generate the idempotency key when you decide to refund, store it with the refund request, and reuse it for every retry of that refund until you have a `refund_id` and a terminal status. Treat `completed` on an `account_number` refund as the start of your own payment to the customer, not the end of the refund, and keep a record of when you paid them back. Reconcile partial refunds against the running total so you never ask for more than is left.
## Testing
Refunds work in the sandbox the same way as in production, provided refunds are enabled on your sandbox account. Make a payment with the [sandbox test values](/docs/debit/testing#sandbox-test-values), wait for `AcceptedSettlementCompleted`, then refund it. You can also produce the main refusals: refund a payment that has not completed (`BP012`), send `partial_refund` on a bank payment (`BP048`), or refund more than the payment (`BP039`).
## Next Steps
- [Card Payments](/docs/debit/guides/card-payments) - How card charges, cancellations and refunds appear to customers
- [Payment Lifecycle](/docs/debit/concepts/payment-lifecycle) - When a payment is final and can be refunded
# Surcharging (Fee Forwarding) (https://merchants.blinkpay.co.nz/docs/debit/guides/surcharging.md)
---
title: Surcharging (Fee Forwarding)
description: Pass BlinkPay's transaction fee on to your customers for one-off bank and card payments, and read the surcharge in API responses
---
# Surcharging (Fee Forwarding)
Surcharging, also called fee forwarding, passes BlinkPay's transaction fee for a payment on to your customer. The customer pays your price plus the surcharge, and the API reports both. For a bank payment the surcharge is BlinkPay's transaction fee for that payment, inclusive of GST. For a card payment it is BlinkPay's fee plus your card acquirer's fee.
This guide covers one-off payments: quick payments and single consents, paid by bank or by card. Surcharging on AutoPay (enduring consents and fixed recurring payments) works differently and is described in [Recurring Payments](/docs/debit/guides/recurring-payments#surcharging).
## Enabling Surcharging
Surcharging is not self-service. BlinkPay enables it for your merchant account on request; contact [support@blinkpay.co.nz](mailto:support@blinkpay.co.nz). Bank surcharging and card surcharging on one-off payments are enabled separately, and neither enables surcharging on AutoPay. Once enabled, one-off payments of that kind are surcharged: you do not opt in per payment, and you never send the surcharge yourself.
| Payment | How the surcharge is set |
| ------------------------------------ | --------------------------------------------------------------------------- |
| One-off bank payment | Set by BlinkPay from your fee plan: a percentage of the amount, a fixed amount, or both |
| One-off card payment | Set by BlinkPay: a fixed fee, plus your card acquirer's percentage fee |
| AutoPay (enduring consents and FRPs) | See [Recurring Payments](/docs/debit/guides/recurring-payments#surcharging) |
## How the Surcharge Appears
You create the consent or quick payment exactly as before, with `amount.total` set to your price. When surcharging applies, BlinkPay adds two read-only fields to the amount:
| Field | Meaning |
| -------------- | ------------------------------------------------------------------------------------------------- |
| `total` | Your price, as you sent it. It never changes. |
| `surcharge` | The surcharge for this payment. |
| `total_charge` | `total` plus `surcharge`: the amount the customer's bank is asked to pay, and the amount debited. |
Don't send `surcharge` or `total_charge` in a request; a request that includes them is rejected with `400`.
A bank surcharge that works out at zero is returned as `"0.00"`. On a card payment, treat a missing `surcharge` as zero.
## When the Surcharge Is Known
**Gateway flow.** Until the customer chooses how to pay, the consent is `GatewayAwaitingSubmission` and `detail.amount` carries only `total`. The gateway shows the customer the surcharge and total for the method they choose on its payment review screen, before they pay, so you don't need to display it yourself. Once the customer has chosen, `surcharge` and `total_charge` appear on the consent's `detail.amount`:
```json
"amount": {
"total": "100.00",
"surcharge": "0.68",
"total_charge": "100.68",
"currency": "NZD"
}
```
**Redirect and decoupled flows.** The payment method is known when you create the consent, so `surcharge` and `total_charge` are calculated at once. The create response carries only IDs, so if you want to show the customer the surcharge before they go to their bank, read it with a `GET` straight after creating the consent:
- For a single consent, `GET /payments/v1/single-consents/{consent_id}` can be called at any time.
- For a quick payment, call `GET /payments/v1/quick-payments/{quick_payment_id}` **before** you send the customer to their bank.
Either way, the customer's bank asks them to authorise `total_charge`, so that is the amount they see at their bank.
## Payment Limits
Payment limits apply to the amount including the surcharge. If `total_charge` is over your merchant account's payment limit, the payment is refused with `400` `BP277`; contact support if you need the limit raised. In the redirect and decoupled flows this is checked when you create the consent or quick payment, so the create request fails. In the gateway flow it is checked when the customer chooses a payment method, so the customer sees the error in the gateway. Bank limits also apply to the surcharge-inclusive amount (`BP229`); see [Payment Limits](/docs/shared/bank-coverage#payment-limits). A price just under a limit can therefore be refused once surcharging is enabled.
## Reconciliation
Reconcile what the customer paid against `total_charge`, which is the amount debited from them, and your order value against `total`. On a surcharged payment the customer's bank statement shows `total_charge`, not your price. If you show the customer a receipt or invoice, list the surcharge as a separate line so the two amounts agree.
## Refunds
A refund can include the surcharge. See [Surcharged Payments](/docs/debit/guides/refunds#surcharged-payments) on the Refunds page for how much you can refund.
## Troubleshooting
For general troubleshooting, see the [Troubleshooting Guide](/docs/shared/help/troubleshooting). Quick checks:
- No `surcharge` in responses: surcharging is not enabled for that payment method on your account (or, for a card payment, the fee was zero).
- `400` on create: remove `surcharge` and `total_charge` from your request.
- `BP277`: the surcharge-inclusive amount is over your account's payment limit.
## Best Practices
Show the surcharge to the customer before they commit to paying: the gateway does this for you, and in the redirect and decoupled flows read it from the consent before redirecting. Store both `total` and `total_charge` against the order so finance can reconcile either figure. Describe the charge in words your customers recognise, such as "payment processing fee".
## Testing
Surcharging can be enabled on your sandbox account as well; ask support. Then create a consent with the [sandbox test values](/docs/debit/testing#sandbox-test-values) and check `amount.surcharge` and `amount.total_charge` in the `GET` response (in the gateway flow, after the customer has chosen how to pay).
## Next Steps
- [Single Payments](/docs/debit/guides/single-payments) - Create the quick payments and single consents that carry the surcharge
- [Recurring Payments](/docs/debit/guides/recurring-payments#surcharging) - Surcharging on AutoPay
# WooCommerce (https://merchants.blinkpay.co.nz/docs/debit/guides/woocommerce.md)
---
title: WooCommerce
description: Accept Blink PayNow payments in a WooCommerce store with the BlinkPay NZ for WooCommerce plugin
---
# WooCommerce
The **BlinkPay NZ for WooCommerce** plugin adds Blink PayNow to a WooCommerce checkout without any custom API work. At checkout the customer is sent to the BlinkPay-hosted [Gateway](/docs/shared/flows/gateway-flow), chooses their bank (or card, when [card payments](/docs/debit/guides/card-payments) are enabled for your merchant account), authorises the payment and returns to your store. The plugin then confirms the outcome through the API and updates the order.
The plugin is free and open source. It is listed in the [WordPress.org plugin directory](https://wordpress.org/plugins/blinkpay-nz-for-woocommerce/), and its source code and releases are on [GitHub](https://github.com/BlinkPay/Blink-Payments-API-WooCommerce).
## When to Use
Use the plugin if your store runs on WooCommerce and you want one-off payments at checkout. It uses [Quick Payments](/docs/debit/guides/single-payments) with the Gateway flow and does not support recurring payments (Blink AutoPay). If you need recurring payments or a custom checkout, integrate with the API directly using the [Quick Start](/docs/debit/quick-start) or one of the [SDKs](/docs/debit/sdks/overview).
## Requirements
| Requirement | Version or setting |
| --------------- | --------------------------------------------------------- |
| WordPress | 6.0 or later, with WP-Cron enabled |
| WooCommerce | 7.0 or later (classic and block-based checkout supported) |
| PHP | 7.4 or later |
| Store currency | NZD |
| BlinkPay access | A client ID and client secret for each environment |
Sandbox and production credentials are separate. Your client ID is shown in this portal under **Settings > API Settings** (open the environment's row). The portal never displays an existing client secret: select **Rotate Secret** to generate a new one, which is shown only once, in the confirmation dialog, so store it somewhere safe. Rotating replaces the previous secret immediately, so update any store already using it at the same time.
## Installation and Setup
1. In WordPress admin, go to **Plugins > Add New**, search for "BlinkPay NZ for WooCommerce", then install and activate it.
2. Go to **WooCommerce > Settings > Payments > BlinkPay**.
3. Enter your sandbox **Client ID** and **Client secret**, leave **Sandbox mode** ticked, and enable the gateway.
4. Copy the **Callback URL** shown on the settings screen.
5. In this portal, go to **Settings > API Settings**, open the **Sandbox** row and add the callback URL under **Whitelisted Redirect URLs**. Payments cannot be created until the URL is whitelisted.
6. Place a test order to confirm everything works.
**Keep the client secret out of the database**
Instead of saving credentials on the settings screen, you can define them in `wp-config.php`. Constants take precedence over saved settings.
```php
define( 'BLINKPAY_CLIENT_ID', 'your-client-id' );
define( 'BLINKPAY_CLIENT_SECRET', 'your-client-secret' );
```
## Settings
| Setting | Purpose |
| -------------------------- | ------------------------------------------------------------------------------------------------------------------------ |
| Enable/Disable | Shows or hides BlinkPay at checkout |
| Title | Payment method name shown at checkout (default "Checkout with BlinkPay") |
| Description | Payment method description shown at checkout |
| Sandbox mode | Uses the sandbox environment. Untick it only when you've entered production credentials |
| Client ID / Client secret | Your credentials for the selected environment |
| Callback URL | Read-only. The URL to whitelist under **Settings > API Settings** for each environment |
| Bank statement particulars | Shown on the customer's bank statement, up to 12 characters (default "Order"). The order number is sent as the reference |
| Debug logging | Logs API activity to **WooCommerce > Status > Logs** (source `blinkpay`). Credentials and tokens are never logged |
## How Orders Are Updated
The plugin never treats the customer's return to your store as proof of payment. When the customer returns, it checks the payment status through the API, and the result sets the order status.
| Payment outcome | WooCommerce order status |
| --------------------------------------- | ---------------------------------------- |
| Payment settled | Processing or Completed |
| Consent or payment rejected | Failed |
| Payment still being processed | On hold |
| Settled amount differs from order total | On hold, with a note naming both amounts |
Bank settlement is asynchronous, so a payment made in the evening may not settle until the next morning. For orders on hold, WP-Cron keeps checking the payment. It checks every minute at first and backs off to every two hours, for up to 36 hours, and completes the order automatically once the payment settles. While those checks are still running, WooCommerce's unpaid-order cancellation won't cancel the order.
If [surcharging (fee forwarding)](/docs/debit/guides/surcharging) is enabled for your merchant account, BlinkPay adds the surcharge on the hosted gateway, where the customer sees and authorises the combined amount. The plugin records the amount actually charged and the surcharge on the order, with a note to help you reconcile it.
## Refunds
Use **Refund via BlinkPay** on the order screen. How the refund works depends on how the customer paid:
| Paid by | What the refund does |
| ------- | -------------------------------------------------------------------------------------------------------------------------------------------------------------------------------- |
| Card | BlinkPay refunds the customer through the card network, in full or in part. |
| Bank | No money moves automatically. The **BlinkPay manual refunds** panel on the order shows the account number the customer paid from, so you can send the refund from your own bank. |
For bank payments, the account number is fetched from the BlinkPay API each time the panel loads and is never stored in WordPress. It is also shown on the payment's details page in this portal. The customer gets an order note saying the refund will arrive by bank transfer.
WooCommerce's **Refund manually** button is hidden for BlinkPay orders so that a refund can't be recorded without going through BlinkPay. The refund button appears only when your API credentials have refund permissions.
## Going Live
When sandbox testing is complete, replace the credentials with your production client ID and secret and untick **Sandbox mode**. Then whitelist the same callback URL for the **production** environment under **Settings > API Settings**, because each environment has its own whitelist. See [Going Live](/docs/shared/help/going-live) for the full production checklist.
## Troubleshooting
For general issues, see the [Troubleshooting Guide](/docs/shared/help/troubleshooting). Quick checks specific to the plugin:
- **BlinkPay doesn't appear at checkout** — check that the store currency is NZD and that both credentials are set.
- **Every payment fails with "We could not start your BlinkPay payment"** — the callback URL probably isn't whitelisted for the environment you're using. The notes on the failed order show the exact error.
- **Orders stay on hold** — this is expected until the payment settles. If your host disables WP-Cron, run `wp-cron.php` from a real cron job. If the order is still on hold after 36 hours, check the payment in this portal and update the order manually.
- **Need more detail** — enable **Debug logging** and read **WooCommerce > Status > Logs** (source `blinkpay`).
## For Developers
The plugin provides two filters:
- `wc_blinkpay_quick_payment_payload` changes the quick payment request body.
- `wc_blinkpay_icon` changes the checkout logo URL.
The payment ID is set as the order's transaction ID, and the quick payment ID is stored in the `_blinkpay_quick_payment_id` order meta, so you can match orders to payments in this portal. The customer identifier sent to BlinkPay is a SHA-256 hash of the WooCommerce customer ID, or of the billing email for guest orders.
## Testing
In sandbox mode, choose the PNZ test bank at the gateway and use the credentials from the [Testing Guide](/docs/debit/testing). Sandbox payments never move real money.
# Testing Guide (https://merchants.blinkpay.co.nz/docs/debit/testing.md)
---
title: Testing Guide
description: Sandbox testing and test scenarios for BlinkPay integration
---
# Testing Guide
Testing your integration in the sandbox environment is essential before going live with BlinkPay.
## Sandbox Environment
**Sandbox URL:** `https://sandbox.debit.blinkpay.co.nz`
The sandbox environment provides:
- Full API functionality with mock bank (PNZ)
- Simulated payment flows that settle within seconds
- All consent flows supported (Gateway, Redirect, Decoupled)
**Limitations:**
- Mock data only (not real customer data)
- Only PNZ mock bank available
- Some bank-specific behaviours simplified
### Getting Sandbox Credentials
Sandbox credentials are provisioned when you sign up at [merchants.blinkpay.co.nz](https://merchants.blinkpay.co.nz/). If **Settings > API Settings** shows no sandbox key, select **Request Sandbox API Key** there. See [Getting API Credentials](/docs/shared/authentication#getting-api-credentials).
## Try the Gateway Experience
To see the Gateway flow in action before building your integration, visit our demo site:
**ACME Demo Site:** [https://acme-sandbox.blinkpay.co.nz](https://acme-sandbox.blinkpay.co.nz)
This demonstrates the full Gateway payment experience from a customer's perspective.
## Sandbox Test Values
The sandbox has one test bank, PNZ: Payments NZ's API Centre test bank, shown as the **PNZ** tile in the Gateway. Use these values for every flow:
| Item | Value |
| --- | --- |
| Test bank | **PNZ** (the Gateway tile is labelled PNZ) |
| Redirect or Gateway login | Username `user01`, password `password` |
| Decoupled, auto-approve | Mobile number `+64-259531933`. In the Gateway, choose **Send to PNZ app**. The consent is approved automatically. |
| Decoupled, any other number | Accepted, but the consent never authorises: it stays `AwaitingAuthorisation` until the bank's authorisation window ends, then becomes `Rejected` (timeout). Other numbers do not simulate a decline. |
| Decline | On the PNZ login page, choose **Cancel** before logging in. The consent becomes `Rejected`; for a quick payment it carries one `Rejected` payment. |
**Automated Testing**
The auto-approve number needs no customer interaction, which makes it the easiest way to drive consents to `Authorised` in automated tests.
## Producing Sandbox Errors
The sandbox can produce these outcomes, so test your handling of each:
| Outcome | How to produce it |
| --- | --- |
| `GatewayTimeout` | Create a gateway consent, follow the redirect, but don't select a bank. Wait out the 15-minute Gateway session cutoff. |
| `Rejected` (declined) | On the PNZ login page, choose **Cancel** before logging in. |
| `Rejected` (timed out) | Leave the PNZ authorisation incomplete until the bank's window elapses, or start a decoupled consent with any number other than the auto-approve number. |
| `Revoked` | Authorise a consent, then call its DELETE endpoint, for example `DELETE /payments/v1/single-consents/{consent_id}`. |
| Payment on a revoked consent | Revoke an authorised consent, then call `POST /payments/v1/payments`: 422 `BP015`. |
| Enduring limit breached | Request a payment above the consent's `maximum_amount_payment` (400 `BP263`), or a single payment above its `maximum_amount_period` (400 `BP262`). |
| Payment already in progress | Create a second payment on a consent while the first is still being processed: 409 `BP703`. |
| Idempotency conflicts | Reuse an `idempotency-key` with a different request body, or resend a request while the first is still in flight. See [Error Codes](/docs/debit/error-codes). |
### Outcomes You Cannot Trigger
Bank-side rejections after authorisation, bank downtime, Fixed Recurring Payment failures, revocation at the bank and consent expiry can't be triggered in the sandbox. Build that handling from the documented statuses and [error codes](/docs/debit/error-codes), and finish with a single low-value live payment in production.
## Test Scenarios
The primary integration path is the **Gateway flow**, which hosts the bank selection and handles the redirect or decoupled sub-flow automatically.
### Gateway Flow (Recommended)
**Objective:** Verify end-to-end payment using Gateway
**Steps:**
1. Create single consent with `flow.type: 'gateway'`
2. Redirect user to `consent.redirect_uri`
3. In Gateway: Select PNZ bank → Choose **Internet banking website** (redirect) or **Send to PNZ app** (decoupled)
4. For redirect: Login as `user01` with password `password` → Approve
5. For decoupled: Use mobile number `+64-259531933` → Auto-approves
6. Handle the return to your redirect_uri: read the `cid` (consent ID) and `status` query parameters. No `status` means the outcome was not reported as failed, not that it succeeded: confirm it with a server-side GET. See [Return Parameters](/docs/shared/flows/redirect-flow#return-parameters)
7. Confirm with `GET /payments/v1/single-consents/{cid}` that the consent status is `Authorised`
8. Create payment using the `consent_id`
9. Verify payment status is `AcceptedSettlementCompleted`
**Expected Results:**
- Consent status: `Authorised`
- Payment status: `AcceptedSettlementCompleted`
- Redirect back to your application
### Quick Payment
**Objective:** Test simplified single-step payment
**Steps:**
1. Create quick payment via `POST /payments/v1/quick-payments` and store the `quick_payment_id`
2. Redirect to Gateway and complete authorisation at PNZ bank
3. As soon as the customer returns, call `GET /payments/v1/quick-payments/{quick_payment_id}`; the gateway normally does this for you, and calling it again is safe. For a bank payment this call completes the payment. If it returns a 4xx or 5xx, retry the GET.
4. Keep polling the same endpoint until the consent is `Consumed` and its single payment is `AcceptedSettlementCompleted`
### Enduring Consent (AutoPay)
**Objective:** Test recurring payment setup
**Steps:**
1. Create enduring consent via `POST /enduring-consents` with `maximum_amount_period`, `maximum_amount_payment`, and `period`
2. Complete authorisation via Gateway
3. Create first payment with an amount within limits
4. Verify consent remains `Authorised` (not `Consumed`)
5. Create subsequent payments - consent should allow reuse within limits
### Card Payment (Gateway)
**Objective:** Verify card payment flow via Gateway
**Steps:**
1. Call `GET /payments/v1/meta` and confirm the response contains a `Card` entry
2. Create a one-off payment (quick payment or single consent) with `flow.detail.type: "gateway"`
3. Follow the redirect to the sandbox gateway
4. Select the card payment option
5. Enter one of the test cards below
6. Handle callback at your `redirect_uri`
7. Poll for payment status — verify `AcceptedSettlementCompleted`
8. Confirm `card_network` field is present in the response (e.g. `VISA`)
**Sandbox Test Card Numbers:**
| Network | Card Number | Expiry | CVV |
| --- | --- | --- | --- |
| Visa | `4000 0000 0000 2503` | Any | Any |
| Mastercard | `5200 0000 0000 2151` | Any | Any |
**Expected Results:**
- Consent status: `Consumed`
- Payment status: `AcceptedSettlementCompleted`
- `accepted_reason`: `card_network_accepted`
- `card_network`: `VISA` or `MASTERCARD`
### Error Handling
Test these scenarios to ensure your integration handles errors gracefully:
**Timeout:** Create a consent and redirect to the Gateway. If you don't select a bank, the consent becomes `GatewayTimeout` once the 15-minute Gateway session cutoff elapses. If you select PNZ but never complete authorisation, it becomes `Rejected` once that bank's authorisation window elapses. See [Authorisation timeouts](/docs/debit/concepts/consent-lifecycle#authorisation-timeouts).
**Rejection:** On the PNZ login page, choose **Cancel** before logging in. The consent status becomes `Rejected` and you'll receive this in your redirect callback. For quick payments, the consent's `payments[]` array will contain a single payment record with status `Rejected`.
**Revocation:** Authorise a consent (the auto-approve number is quickest), then call `DELETE /payments/v1/single-consents/{consent_id}` before creating a payment. The consent becomes `Revoked`, and a subsequent `POST /payments/v1/payments` fails with 422 `BP015`.
## Next Steps
- **[Going Live](/docs/shared/help/going-live)** - Production checklist when testing is complete
# SDKs & Client Libraries (https://merchants.blinkpay.co.nz/docs/debit/sdks/overview.md)
---
title: SDKs & Client Libraries
description: Production-ready SDKs for Java, Node.js, .NET and PHP
---
# SDKs & Client Libraries
BlinkPay provides official SDKs for multiple languages and platforms. All SDKs are open source and actively maintained.
## Available SDKs
| SDK | Repository |
| ----------- | -------------------------------------------------------------------------------------------------------------------- |
| **Java** | [github.com/BlinkPay/Blink-Payments-API-Client-Java](https://github.com/BlinkPay/Blink-Payments-API-Client-Java) |
| **Node.js** | [github.com/BlinkPay/Blink-Payments-API-Client-Node](https://github.com/BlinkPay/Blink-Payments-API-Client-Node) |
| **.NET** | [github.com/BlinkPay/Blink-Payments-API-Client-DotNet](https://github.com/BlinkPay/Blink-Payments-API-Client-DotNet) |
| **PHP** | [github.com/BlinkPay/Blink-Payments-API-Client-PHP](https://github.com/BlinkPay/Blink-Payments-API-Client-PHP) |
Installation instructions and package names are available in each repository.
## E-commerce Plugins
If your store runs on WooCommerce, the [BlinkPay NZ for WooCommerce](/docs/debit/guides/woocommerce) plugin adds Blink PayNow to your checkout without any API integration work.
There are no plugins for other platforms, such as Shopify; use the [gateway flow](/docs/shared/flows/gateway-flow), or an SDK on your server.
## Reference Implementations
### Snipcart Demo
**Repository:** [github.com/BlinkPay/BlinkPay-Snipcart-Demo](https://github.com/BlinkPay/BlinkPay-Snipcart-Demo)
An Astro shop that takes Blink PayNow at a Snipcart checkout through Snipcart's custom payment gateway. Netlify Functions on the server hold the client credentials and use the Node.js SDK to create a quick payment through the gateway flow, then check its outcome when the customer returns. It is a reference implementation, not a supported plugin.
### Flutter Demo
**Reference Implementation Only**
The Flutter Demo is a reference implementation for mobile integration, not a supported SDK package.
**Repository:** [github.com/BlinkPay/BlinkPay-Flutter-Demo](https://github.com/BlinkPay/BlinkPay-Flutter-Demo)
The demo is a reference for mobile integration in any framework. It uses the Gateway flow with single and enduring consents (not quick payments), and a small backend proxy (Dart Shelf, in `server/`) that holds the client credentials and obtains access tokens, so no secret is ever in the app. The app opens the Gateway with `flutter_custom_tabs` (Chrome Custom Tabs on Android, SFSafariViewController on iOS) and receives the customer back through the custom-scheme return link `blinkpaydemo://callback`, handled with `app_links`. It runs on iOS and Android; see the [deep linking setup](https://github.com/BlinkPay/BlinkPay-Flutter-Demo#deep-linking-setup) in its README.
Some shortcuts in the demo are not for production: the app sets the amount and payment reference (your backend must), the app and backend share a fixed demo key rather than your own user authentication, and the consent ID is held only in memory rather than stored on your server. See [Mobile Integration](/docs/shared/flows/mobile-integration#reference-implementation).
# Security & Compliance (https://merchants.blinkpay.co.nz/docs/shared/security.md)
---
title: Security & Compliance
description: Learn about BlinkPay's security measures, certifications, and data protection practices
---
# Security & Compliance
Security is at the core of BlinkPay's design. We maintain bank-grade security standards to protect your business and your customers' financial data.
## ISO 27001:2022 Certification
BlinkPay is certified to ISO 27001:2022, the international standard for information security management systems. This certification demonstrates our commitment to:
- Systematic security management
- Regular risk assessments and audits
- Incident response and management
- Continuous improvement processes
## No Screen Scraping
Unlike some financial service providers, BlinkPay never uses screen scraping:
**Screen Scraping Risks**
Screen scraping requires storing customer banking credentials and mimicking user actions. This approach:
- Exposes credentials to third parties
- Creates security vulnerabilities
- Breaks when banks update their interfaces
- Violates many bank terms of service
**BlinkPay's Approach**
- Direct integration with official bank APIs
- No credential storage required
- Bank-to-bank secure communication
- Compliant with bank security requirements
## Encrypted Data
All data is encrypted both in transit and at rest:
- **In Transit**: All communications use HTTPS/TLS encryption
- **At Rest**: Stored data is encrypted using industry-standard encryption
## Two-Way Authentication
All BlinkPay integrations use two-way authentication:
**BlinkPay ↔ Your Application:**
- OAuth 2.0 tokens for API access
- HTTPS with certificate validation
**BlinkPay ↔ Banks:**
- Mutual TLS authentication
- Certificate-based authentication
**Customer ↔ Bank:**
- Customers authenticate directly with their bank using their existing banking credentials
- BlinkPay never sees or stores banking credentials
## Consent Management
All access requires explicit customer consent:
- **Clear Purpose**: Customers see exactly what they're authorising
- **Scope Limitation**: Access limited to authorised accounts and actions
- **Revocable**: Customers can revoke consent at any time through their bank or your application
## Data Handling
BlinkPay operates as an integration layer between your application and banks:
**No Customer Data Storage**
BlinkPay does not hold any Customer Personally Identifiable Information for first-party use. We hold information solely on behalf of merchants and banks as part of the payment integration process.
## Testing & Security
**Prior Permission Required**
Prior permission must be obtained before conducting penetration tests or load tests. This applies to any environment hosted by BlinkPay.
# Bank Coverage (https://merchants.blinkpay.co.nz/docs/shared/bank-coverage.md)
---
title: Bank Coverage
description: Detailed coverage of supported banks, authentication flows, and bank-specific features
---
# Bank Coverage
BlinkPay connects to all major New Zealand banks, providing comprehensive coverage for retail and personal banking accounts.
## Supported Banks
Both products connect to the same six production banks. Blink Data can read accounts, balances, transactions and party details at every bank, but statements only at some:
| Bank | `bank` value | Blink Payments | Blink Data | Blink Data statements |
| ----------------------------- | ------------ | -------------- | ---------- | --------------------- |
| **ANZ New Zealand** | `ANZ` | ✓ | ✓ | ✓ |
| **ASB Bank** | `ASB` | ✓ | ✓ | ✓ |
| **Bank of New Zealand (BNZ)** | `BNZ` | ✓ | ✓ | ✓ |
| **Kiwibank** | `Kiwibank` | ✓ | ✓ | ✗ |
| **NZHL** | `NZHL` | ✓ | ✓ | ✗ |
| **Westpac New Zealand** | `Westpac` | ✓ | ✓ | ✓ |
The `bank` value is case-sensitive. In the sandbox, test with PNZ, BlinkPay's test bank, which supports every flow and, for Blink Data, every data type including statements. Which banks you can use is set for your organisation: on Blink Data, a `bank` value the API doesn't recognise returns 400 `BDT243`, and a bank your organisation isn't set up for returns 400 `BDT213`.
Each bank supports different authentication flows and features. Understanding these differences helps you provide the best experience for your customers.
## Authentication Flow Support
Different banks support different authentication flows. Here's what's available:
### Redirect Flow Support
| Redirect Method | ASB | BNZ | Westpac | ANZ | Kiwibank | NZHL |
| ------------------------------- | --------- | -------------- | -------- | --------- | -------- | -------- |
| **Browser Redirect (Web)** | ✓ QR code | ✓ Direct (2FA) | ✓ Direct | ✓ QR code | ✓ Direct | ✓ Direct |
| **Deep Link to Bank App (Mobile)** | ✓ | ✗ | ✓ | ✓ | ✗ | ✗ |
**Notes:**
- **ASB/ANZ Web:** Browser displays QR code. Customer scans with their banking app to approve.
- **BNZ:** Browser-based authentication only with 2FA required.
- **Deep Link to Bank App:** on a phone, the redirect deep links into the customer's banking app instead of opening the bank's website (ANZ needs a current version of goMoney). This is not the same as returning the customer to your app afterwards; see [Mobile App Deep Linking](#mobile-app-deep-linking).
### Decoupled Flow Support
| Identifier Type | ASB | BNZ | Westpac | ANZ | Kiwibank | NZHL |
| ----------------------------------------------- | --- | --- | ------- | --- | -------- | ---- |
| **Mobile Number** (`mobile_number`) | ✓ | ✓ | ✗ | ✓ | ✓ | ✓ |
| **Email** (`email`) | ✗ | ✓ | ✗ | ✗ | ✗ | ✗ |
| **Access Number** (`banking_username`) | ✗ | ✗ | ✓ | ✗ | ✗ | ✗ |
| **Consent ID** (`consent_id`, repeat customer) | ✓ | ✓ | ✓ | ✓ | ✓ | ✓ |
An identifier the bank doesn't recognise is not reported as an error: the consent is created and times out. ASB, BNZ and Westpac send a push notification for a decoupled request; ANZ sends a goMoney notification on iOS, and on Android the customer opens goMoney to find the request; Kiwibank customers open their app to find the request. See [Decoupled Flow Identifiers](#decoupled-flow-identifiers) for how to use each identifier.
### Gateway Flow
All banks support Gateway Flow on both products, and it is recommended for most integrations.
**Recommended: Gateway Flow**
The Gateway Flow is recommended for most integrations as it automatically selects the best available flow for each bank and handles all authentication complexity.
## Bank-Specific Features
### ANZ New Zealand
**Redirect Flow:**
- **Mobile:** Opens the ANZ goMoney app (the customer needs a current version)
- **Web/Desktop:** Redirects to ANZ web page displaying QR code. Customer scans with their ANZ app to approve.
**Decoupled Flow:**
- Mobile number or previous consent ID as the identifier
- Customer authorises on their mobile device
- goMoney notification on iOS; on Android, customers open goMoney to approve
**Payment Limits (Blink Payments only):** see [Payment Limits](#payment-limits). ANZ caps each payment rather than a daily total, and requires [Voice ID](https://www.anz.co.nz/banking-with-anz/ways-to-bank/guides/voice-id-phone-banking/) over $10,000.
**Blink Data:** accounts, balances, transactions, statements and party details.
**Session Timeout:**
- Set per bank and per flow - see [Timeouts and Deadlines](#timeouts-and-deadlines)
### ASB Bank
**Redirect Flow:**
- **Mobile:** Opens the ASB app
- **Web/Desktop:** Browser displays QR code. Customer scans with their ASB app to approve.
- Supports FastNet Classic and FastNet login
- Biometric authentication where enabled
**Decoupled Flow:**
- Mobile number or previous consent ID as the identifier
- Customer authorises on their mobile device
- Push notifications supported
**Payment Limits (Blink Payments only):** see [Payment Limits](#payment-limits).
**Blink Data:** accounts, balances, transactions, statements and party details.
**Session Timeout:**
- Set per bank and per flow - see [Timeouts and Deadlines](#timeouts-and-deadlines)
**Special Features:**
- Supports both FastNet Classic and new FastNet
- Wide range of account types supported
### Bank of New Zealand (BNZ)
**Redirect Flow:**
- Opens BNZ website for authorisation (browser-based only)
- 2FA required for authorisation
**Decoupled Flow:**
- Supported identifiers: Mobile Number, Email, or Consent ID
- Customer authorises on their mobile device
- Push notifications supported
**Payment Limits (Blink Payments only):** see [Payment Limits](#payment-limits).
**Blink Data:** accounts, balances, transactions, statements and party details. A consent's `start_date_time` can be no more than 2 years in the past.
**Session Timeout:**
- Set per bank and per flow - see [Timeouts and Deadlines](#timeouts-and-deadlines)
**2FA Requirements:**
**BNZ 2FA Restriction**
**Blink Payments:** devices registered with BNZ for less than 24 hours cannot make payments. This is a BNZ security requirement. Customers must wait 24 hours after registering a new device before completing payments.
### Kiwibank
**Redirect Flow:**
- Opens Kiwibank website for authorisation (browser-based only)
**Decoupled Flow:**
- Mobile number or previous consent ID as the identifier
- Push notifications not supported - customers open the app to find the request
**Payment Limits (Blink Payments only):** see [Payment Limits](#payment-limits).
**Blink Data:** accounts, balances, transactions and party details; statements are not available.
**Session Timeout:**
- Set per bank and per flow - see [Timeouts and Deadlines](#timeouts-and-deadlines)
### NZHL
**Redirect Flow:**
- Opens the NZHL website for authorisation on all devices
**Decoupled Flow:**
- Mobile number or previous consent ID as the identifier
**Payment Limits (Blink Payments only):** read the current limit from `payment_limit` on the Blink Payments metadata endpoint; see [Payment Limits](#payment-limits).
**Blink Data:** accounts, balances, transactions and party details; statements are not available.
**Session Timeout:**
- Set per bank and per flow - see [Timeouts and Deadlines](#timeouts-and-deadlines)
### Westpac New Zealand
**Redirect Flow:**
- Opens the Westpac app on mobile devices
- Supports Westpac One authentication
- App-to-app return to your app is available on request (Blink Payments only; see [Mobile App Deep Linking](#mobile-app-deep-linking))
**Decoupled Flow:**
- Supported identifiers: the customer's Access Number (sent as `banking_username`), or Consent ID
- Customer authorises on their mobile device
- Push notifications supported
**Payment Limits (Blink Payments only):** see [Payment Limits](#payment-limits).
**Blink Data:** accounts, balances, transactions, statements and party details.
**Session Timeout:**
- Set per bank and per flow - see [Timeouts and Deadlines](#timeouts-and-deadlines)
**Special Features:**
- Westpac One unified authentication
- Supports personal and business accounts (v2.3 limitations apply)
## Decoupled Flow Identifiers
The decoupled flow needs an identifier that tells the bank which customer to send the request to. The redirect flow needs none: the customer identifies themselves at the bank. Each bank accepts different identifier types:
| Bank | `identifier_type` values |
| ------------ | ------------------------------------------------------------- |
| **ANZ** | `mobile_number`, `consent_id` |
| **ASB** | `mobile_number`, `consent_id` |
| **BNZ** | `mobile_number`, `email`, `consent_id` |
| **Kiwibank** | `mobile_number`, `consent_id` |
| **NZHL** | `mobile_number`, `consent_id` |
| **Westpac** | `banking_username` (the customer's Access Number), `consent_id` |
Send the customer's mobile number as `mobile_number` (Westpac takes `banking_username` instead); use `mobile_number`, not `phone_number`. A type the bank doesn't accept is rejected when you create the consent, while a value the bank doesn't recognise is accepted and the consent simply times out.
**Using Previous Consents**
For a returning customer, send `consent_id` with the ID of an earlier consent your application created for that customer at the same bank. It must be `Authorised` or `Consumed`, not revoked, and the customer then enters nothing. If the bank rejects an old consent as an identifier, fall back to the customer's usual identifier.
## Payment Limits
Payment limits apply to Blink Payments only. Blink Data has no payment limits.
### Transaction Limits
**Blink Payments only.** Each bank limits how much a customer can pay, and the limits differ between one-off PayNow payments and AutoPay (enduring consent) payments:
| Bank | PayNow (one-off) | AutoPay (enduring) |
| ------------ | ---------------------------------------------------------------------------------------------------------------------------------------- | ---------------------------------------------------------------------------------------------------------------------------------------------------- |
| **ANZ** | $25,000 per payment, but no more than the customer's goMoney limit (default $10,000). No daily total. Voice ID needed over $10,000 | The same $25,000 and goMoney limits apply; the consent maximum can't exceed the goMoney limit. Voice ID needed if the consent maximum is over $10,000 |
| **BNZ** | $50,000 per day in total (shared with Internet Banking) | Same, no separate AutoPay limit |
| **Westpac** | $30,000 per day in total (shared with Westpac One) | Same, no separate AutoPay limit |
| **ASB** | $100,000 per day in total (shared with ASB Internet Banking and Mobile Banking) | $10,000 per payment, no daily limit (only limits set in the consent) |
| **Kiwibank** | $50,000 per day in total | Same; the daily limit covers PayNow and AutoPay together |
A daily total is the customer's own limit at that bank, so payments they have already made through the bank's other channels that day count towards it. ANZ's [Voice ID](https://www.anz.co.nz/banking-with-anz/ways-to-bank/guides/voice-id-phone-banking/) requirement is ANZ's, not a BlinkPay limit.
BlinkPay also applies a limit to your account; contact [support@blinkpay.co.nz](mailto:support@blinkpay.co.nz) to change it. Bank limits change, so where you need the current figure at runtime, read `payment_limit` from `GET /payments/v1/meta`, which returns one `{total, currency}` value per bank (including NZHL, which isn't in the table above), rather than hard-coding this table.
**Verify Large Payments**
For high-value payments, it's recommended to inform customers in advance, as some may need to increase their daily limit with their bank before authorising.
### Minimum Payment
The minimum payment amount across all banks is **$0.01 NZD**.
### Maximum Payment
The maximum payment amount, or how much a customer can pay, depends on their bank and on whether it is a PayNow or an AutoPay payment; see [Transaction Limits](#transaction-limits) for each bank's limit. Your account's own limit with BlinkPay also applies.
### Daily Limits
A customer's own daily limit can be lower than the bank maximum above, depending on their account type, security settings and history with the bank. Customers can typically view and adjust it through their internet banking or mobile app.
## Timeouts and Deadlines
Every timer that can end a consent or a payment, on both products: the gateway cutoff, each bank's authorisation timeout for the redirect and decoupled flows, the payment and card deadlines, and the token and idempotency lifetimes. Banks change their windows, so **Blink Payments** integrations should read the live authorisation windows from `GET /payments/v1/meta` (`redirect_flow.request_timeout` and `features.decoupled_flow.request_timeout`; see [Payment Metadata Fields](/docs/shared/reference/metadata#payment-metadata-fields)). `GET /v1/meta` on Blink Data has no timeouts.
| Timer | Product | Value | When it runs out |
| --------------------------------------- | -------------- | ------------------------------------------------------- | ------------------------------------------------------- |
| Gateway session, before a bank is chosen | Both | 15 minutes | Consent `GatewayTimeout` |
| Redirect authorisation window | Both | Per bank, see below | Consent `Rejected` |
| Decoupled authorisation window | Both | Per bank, see below | Consent `Rejected` |
| Bank quick payment retrieval | Blink Payments | Retrieve as soon as the customer returns | That retrieval completes the payment |
| Single consent, bank payment | Blink Payments | 48 hours after the consent becomes `Authorised` | Consent `Rejected` |
| Single consent, card reservation | Blink Payments | 5 days without a payment | Reservation released, consent `Revoked` |
| Card quick payment never captured | Blink Payments | 24 hours after authorisation | Payment `Rejected`, hold released |
| Card refund | Blink Payments | 60 days after the payment completes | Refund refused with `BP045`; contact support |
| Enduring consent | Blink Payments | `expiry_timestamp`, if you set one | Consent `Consumed` |
| Data consent | Blink Data | `expiration_date_time`, if you set one | Consent `Consumed` |
| Payment still `Pending` | Blink Payments | 6 hours | Contact support with the consent and payment IDs |
| Access token | Both | 1 hour | 401; request a new token |
| Idempotency key | Both | 24 hours | A reused key creates a new consent or payment |
### How Long the Customer Has to Authorise
The bank's authorisation window, from when the consent is created (or, in the gateway, from when they choose the bank). A consent that isn't authorised in time becomes `Rejected`.
| Bank | Redirect, Blink Payments | Redirect, Blink Data | Decoupled, Blink Payments | Decoupled, Blink Data |
| -------- | ------------------------ | -------------------- | ------------------------- | --------------------- |
| ANZ | 10 min | 10 min | 7 min | 7 min |
| ASB | 10 min | 10 min | 10 min | 5 min |
| BNZ | 10 min | 5 min | 4 min | 4 min |
| Westpac | 10 min | 10 min | 10 min | 10 min |
| Kiwibank | 10 min | 10 min | 5 min | 5 min |
| NZHL | 10 min | 10 min | 5 min | 5 min |
Show the customer a clear message when their session expires, and let them start again.
### Payment Authorisation
**Blink Payments only.** Once a consent is authorised, how long you have to take the payment depends on the consent type. Retrieve a bank quick payment as soon as the customer returns (see [Redirect Flow](/docs/shared/flows/redirect-flow)); that call completes the payment. A single consent must be paid within 48 hours of authorisation, otherwise it becomes `Rejected`. An enduring consent remains valid until its expiry date or until it is revoked.
**Blink Data:** an authorised consent stays valid until its `expiration_date_time` passes (it then becomes `Consumed`) or it is revoked, by you or by the customer at their bank. A consent created without `expiration_date_time` has no expiry; if the bank ends it, data calls return 403 `BDT415`.
## Account Type Support
### Supported Account Types
All banks support the following account types:
- **Savings Accounts** - Personal savings accounts
- **Everyday (Cheque) Accounts** - Transaction accounts
- **Credit Cards** - Credit card accounts (where applicable)
### Account Identification
Accounts are identified using:
- Account number and suffix
- Bank branch code
- Account name/label
### Multiple Accounts
Account selection happens at the bank, during authorisation. **Blink Payments:** the customer chooses the account to pay from, and with an enduring consent can change accounts for later payments. **Blink Data:** the customer chooses one or more accounts to share, so `GET /v1/accounts` can return several.
## Mobile App Deep Linking
"Deep linking" can mean two different things on mobile. The first is the bank's app opening when the customer is sent to the bank, instead of the bank's website; this needs nothing from you. The second is app-to-app return (`redirect_to_app`, Blink Payments only), which lets your app open directly from the bank's app once the customer has approved, instead of coming back through the browser. It needs custom setup with each bank, so request it through BlinkPay support, who can tell you more; the banks that offer it are below. See [App-to-App Flow](/docs/shared/flows/app-to-app) for how it works.
| Bank | Opens the Bank App on Mobile | App-to-App Return (`redirect_to_app`) |
| -------- | ---------------------------- | ------------------------------------- |
| ANZ | ✓ (current goMoney app) | ✗ |
| ASB | ✓ | ✓ On request |
| BNZ | ✗ Website | ✗ |
| Kiwibank | ✗ Website | ✗ |
| NZHL | ✗ Website | ✗ |
| Westpac | ✓ | ✓ On request |
Without app-to-app return, the customer comes back to your `redirect_uri`, which can be a custom scheme or universal link that opens your app. For complete mobile integration guidance, including in-app browsers (embedded WebViews are not supported), registering your return link, and platform requirements:
[View Mobile Integration Guide →](/docs/shared/flows/mobile-integration)
## Business Account Limitations
**Business Account Support**
To access a business account via open banking, it generally needs to be linked to a personal account. Current open banking standards (v2.3) are tailored for retail/personal banking, and business accounts with multi-authorisation requirements may have limitations.
### Future Support (Open Banking v3)
Version 3 of the open banking standard will address:
- Multi-authorisation requirements
- Enhanced business account support
- Corporate account types
- Improved delegation and permissions
## Supporting Customers by Bank
What to tell a customer who is having trouble authorising at their bank:
### ANZ
- Decoupled flow on Android: no notification arrives, so tell the customer to open goMoney and find the request (iOS customers get a notification)
- Blink Payments: a payment over the customer's goMoney limit, or over $10,000 without Voice ID, fails at ANZ; see [Payment Limits](#payment-limits)
### ASB
- Both FastNet types work
- Decoupled flow: the customer needs notifications enabled for the ASB app, or they should open the app to find the request
### BNZ
- Blink Payments: a device registered with BNZ less than 24 hours ago can't make payments. This is a BNZ security rule, so tell the customer to try again once the 24 hours have passed, or to use a device they registered earlier
- Redirect uses the BNZ website on every device (the BNZ app doesn't open)
- Decoupled flow: Mobile Number, Email or Consent ID
### Kiwibank
- Decoupled flow sends no notification: tell the customer to open the Kiwibank app and find the request
- Redirect uses the Kiwibank website on every device (the Kiwibank app doesn't open)
- Decoupled flow: Mobile Number or Consent ID
### Westpac
- Opens the Westpac app on mobile; app-to-app return available on request
- Decoupled flow: the customer's Access Number (`banking_username`) or Consent ID
## Troubleshooting
For common bank issues (authentication failures, payment limits, session timeouts) and their solutions:
[View Troubleshooting Guide →](/docs/shared/help/troubleshooting)
# Error Codes Reference (https://merchants.blinkpay.co.nz/docs/debit/error-codes.md)
---
title: Error Codes Reference
description: Common Payment API error codes and their meanings
---
# Error Codes Reference
This page lists the error codes returned by the Payment API, with the HTTP status each one comes with. Each error has a `code` (`BPnnn`) and a `message`. Branch on `code`.
## Error Response Format
```json
{
"timestamp": "2026-01-15T10:30:00.000+13:00",
"path": "/payments/v1/payments",
"status": 422,
"error": "UNPROCESSABLE_CONTENT",
"message": "Consent has been revoked",
"code": "BP015"
}
```
Some responses carry no BlinkPay code:
- **401** has an empty body and a `WWW-Authenticate` header: `Bearer error="invalid_token"` when the access token is expired or invalid, and a bare `Bearer` when no token was sent. Get a new token and retry.
- **429 Too Many Requests**: wait for the time in the `Retry-After` header, then back off; see [API Rate Limits](/docs/shared/reference/api-policies#api-rate-limits).
Every response carries a `request-id` header (it echoes yours if you send one). Include it when you contact support.
## Common Error Codes
### Consent Errors
| Code | HTTP | Description | Resolution |
|-------|------|--------------------------------------------------|------------------------------------------------|
| BP101 | 404 | Consent does not exist | Verify the consent ID is correct |
| BP002 | 422 | Consent already consumed or rejected, including a single consent not paid within 48 hours of authorisation | GET the consent and check `payments[0]` first. If a payment exists and is not `Rejected`, it may still settle: poll it rather than creating a new consent. Otherwise create a new consent |
| BP003 | 422 | Enduring consent is past its `expiry_timestamp` (it is now `Consumed`) | Create a new consent |
| BP004 | 422 | Consent exceeded request timeout | Customer took too long; create new consent |
| BP011 | 422 | Consent cannot be revoked because it was never authorised (`Rejected` or `GatewayTimeout`) | No action needed |
| BP015 | 422 | Consent has been revoked — possibly cancelled by the customer in their banking app | Create a new consent |
| BP017 | 422 | Consent not yet authorised (a payment was created too early) | Customer hasn't approved yet; continue polling |
| BP018 | 422 | Quick payment cannot be processed, for example `POST /payments` on a quick payment | Don't create payments for a quick payment: `GET` the quick payment instead |
| BP021 | 422 | Gateway consent timed out (>15 min) | Create a new consent |
| BP701 | 409 | Consent was already revoked — either earlier via the API, or by the customer in their banking app | No action needed; create a new consent to take further payments |
| BP707 | 409 | Consent has a payment still settling, so it cannot be revoked yet | Poll the payment until it is terminal, then revoke if still needed |
### Request Errors
These mean the request needs fixing; resending it unchanged gets the same error.
| Code | HTTP | Description | Resolution |
|-------|------|-------------------------------------------------|--------------------------------------------------|
| BP035 | 422 | Referenced consent is for a different bank | Use a consent ID from the same bank |
| BP214 | 400 | Redirect URI not whitelisted | Register the URI under Settings > API Settings |
| BP216 | 400 | Bank not configured for merchant | Contact BlinkPay to enable the bank |
| BP235 | 400 | `amount` or `pcr` sent when creating a payment on a single consent | Send only the `consent_id`; the amount and PCR come from the consent |
| BP240 | 400 | Decoupled identifier type not supported by the bank | Use an identifier type listed for the bank in `features.decoupled_flow.available_identifiers` on the metadata endpoint |
| BP265 | 400 | Identifier value is not a valid consent ID | Pass a consent ID as the decoupled `identifier_value` |
| BP276 | 400 | `surcharge` or `total_charge` was sent | Remove them: BlinkPay calculates these fields |
| BP283 | 400 | An enduring consent's `from_timestamp` and `expiry_timestamp` fall on the same date | Set the expiry at least one day after the start |
| BP289–BP293 | 400 | `callback_url` is malformed or is not a public `https` URL | Send a publicly reachable HTTPS URL (the sandbox also accepts `http`) |
| BP299 | 400 | Invalid request parameters, for example an ID or an `idempotency-key`, `request-id` or `x-correlation-id` header that is not a UUID | Fix the request; send UUIDs for IDs and those headers |
### Idempotency and Concurrency Errors
An idempotency key is bound permanently to the payment it creates. These 409s tell you which of the
two situations you are in: the key is still busy with an earlier request (retry later), or it has
been spent (use a fresh key).
| Code | HTTP | Description | Resolution |
|-------|------|-------------------------------------------------------------------|-------------------------------------------------------------------------------------------------------------------|
| BP702 | 409 | Duplicate idempotency key with different payload | Use a unique idempotency key per distinct request |
| BP703 | 409 | The named payment is still in flight | Poll the payment ID in the message until it reaches a terminal status; don't resubmit |
| BP708 | 409 | A request with this key is still in progress | Retry with the same key after a few seconds |
| BP709 | 409 | The consent was changed by another request at the same time | Retry the request |
| BP710 | 409 | The key was already used by a payment that is now terminal | Read the status in the message: `Rejected` means you may re-submit under a fresh key, `AcceptedSettlementCompleted` means the money already moved and you must not |
| BP711 | 409 | A concurrent refund request holds the same key | Retry the same request with the same key shortly |
| BP712 | 409 | Another request on this consent is submitting a payment | GET the consent's payments before retrying |
| BP713 | 409 | Duplicate of a payment made in the same minute without an `idempotency-key` | Always send an `idempotency-key` |
| BP715 | 409 | The charge went out while the refund was being processed, so it could no longer be cancelled | Retry the refund with a **new** idempotency key — the money will be sent back as a refund instead |
### Refund Errors
See [Refunds](/docs/debit/guides/refunds).
| Code | HTTP | Description | Resolution |
|-------|------|------------------------------------------------------------------------|---------------------------------------------------------------------------------------|
| BP012 | 422 | The payment is not `AcceptedSettlementCompleted` | Poll the payment until it settles, then refund it |
| BP013 | 422 | The refund type is not supported for this payment, for example `account_number` on a card payment | Use `full_refund` or `partial_refund` for a card payment |
| BP014 | 422 | The payer's account number is not available for this payment, so an `account_number` refund cannot be made | Contact BlinkPay support |
| BP039 | 422 | The refund would take the total refunded above the payment amount, for example a `full_refund` after a partial one | Refund only what remains, with a `partial_refund` |
| BP045 | 422 | The card payment settled more than 60 days ago | Contact BlinkPay support |
| BP046 | 422 | The card payment has already been refunded or reversed | No action needed |
| BP047 | 422 | Refunds are not enabled for the merchant | Contact BlinkPay support to have refunds enabled |
| BP048 | 422 | `full_refund` or `partial_refund` on a bank payment | Use an `account_number` refund and pay the customer back yourself |
| BP049 | 422 | Card refunds are not enabled for the merchant | Contact BlinkPay support — card refunds are granted separately from bank refunds |
| BP053 | 422 | The payment's charge has not completed yet, so there is no money to send back | Poll the payment until it reaches `AcceptedSettlementCompleted`, then refund it. Do not re-create the payment — the consent is already used |
| BP110 | 404 | Refund does not exist | Verify the refund ID is correct |
| BP111 | 404 | This refund type is not supported for this transaction (the payer's account number could not be found) | Contact BlinkPay support |
| BP903–BP905 | 502 | The card processor's answer to the refund is unknown | GET the refund to check its status before retrying |
### Payment Errors
| Code | HTTP | Description | Resolution |
|-------|------|-----------------------|--------------------------------------------------------------------------|
| BP020 | 422 | Card payment declined | Customer should retry with a different card or contact their card issuer |
| BP036 | 422 | The bank refused the payment for this consent period | Enduring consent: wait for the next period. Single consent: the consent stays `Authorised`, so once the cause is resolved you may try again with a new `idempotency-key` |
| BP044 | 422 | An enduring-consent payment would take the period's total above `maximum_amount_period` | Wait for the next period, or take a smaller amount |
| BP102 | 404 | Payment does not exist | Verify the payment ID is correct |
| BP229 | 400 | The amount is over the bank's payment limit | Lower the amount; see [Payment Limits](/docs/shared/bank-coverage#payment-limits) and `payment_limit` on the metadata endpoint |
| BP230 | 400 | The amount is over your merchant account's payment limit | Lower the amount, or contact BlinkPay support to change your merchant limit |
| BP262 | 400 | An enduring-consent payment is larger than `maximum_amount_period` | Lower the amount |
| BP263 | 400 | An enduring-consent payment is larger than `maximum_amount_payment` | Lower the amount |
| BP277 | 400 | With [surcharging (fee forwarding)](/docs/debit/guides/surcharging), the amount including the surcharge is over your merchant payment limit (for an enduring consent, the maximum amount) | Lower the amount or the maximum, or contact BlinkPay support to change your merchant limit |
| BP287 | 400 | An enduring consent without `maximum_amount_payment` has a `maximum_amount_period` over the bank's payment limit, because a single payment could draw the whole period amount | Send a `maximum_amount_payment` at or below the bank's limit |
| BP288 | 400 | As BP287, but the `maximum_amount_period` is over your merchant account's payment limit | Send a `maximum_amount_payment` at or below your limit, or contact BlinkPay support |
### Fixed Recurring Payment Errors
See the [Fixed Recurring Payments guide](/docs/debit/guides/fixed-recurring-payments) for how `start_date` is resolved.
| Code | HTTP | Description | Resolution |
|-------|------|-----------------------------------------------------------------------------|-------------------------------------------------------------------|
| BP009 | 422 | Start date is in the past | Use today or a future date (NZ timezone) |
| BP023 | 422 | Start date is before the consent's `from_timestamp` | Use a date on or after the consent's activation date |
| BP024 | 422 | Start date is after the consent's `expiry_timestamp` | Use a date inside the consent window, or create a new consent |
| BP025 | 422 | The consent has already expired | Create a new consent |
| BP030 | 422 | `daily` schedule cannot start today — submitted after 21:45 NZ | Set `start_date` to tomorrow |
| BP038 | 422 | `daily` schedule whose consent only becomes active after 21:45 NZ on `start_date` | Set `start_date` to the following day |
| BP108 | 404 | Fixed recurring payment does not exist | Verify the schedule ID is correct |
| BP705 | 409 | Duplicate fixed recurring payment | Only one active schedule is allowed per consent |
| BP706 | 409 | Fixed recurring payment already cancelled | No action needed |
### Card Payment Errors
These errors are specific to card payment processing. For a detailed troubleshooting guide, see [Card Payments](/docs/debit/guides/card-payments).
| Code | HTTP | Description | Resolution |
|-------|------|--------------------------------------------|------------------------------------------------|
| BP050 | 422 | The consent is a card Quick Payment, which completed at the gateway | Nothing to do — a Quick Payment has no separate payment step |
| BP051 | 422 | The card consent is not authorised, so there is no payment to create | Wait for the customer to authorise at the gateway, then create the payment |
| BP052 | 422 | The card consent carries no card authorisation | Contact BlinkPay support |
| BP054 | 422 | The card consent has already been authorised | Create the payment, or let the reservation be released; do not authorise the same consent twice |
| BP256–BP258 | 400 | Card payment set-up details are missing | Complete card payment onboarding with BlinkPay; contact support if it persists |
| BP259 | 400 | Card transient token missing from the request | Send the transient token from the card capture step |
| BP260 | 400 | No card payment types configured | Complete card payment onboarding with BlinkPay |
| BP261 | 400 | No card networks configured | Complete card payment onboarding with BlinkPay |
| BP270 | 400 | Card payment set-up is incomplete | Contact BlinkPay to complete card onboarding |
### Service Errors
| Code | HTTP | Description | Resolution |
|-------|------|--------------------------|-------------------------------------------|
| BP601 | 503 | Bank service unavailable | Retry with backoff, using the same `idempotency-key` for a `POST`; check for maintenance |
| BP602 | 503 | BlinkPay is temporarily unavailable | Retry after the `Retry-After` time, using the same `idempotency-key` for a `POST` |
| BP603 | 503 | The bank refused the consent; no payment was sent | GET the consent to check its status before trying again |
For a request that times out or returns another `5xx` with no clear answer, see [If a Request Times Out](/docs/debit/concepts/payment-lifecycle#if-a-request-times-out).
## Need Help?
For errors not listed here or for assistance troubleshooting:
1. Check the `message` field for specific details
2. Review the [Troubleshooting Guide](/docs/shared/help/troubleshooting)
3. Contact [support@blinkpay.co.nz](mailto:support@blinkpay.co.nz), including the `request-id` from the response
# API Policies (https://merchants.blinkpay.co.nz/docs/shared/reference/api-policies.md)
---
title: API Policies
description: Acceptable use, security testing, and API change policies
---
# API Policies
## Acceptable Use of Services
Use BlinkPay services only in accordance with their intended use, and additionally in accordance with the [BlinkPay Acceptable Use Policy](https://www.blinkpay.co.nz/aup).
## Security and Load Testing
Prior permission must be obtained before conducting penetration tests or load tests against any BlinkPay environment. Contact [support@blinkpay.co.nz](mailto:support@blinkpay.co.nz) to arrange testing windows.
## API Rate Limits
The Blink Payments and Blink Data APIs limit how many requests each IP address can send in a short time. The limits allow for normal e-commerce traffic, including the polling intervals recommended on these pages.
When you go over a limit, the API responds `429 Too Many Requests` with a `Retry-After` header giving the number of seconds to wait. Wait at least that long before retrying, and if you are limited again, back off exponentially with some random jitter. Rely on the status and the header, not on the body.
Most rate limiting comes from avoidable traffic:
- **Reuse access tokens.** Request a new token only when the current one is about to expire; see [Token Caching](/docs/shared/authentication#token-caching).
- **Poll sensibly.** Don't poll while the customer is at their bank: use their return to your redirect URI, or a decoupled `callback_url`, to know when to look, then poll every second until the consent leaves `AwaitingAuthorisation`. In the direct decoupled flow with no callback, poll every 5 seconds. **Blink Payments:** poll a payment every second until it is `AcceptedSettlementCompleted` or `Rejected`, for a minute or two at most.
- **Stop at a terminal state**, and pick up anything still in flight with a periodic sweep rather than continuous polling.
If you expect high volumes, for example a sale or a large billing run, email [support@blinkpay.co.nz](mailto:support@blinkpay.co.nz) in advance with your expected peak transactions per hour. Security testing and load testing both need prior permission, as above.
## API Change Policy
To preserve backward compatibility, breaking changes such as endpoint naming updates or the removal of JSON elements will not occur until a major version (URL) change.
In general, additive changes may be made to request query parameters and JSON responses.
This policy applies only after your Go-Live Date.
### Non-Breaking Changes
These may occur at any time without advance notice:
- Addition of new endpoints
- Addition of new optional request parameters
- Addition of new fields in JSON responses
- Addition of new error codes
- Addition of new enum values
- Performance improvements
- Bug fixes
**Your Responsibility:**
- Design clients to ignore unknown response fields
- Don't rely on field order in JSON responses
- Handle new enum values gracefully
## Request Headers
### Optional Headers
The following optional headers can be included in API requests:
| Header | Description |
| ----------------------- | ---------------------------------------------------------- |
| `x-customer-ip` | The customer's IP address if they are currently logged in |
| `x-customer-user-agent` | The User-Agent of the application on the customer's device |
These headers help banks with fraud detection and compliance. Include them when available.
## Terms of Service
These API policies supplement BlinkPay's:
- [Terms of Service](https://merchants.blinkpay.co.nz/terms/v3-0.html)
- [Privacy Policy](https://www.blinkpay.co.nz/privacy)
- [Acceptable Use Policy](https://www.blinkpay.co.nz/aup)
In case of conflict, the Terms of Service take precedence.
## Questions?
For questions about these policies:
- Email: [support@blinkpay.co.nz](mailto:support@blinkpay.co.nz)
- Documentation: [merchants.blinkpay.co.nz](https://merchants.blinkpay.co.nz/)
# Metadata Endpoint (https://merchants.blinkpay.co.nz/docs/shared/reference/metadata.md)
---
title: Metadata Endpoint
description: Query bank features, limits, and capabilities
---
# Metadata Endpoint
Each product has its own metadata endpoint, returning information about the banks available to you and their capabilities. Use it to configure your integration from bank features rather than hard-coding them. The two responses differ: only the Blink Payments one carries payment limits, flow support and authorisation timeouts.
## Payment API (Blink Payments)
```http
GET /payments/v1/meta HTTP/1.1
Host: sandbox.debit.blinkpay.co.nz
Authorization: Bearer {access_token}
```
**Required scope:** `view:metadata`
### Response
```json
[
{
"name": "ASB",
"payment_limit": {
"total": "100000",
"currency": "NZD"
},
"features": {
"enduring_consent": {
"enabled": true,
"consent_indefinite": false
},
"decoupled_flow": {
"enabled": true,
"available_identifiers": [
{ "type": "mobile_number", "name": "Mobile Number" },
{ "type": "consent_id", "name": "Consent ID" }
],
"request_timeout": "PT10M"
}
},
"redirect_flow": {
"enabled": true,
"request_timeout": "PT10M"
}
}
]
```
### Payment Metadata Fields
| Field | Description |
| ----------------------------------------------- | ---------------------------------------- |
| `payment_limit.total` | BlinkPay's maximum for a single payment to this bank, in NZD: one value per bank, applied to every flow and every consent type. An amount string such as `"100000"`. A payment over it is rejected with `400` BP229. It doesn't show the bank's own limits, such as a daily total or ASB's $10,000 per AutoPay payment, so a smaller payment can still be declined at the bank; see [Transaction Limits](/docs/shared/bank-coverage#transaction-limits). A separate limit applies to your account |
| `features.decoupled_flow.enabled` | Whether decoupled flow is supported |
| `features.decoupled_flow.available_identifiers` | Supported identifier types |
| `features.decoupled_flow.request_timeout` | Timeout for decoupled consent (ISO 8601) |
| `features.enduring_consent.enabled` | Whether recurring payments are supported |
| `features.enduring_consent.consent_indefinite` | Whether indefinite consents are allowed |
| `features.enduring_consent.maximum_consent` | Maximum consent duration (ISO 8601) |
| `features.card_payment.enabled` | Whether card payments are supported |
| `features.card_payment.allowed_card_payment_types` | Supported card payment types (e.g. `PANENTRY`, `GOOGLEPAY`) |
| `features.card_payment.allowed_card_networks` | Supported card networks (e.g. `VISA`, `MASTERCARD`) |
| `redirect_flow.enabled` | Whether redirect flow is supported |
| `redirect_flow.request_timeout` | Timeout for redirect consent (ISO 8601) |
### Card Payment Metadata
When card payments are enabled for your account, an entry with `"name": "Card"` appears in the same array as the bank entries:
```json
{
"name": "Card",
"features": {
"card_payment": {
"enabled": true,
"allowed_card_payment_types": [
"APPLEPAY",
"CLICKTOPAY",
"GOOGLEPAY",
"PANENTRY"
],
"allowed_card_networks": [
"VISA",
"MASTERCARD"
]
}
}
}
```
If the card payment entry is not present, card payment onboarding has not been completed; the Blink Payments card payments guide describes the onboarding steps.
## Data API (Blink Data)
```http
GET /v1/meta HTTP/1.1
Host: sandbox.data.blinkpay.co.nz
Authorization: Bearer {access_token}
```
**Required scope:** `read:meta`
### Response
The response is a top-level JSON array with one entry per bank enabled for your organisation, so it lists only the banks you can create consents for:
```json
[
{
"bank_id": "59a68dd9-6070-11f0-bb8d-0ad2a4bc413d",
"name": "ASB",
"features": {
"accounts": true,
"balances": true,
"transactions": true,
"statements": true,
"party": true
}
}
]
```
### Data Metadata Fields
| Field | Description |
| ----------------------- | ------------------------------------------------ |
| `bank_id` | Identifier for the bank. It differs between sandbox and production, so don't hard-code it; use `name` (the `bank` value you send when creating a consent) |
| `name` | Bank display name |
| `features.accounts` | Whether account data is supported |
| `features.balances` | Whether balance data is supported |
| `features.transactions` | Whether transaction data is supported |
| `features.statements` | Whether statement data is supported (`false` at Kiwibank and NZHL) |
| `features.party` | Whether party (account holder) data is supported |
## Caching
Metadata changes infrequently. Cache the response for up to **24 hours** to reduce API calls.
## Use Cases
| Use case | Product | How |
| -------- | ------- | --- |
| Bank selection UI | Both | Blink Payments: show only banks whose `redirect_flow` or `features.decoupled_flow` is enabled for the flow you use. Blink Data: show the banks in the response, which are those enabled for your organisation |
| Payment limits | Blink Payments only | Check the payment amount against `payment_limit.total` before submitting |
| Card payment availability | Blink Payments only | Check for the `Card` entry and its allowed card types and networks |
| Timeout configuration | Blink Payments only | Size your polling window from `request_timeout`. The Blink Data response has no timeouts |
| Permission availability | Blink Data only | Request only the permissions the bank supports, for example leave out `ReadStatements` where `features.statements` is `false` (otherwise 400 `BDT241`) |
# Glossary (https://merchants.blinkpay.co.nz/docs/shared/reference/glossary.md)
---
title: Glossary
description: Definitions of key BlinkPay and open banking terms
---
# Glossary
Key terms used in BlinkPay documentation and open banking, grouped by the product they apply to: terms used by both Blink Payments and Blink Data first, then terms specific to each product.
## Terms Used by Both Products
### API (Application Programming Interface)
A technical integration bridge between the services provided by Banks, BlinkPay and your application. An API defines the kinds of calls or requests that can be made, how to make them, the data formats that should be used, the conventions to follow, etc.
### Authentication
The verification that a user is valid.
### Authorisation
The rights and permissions that an authenticated user is allowed to access, based on an access policy.
### Bank
A financial institution that is authorised to perform monetary transactions and provide financial and other services to its Customers.
### Callback URL
An optional `callback_url` on a decoupled flow consent, on both products. BlinkPay sends it an unsigned `GET` with the consent ID as `cid` (`GET
**Request ID for Support**
When contacting BlinkPay support, include the `request-id` from your API calls. This allows BlinkPay to quickly locate your request in their logs.
### Logging Best Practices
For debugging and audit purposes:
- Log all API request/response pairs (sanitise sensitive data)
- Record the `request-id` returned in response headers
- Track request duration for performance monitoring
- Never log full access tokens or client secrets
## Getting Support
If issues persist after troubleshooting, contact [support@blinkpay.co.nz](mailto:support@blinkpay.co.nz) with your environment, consent/payment IDs, and steps to reproduce.
[View full support resources →](/docs/shared/help/support)
## Service Status
Check system status: [www.blinkpay.co.nz/service-status](https://www.blinkpay.co.nz/service-status)
Sign up for updates on that page to be notified of any incidents.
# Going Live (https://merchants.blinkpay.co.nz/docs/shared/help/going-live.md)
---
title: Going Live
description: Production readiness checklist for BlinkPay integration
---
# Going Live
This guide covers the process of taking your BlinkPay integration from sandbox to production.
## Production Readiness Checklist
### Integration
- [ ] Consent creation and authorisation working
- [ ] **Blink Payments:** payment initiation and status polling working
- [ ] **Blink Data:** consents created and their status checked with `GET /v1/consents/{consent_id}`, account data retrieved with the `consent_id`, and revocation with `DELETE /v1/consents/{consent_id}` working
- [ ] Each flow you use (Gateway/Redirect/Decoupled) tested for every outcome the sandbox can produce: approval, decline, timeout and revocation
- [ ] Where required, handling in place for outcomes the sandbox cannot produce (bank errors, revocation at the bank, and for Blink Payments a payment rejected by the bank after authorisation), built from the documented statuses and error codes
- [ ] Return URL handling correct, with every outcome confirmed by a server-side GET
- [ ] Error handling implemented (401 token refresh, 5xx retry with backoff, timeouts)
- [ ] Tested with mock bank (PNZ) in sandbox
- [ ] **Blink Payments:** `AcceptedSettlementCompleted` is the only status treated as success (it means the payer's bank has confirmed sending the funds), never the return redirect or the consent status alone
- [ ] **Blink Payments:** your own payment confirmation or receipt sent to the customer. BlinkPay does not send receipts to your customers.
### Card Payments (Blink Payments, if applicable)
- [ ] Card payment onboarding completed (acquirer merchant ID, MCC, acquirer bank provided to BlinkPay)
- [ ] Card payment feature confirmed enabled via metadata endpoint
- [ ] Card payment flow tested in sandbox with test card numbers
### Security
- [ ] API credentials stored securely (environment variables or secret manager)
- [ ] No credentials in source control
- [ ] All API calls use HTTPS
- [ ] Bearer tokens implemented correctly
- [ ] No tokens exposed in client-side code
- [ ] [Credential and Integration Security](/docs/shared/standards/credential-security) guidance followed
### User Experience
- [ ] Clear instructions displayed: what the customer is paying, or what account data they are sharing and for how long
- [ ] Loading states implemented
- [ ] User-friendly error messages
- [ ] Success confirmation displayed
- [ ] Mobile responsive design
### Consent Management (Blink Data)
- [ ] Customers can view active consents
- [ ] Customers can revoke consents through same channel used for creation
- [ ] Consent expiry handling implemented
- [ ] Expired/revoked consent detection in place
### Monitoring
- [ ] Signed up for service status updates: [blinkpay.co.nz/service-status](https://www.blinkpay.co.nz/service-status)
- [ ] Consent and payment IDs logged for troubleshooting, and for Blink Payments the `request-id` of each call
- [ ] Error rates monitored
- [ ] **Blink Payments:** payments still `Pending` are followed up. Most payments move within seconds; if one is still `Pending` after 6 hours, contact support with the consent ID and payment ID
### Compliance (Direct Flows Only)
If using Redirect/Decoupled flows directly (not Gateway):
- [ ] Payments NZ Customer Experience Guidelines compliance verified (see [Consent Experience for Direct Flows](/docs/shared/standards/consent-experience))
- [ ] `x-customer-ip` and `x-customer-user-agent` headers implemented
- [ ] **Blink Data:** privacy policy updated to cover account data access
## Requesting Production Access
Production access is requested from the same portal you use for sandbox, at [merchants.blinkpay.co.nz](https://merchants.blinkpay.co.nz/).
### Step 1: Select "Upgrade to Production"
Log in and select **Upgrade to Production**, in the top navigation bar or on **Settings > API Settings**. Anyone in your organisation can see the button, but only an Administrator can submit the application.
### Step 2: Submit the Application
The application asks for your business details, the services you need, banking and billing details and a security questionnaire, then for you to review it and accept the Client Service Agreement.
### Step 3: Production Upgrade Approval
BlinkPay reviews your business and integration needs. Production upgrade approval usually takes 1-3 business days.
### Step 4: Get Your Production Credentials
Once approved, open **Settings > API Settings** and open the **Production** row. Copy the API Client ID, then select **Rotate Secret** to obtain the client secret. The portal shows the secret only once, so store it in your secret manager straight away.
Base URLs:
- Blink Payments: `https://debit.blinkpay.co.nz`
- Blink Data: `https://data.blinkpay.co.nz`
### Step 5: Configure and Check Production
Production is configured separately from sandbox. Before you launch:
1. **Register your production redirect URLs.** The production whitelist is separate from the sandbox one: add them under **Settings > API Settings**, Production row, **Whitelisted Redirect URLs**. Production rejects `http://` and `localhost` URLs. **Blink Payments:** if you use Fixed Recurring Payment webhooks, create the subscription again in production; its callback URL must also be on the production whitelist.
2. **Confirm which banks are enabled for your account** by calling the metadata endpoint with your production credentials (**Blink Payments:** `GET /payments/v1/meta`; **Blink Data:** `GET /v1/meta`). See [Metadata](/docs/shared/reference/metadata).
3. **Make a low-value live payment** (or, for Blink Data, a live consent) as a final smoke test, and check it reaches its expected final status.
## Production Configuration
Configure your application to use production endpoints and credentials:
- Base URL for Blink Payments: `https://debit.blinkpay.co.nz`
- Base URL for Blink Data: `https://data.blinkpay.co.nz`
- Store Client ID and Client Secret in environment variables
**Use Environment Variables**
Never hard-code production credentials. Always use environment variables or a secure secret management system.
## Key Metrics to Monitor
Track these metrics to understand your integration performance:
- Payment success rate (Blink Payments)
- API error rate
- Consent authorisation rate
- Average time to completion
# Demo Applications (https://merchants.blinkpay.co.nz/docs/shared/help/demos.md)
---
title: Demo Applications
description: Live examples and reference implementations
---
# Demo Applications
Explore BlinkPay's capabilities through our live demo applications and reference implementations.
## Live Payment Demos
### ACME Payments Demo (Sandbox)
**Live Demo**: [acme-sandbox.blinkpay.co.nz](https://acme-sandbox.blinkpay.co.nz)
A full-featured e-commerce checkout demo showcasing:
- **Gateway Flow** - Complete payment experience
- **Multiple Payment Amounts** - Test various transaction sizes
- **Real-time Status Updates** - See consent and payment state changes
- **Error Handling** - Examples of timeout, rejection scenarios
**How to Use:**
1. Select a product and amount
2. Click "Pay with BlinkPay"
3. Choose bank "PNZ" (sandbox bank)
4. Login with username `user01`, password `password`
5. Approve payment
6. Return to see payment confirmation
**Sandbox Testing**
This demo uses the BlinkPay sandbox environment. No real money is transferred, and you can test freely without consequences.
---
## Account Information Demo
### ACME Loans Demo
**Live Demo**: [acme-loans-dev.blinkpay.co.nz](https://acme-loans-dev.blinkpay.co.nz)
Demonstrates Blink Data (account information access):
- **Account Aggregation** - Connect multiple bank accounts
- **Balance Display** - View current and available balances
- **Transaction History** - Access historical transactions
- **Account Details** - See account metadata
**How to Use:**
1. Click "Connect Your Bank"
2. Select bank "PNZ"
3. Login with username `user01`, password `password`
4. Approve data access
5. View aggregated account information
---
## E-commerce Demo
### Snipcart Demo
**Blink Payments only.** An Astro shop that takes Blink PayNow at a Snipcart checkout through Snipcart's custom payment gateway. Netlify Functions on the server hold the client credentials and use the Node.js SDK to create a quick payment through the gateway flow, then check its outcome when the customer returns. It is a reference implementation, not a supported plugin; there are no plugins for platforms such as Shopify.
**Repository**: [github.com/BlinkPay/BlinkPay-Snipcart-Demo](https://github.com/BlinkPay/BlinkPay-Snipcart-Demo)
---
## Mobile Demo Application
### Flutter Demo App
A reference implementation for mobile integration on iOS and Android, useful whatever framework you build in. It is a demo app, not an SDK.
**Repository**: [github.com/BlinkPay/BlinkPay-Flutter-Demo](https://github.com/BlinkPay/BlinkPay-Flutter-Demo)
The app makes Blink Payments single and enduring consents through the Gateway flow. A small backend proxy (Dart Shelf, in `server/`) holds the client credentials and obtains access tokens, so the secret never reaches the app. The app opens the Gateway with `flutter_custom_tabs` (Chrome Custom Tabs on Android, SFSafariViewController on iOS) and the customer comes back through the custom-scheme return link `blinkpaydemo://callback`, received with `app_links`. The README's [deep linking setup](https://github.com/BlinkPay/BlinkPay-Flutter-Demo#deep-linking-setup) covers the platform configuration.
The demo takes shortcuts a production app should not: the app sets the amount and payment reference (your backend must), the app and backend share a fixed demo key instead of your own user authentication, and the consent ID is held only in memory rather than stored on your server. See [Mobile Integration](/docs/shared/flows/mobile-integration#reference-implementation).
---
## Testing Credentials
The ACME demos authorise with PNZ, BlinkPay's test bank, using these credentials. No real bank account is involved.
### Mock Bank (PNZ)
**Bank Name:** PNZ (the Gateway tile is labelled **PNZ**)
**Username:** `user01`
**Password:** `password`
**Decoupled auto-approve number:** `+64-259531933` (in the Gateway, choose **Send to PNZ app**)
**Test Scenarios:**
| Scenario | Steps | Result |
| --------------------- | ------------------------------------------------------ | ------ |
| Successful payment (Blink Payments) | Select PNZ → **Internet banking website** → Login with user01 → Approve | Consent `Authorised`, then the payment completes |
| Successful data access (Blink Data) | Start a bank connection → select PNZ → **Internet banking website** → Login with user01 → choose one or more accounts → Approve | Consent `Authorised`; the demo shows the accounts, balances and transactions shared |
| Decoupled Approval | Select PNZ → **Send to PNZ app** → enter `+64-259531933` | Consent approved automatically |
| Decline | Start authorisation → choose **Cancel** on the PNZ login page, before logging in | Consent `Rejected`; no payment is made and no account data is shared |
| Timeout | Start authorisation → don't complete it (or use any other mobile number for decoupled) → wait out the bank's window (up to 10 minutes) | Consent `Rejected` |
# Support & Help (https://merchants.blinkpay.co.nz/docs/shared/help/support.md)
---
title: Support & Help
description: Get help with your BlinkPay integration
---
# Support & Help
Need assistance with your BlinkPay integration? We're here to help!
## Contact Support
### Email Support
**Primary Contact:** [support@blinkpay.co.nz](mailto:support@blinkpay.co.nz)
**Response Times:**
- **Urgent Issues** (Production impacting): 24/7 support via email, or **Support** in the top navigation of the [Client Portal](https://merchants.blinkpay.co.nz/)
- **Standard Issues**: 2 business days for assignment
**When Contacting Support:**
Please include:
- Your client ID or company name
- Environment (sandbox or production)
- Description of the issue
- Steps to reproduce (if applicable)
- Error messages or codes
- The `request-id` response header of the failing call (Blink Payments)
- The consent ID and payment ID involved, if any
- Request/response examples (sanitise sensitive data, and never send your client secret or access tokens)
- Approximate time of occurrence
**Faster Resolutions**
The more details you provide, the faster we can help resolve your issue!
---
### General Inquiries
**Website:** [www.blinkpay.co.nz/support](https://www.blinkpay.co.nz/support)
For:
- Sales inquiries
- Partnership opportunities
- General information
- Product demos
---
## Self-Service Resources
### Documentation Portal
**API Documentation:** [merchants.blinkpay.co.nz](https://merchants.blinkpay.co.nz/)
Comprehensive API reference including:
- Complete endpoint documentation
- Request/response schemas
- Authentication details
- Error codes and descriptions
- OpenAPI specifications for [Blink Payments](https://merchants.blinkpay.co.nz/docs/debit/openapi.yaml) and [Blink Data](https://merchants.blinkpay.co.nz/docs/data/openapi.yaml)
### Integration Guides
Each product's section of the sidebar opens with its Overview and Quick Start, followed by its guides.
**Shared Guides:**
- [Authentication Guide](/docs/shared/authentication) - OAuth 2.0 setup
- [Going Live Checklist](/docs/shared/help/going-live) - Production readiness
---
## Sandbox Testing
**Endpoints:** `https://sandbox.debit.blinkpay.co.nz` (Blink Payments), `https://sandbox.data.blinkpay.co.nz` (Blink Data)
**Mock Bank:** PNZ (the Gateway tile is labelled **PNZ**)
**Test Credentials:** username `user01`, password `password`
**Decoupled:** mobile number `+64-259531933` auto-approves (in the Gateway, choose **Send to PNZ app**). Other numbers are accepted but never authorise: the consent stays `AwaitingAuthorisation` until the bank's window ends, then becomes `Rejected`.
**Decline:** choose **Cancel** on the PNZ login page, before logging in; the consent becomes `Rejected`.
**Revocation:** authorise a consent with the auto-approve number, then revoke it with the API's DELETE endpoint.
Nothing in the sandbox touches a real bank: no money moves and no real account data is shared.
---
## Community & Resources
### GitHub
**Organisation:** [github.com/BlinkPay](https://github.com/BlinkPay)
- SDK repositories (Blink Payments; Blink Data has no SDK and is called over HTTPS directly)
- Code examples
- Feature requests
### Postman Workspace
Each product has its own public Postman workspace with a collection, example requests and a sample environment. See [Postman Collection](/docs/shared/reference/postman) for both workspaces and how to set them up.
---
## Useful Links
### Documentation
- **API Docs**: [merchants.blinkpay.co.nz](https://merchants.blinkpay.co.nz/)
- **OpenAPI specifications**: [Blink Payments](https://merchants.blinkpay.co.nz/docs/debit/openapi.yaml) and [Blink Data](https://merchants.blinkpay.co.nz/docs/data/openapi.yaml)
- **Postman**: [Postman Collection](/docs/shared/reference/postman) (one workspace per product)
### Code & SDKs
- **GitHub**: [github.com/BlinkPay](https://github.com/BlinkPay)
### Demos
- **ACME Payments Demo** (Blink Payments): [acme-sandbox.blinkpay.co.nz](https://acme-sandbox.blinkpay.co.nz)
- **ACME Loans Demo** (Blink Data): [acme-loans-dev.blinkpay.co.nz](https://acme-loans-dev.blinkpay.co.nz)
- See [Demo Applications](/docs/shared/help/demos) for how to use them
### Contact
- **Support**: [support@blinkpay.co.nz](mailto:support@blinkpay.co.nz)
- **Website**: [www.blinkpay.co.nz](https://www.blinkpay.co.nz)
# Getting Started with Blink Data (https://merchants.blinkpay.co.nz/docs/data.md)
---
title: Getting Started with Blink Data
description: Blink Data gives your application customer-authorised access to account, balance, transaction and statement data from New Zealand banks.
layout: home
hero:
name: Blink Data
text: Account Information APIs
tagline: Secure access to customer-authorised financial data from NZ banks
actions:
- theme: brand
text: Get Started
link: /docs/data/quick-start
- theme: alt
text: Data Retrieval Guide
link: /docs/data/guides/data-retrieval
- theme: alt
text: Payment APIs
link: /docs/debit
features:
- icon: 🏦
title: Multi-Bank Support
details: Connect with ANZ, ASB, BNZ, Westpac, Kiwibank and NZHL through a single integration. Access real-time account data securely.
- icon: 🔒
title: Customer-Authorised
details: All data access requires explicit customer consent with defined permissions and, optionally, an expiry date.
- icon: 📊
title: Comprehensive Data
details: Access accounts, balances, transactions, statements, and party information through standardised APIs.
- icon: ⚡
title: Real-Time Access
details: Get near real-time account data directly from banks. No screen scraping or outdated data.
- icon: 🔄
title: Ongoing Consents
details: One consent gives ongoing data access until it expires or the customer revokes it.
- icon: 🛠️
title: Easy Integration
details: Gateway Flow handles bank selection and authentication. Single API for all banks.
---
Using an AI coding assistant? Connect it to the [BlinkPay MCP server](/docs/shared/reference/ai-tools), which has all of this documentation and the API schemas.
## Quick Start
Get started with Blink Data in minutes:
```bash
# Authenticate
curl -X POST https://sandbox.data.blinkpay.co.nz/oauth2/token \
-d "client_id=YOUR_ID&client_secret=YOUR_SECRET&grant_type=client_credentials"
# Create consent
curl -X POST https://sandbox.data.blinkpay.co.nz/v1/consents \
-H "Authorization: Bearer YOUR_TOKEN" \
-H "Content-Type: application/json" \
-d '{
"flow": {
"detail": {
"type": "gateway",
"redirect_uri": "https://yourapp.com/callback"
}
},
"permissions": ["ReadAccounts", "ReadBalances", "ReadTransactions"],
"expiration_date_time": "2026-12-31T23:59:59+13:00"
}'
```
## Environment URLs
The Blink Data base URL for each environment, with its token endpoint. API paths sit under `/v1`; the token endpoint sits at the host root.
| Environment | Base URL | Token endpoint |
| ----------- | -------------------------------------- | ------------------------------------------------------- |
| Sandbox | `https://sandbox.data.blinkpay.co.nz` | `POST https://sandbox.data.blinkpay.co.nz/oauth2/token` |
| Production | `https://data.blinkpay.co.nz` | `POST https://data.blinkpay.co.nz/oauth2/token` |
In the sandbox, use the test bank `PNZ`; the production banks (ANZ, ASB, BNZ, Westpac, Kiwibank and NZHL) are used in production. See [Sandbox and Production Banks](/docs/data/testing#sandbox-and-production-banks).
## Choose Your Integration Path
### Gateway Flow (Strongly Recommended)
Let BlinkPay handle the bank selection and authentication UI. Customer selects their bank and authentication method through our hosted gateway.
[Learn more about Gateway Flow →](/docs/shared/flows/gateway-flow)
### Redirect Flow
Direct browser-based flow where customers authenticate with their bank and return to your site.
[Learn more about Redirect Flow →](/docs/shared/flows/redirect-flow)
### Decoupled Flow
Customer authorises on a different device or at a different time via their banking app.
[Learn more about Decoupled Flow →](/docs/shared/flows/decoupled-flow)
## Data Access APIs
All Data APIs are documented in the comprehensive Data Retrieval guide:
### Available APIs
- **Accounts API** - Get list of customer accounts including account numbers, types, names, and currencies
- **Balances API** - Access current and available balances for customer accounts with timestamps
- **Transactions API** - Retrieve transaction history with detailed payee information and filtering options
- **Statements API** - Download account statements (availability varies by bank, most support at least 2 years)
- **Party API** - Get account holder information including name and contact details
[Explore Data Retrieval Guide →](/docs/data/guides/data-retrieval)
## Use Cases
### Personal Finance Apps
Aggregate accounts from multiple banks into a single view.
### Lending & Credit Assessment
Verify income and assess creditworthiness using actual bank data.
### Accounting Software
Automate bank reconciliation and transaction categorisation.
### Budgeting Tools
Track spending patterns and provide insights.
### Wealth Management
Provide holistic financial overview across institutions.
## What You'll Need
**Prerequisites**
- A BlinkPay account: sign up at [merchants.blinkpay.co.nz](https://merchants.blinkpay.co.nz/); sandbox credentials are provisioned at sign-up (see [Getting API Credentials](/docs/shared/authentication#getting-api-credentials))
- OAuth 2.0 client credentials (Client ID and Secret)
- HTTPS-enabled redirect URI for production
## Integration Standards
Before you go live, read [Credential and Integration Security](/docs/shared/standards/credential-security) for how to store credentials and handle outcomes safely, and, if you use the redirect or decoupled flow directly rather than the Gateway, [Consent Experience for Direct Flows](/docs/shared/standards/consent-experience) for what your consent screens must show.
## Support
[View all support resources →](/docs/shared/help/support)
## Next Steps
1. [Understand the basics](/docs/data/overview) - Learn about Blink Data architecture
2. [Review bank coverage](/docs/shared/bank-coverage) - See which features each bank supports
3. [Follow the quick start guide](/docs/data/quick-start) - Create your first consent in minutes
4. [Explore authentication flows](/docs/shared/flows/gateway-flow) - Choose the right flow for your use case
# Blink Data Overview (https://merchants.blinkpay.co.nz/docs/data/overview.md)
---
title: Blink Data Overview
description: Secure account information access through open banking
---
# Blink Data Overview
Blink Data is BlinkPay's Account Information API that provides secure access to customer-authorised financial data from major New Zealand banks through Open Banking.
## What is Blink Data?
Blink Data allows businesses to access account information directly from customer bank accounts using the newest data access methods provided by participating banks. It integrates with data recipients and banks, enabling customers to use a modern consent process to share their financial data securely.
Customers can grant access to their account information, avoid traditional document-based verification processes, and obtain greater control over when, where, and how their data is shared.
### Key Features
- **Multi-Bank Aggregation** - Single API for ANZ, ASB, BNZ, Westpac, Kiwibank and NZHL
- **Real-Time Data** - Near real-time access to account information
- **No Screen Scraping** - Official bank APIs only
- **Customer-Authorised** - Explicit consent required
- **Secure** - ISO 27001:2022 certified, encrypted data transmission
## Architecture
Blink Data operates as an aggregation layer between data recipients and banks:
```
Your Application ←→ Blink Data API ←→ Bank APIs ←→ Customer Accounts
```
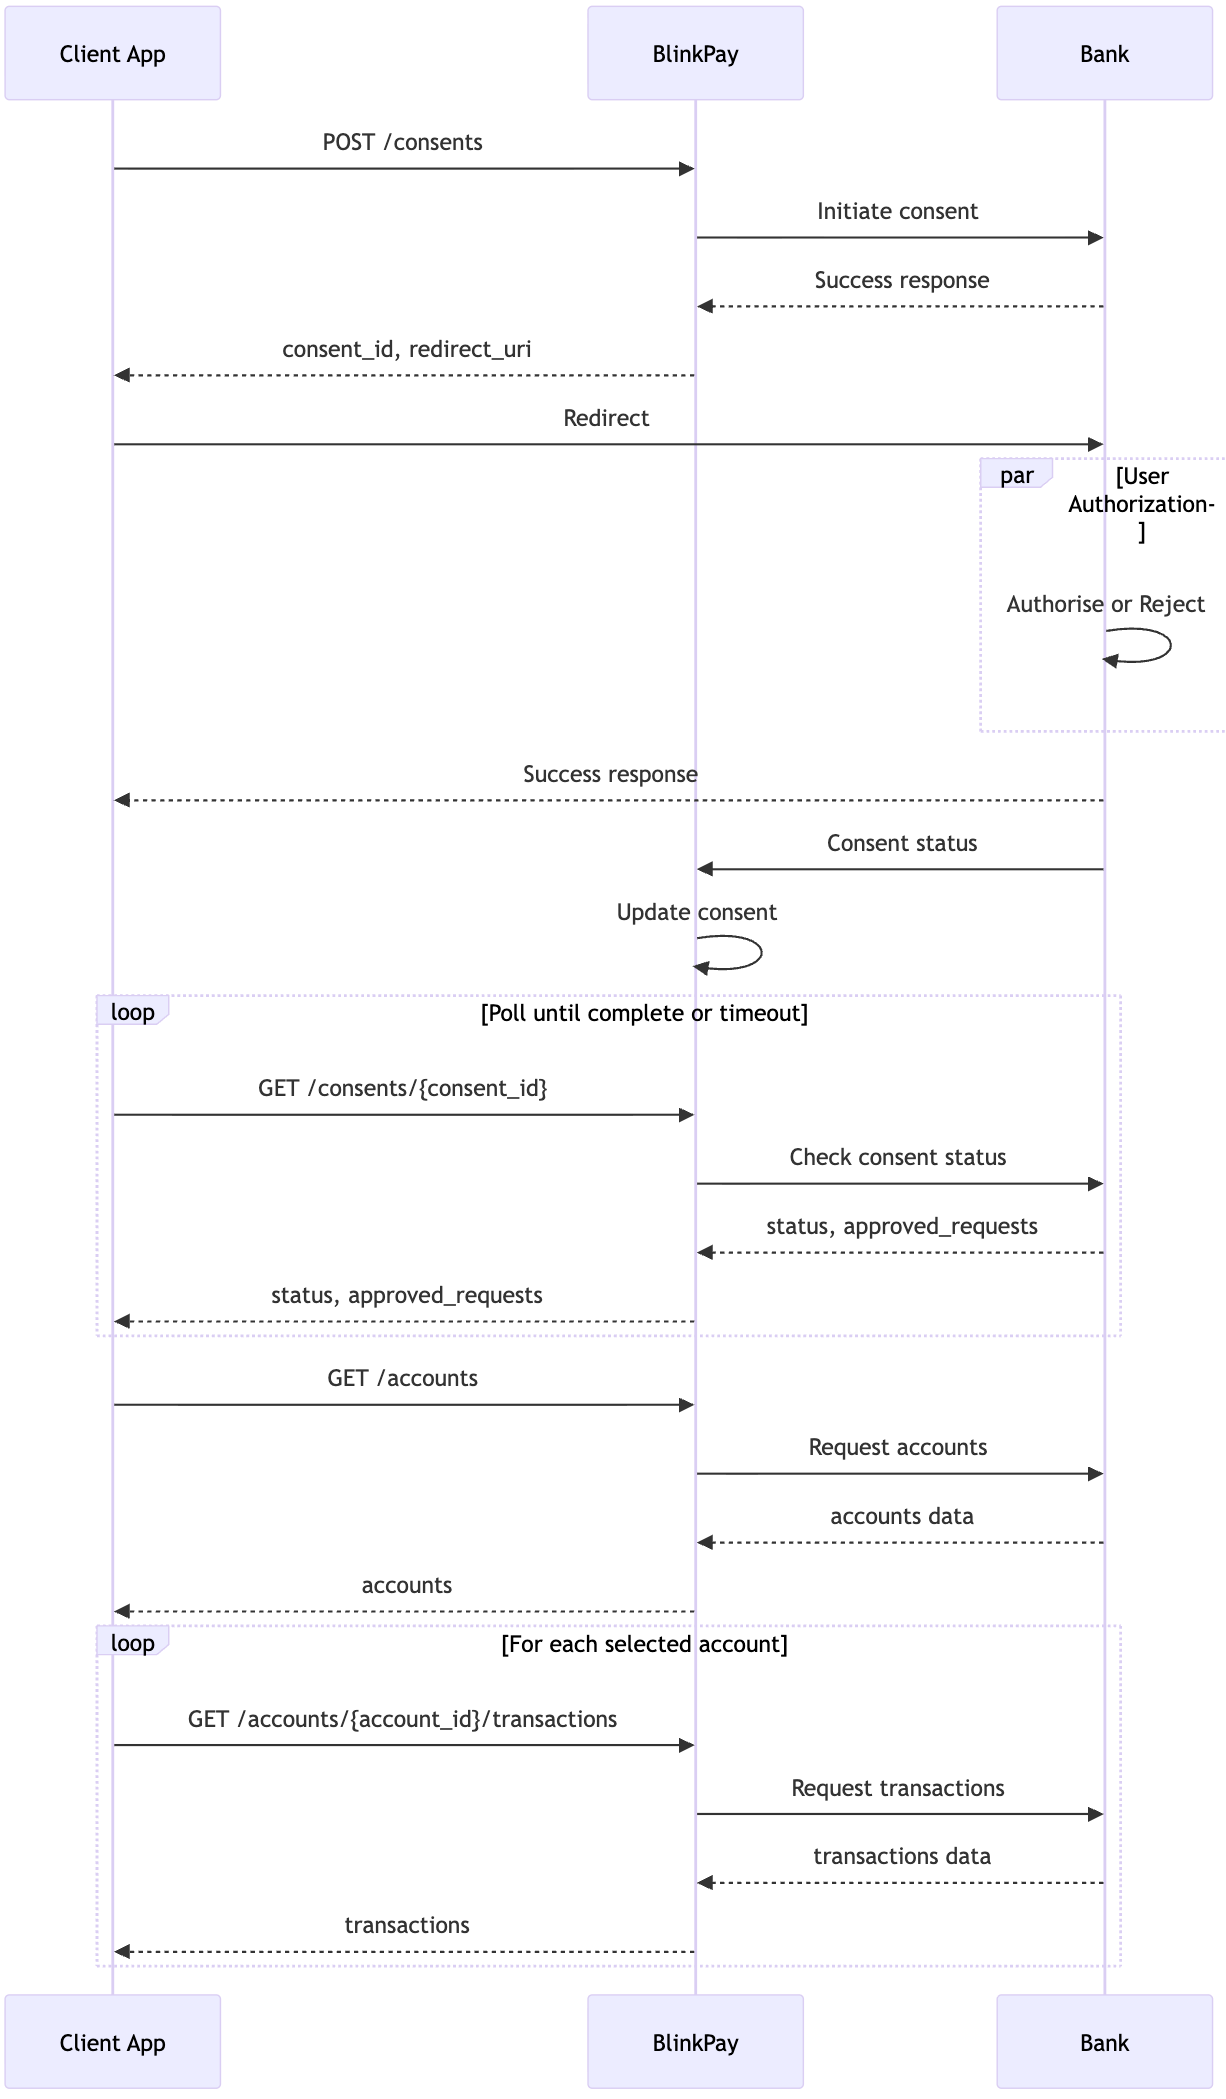 ### Benefits of Aggregation
- **Single Integration** - Integrate once with BlinkPay instead of separately with each bank
- **Stable API** - Your code remains unchanged as banks upgrade their APIs
- **Consistent Experience** - Unified API across all banks
- **Reduced Maintenance** - BlinkPay handles bank-specific changes
## Supported Banks
In production, Blink Data connects to ANZ, ASB, BNZ, Westpac, Kiwibank and NZHL. The sandbox has one test bank, PNZ. Every bank supports the redirect and decoupled flows and returns accounts, balances, transactions and party data; statements are available at some banks only. The per-bank table, including the `bank` values and decoupled identifiers, is on the [Bank Coverage](/docs/shared/bank-coverage) page. Blink Data has no payment limits; the limits on that page apply to Blink Payments.
## Available Data
| Permission | Data Access |
| ------------------ | ----------------------------------------------------------------------------- |
| `ReadAccounts` | Account numbers, names, types, currency |
| `ReadBalances` | Current and available balances |
| `ReadTransactions` | Transaction history with payee info |
| `ReadStatements` | Account statements (availability varies, most banks support at least 2 years) |
| `ReadParty` | Account holder name and contact details |
### Benefits of Aggregation
- **Single Integration** - Integrate once with BlinkPay instead of separately with each bank
- **Stable API** - Your code remains unchanged as banks upgrade their APIs
- **Consistent Experience** - Unified API across all banks
- **Reduced Maintenance** - BlinkPay handles bank-specific changes
## Supported Banks
In production, Blink Data connects to ANZ, ASB, BNZ, Westpac, Kiwibank and NZHL. The sandbox has one test bank, PNZ. Every bank supports the redirect and decoupled flows and returns accounts, balances, transactions and party data; statements are available at some banks only. The per-bank table, including the `bank` values and decoupled identifiers, is on the [Bank Coverage](/docs/shared/bank-coverage) page. Blink Data has no payment limits; the limits on that page apply to Blink Payments.
## Available Data
| Permission | Data Access |
| ------------------ | ----------------------------------------------------------------------------- |
| `ReadAccounts` | Account numbers, names, types, currency |
| `ReadBalances` | Current and available balances |
| `ReadTransactions` | Transaction history with payee info |
| `ReadStatements` | Account statements (availability varies, most banks support at least 2 years) |
| `ReadParty` | Account holder name and contact details |
**Bank Support Varies**
Not all banks support all data types. Use the metadata endpoint (`GET /v1/meta`) to check feature availability.
## How It Works
1. **Customer Initiates** - Customer wants to connect their bank account
2. **Create Consent** - Your application creates a data access consent
3. **Customer Authorises** - Customer authenticates with their bank and approves access
4. **Access Data** - Your application retrieves authorised account information
5. **Ongoing Access** - Continue accessing data until consent expires or is revoked
## Data Handling
Blink Data operates as an integration layer and does not hold customer Personally Identifiable Information for first-party use:
- **Customer-Authorised** - All data access requires explicit customer consent
- **Time-Limited** - Consents can carry an expiry date, and start and end dates that limit the data they cover
- **Customer Control** - Customers can revoke consent anytime through the same channel used to create it
## Environment URLs
API paths sit under `/v1`; the token endpoint sits at the host root.
| Environment | Base URL | Token endpoint |
| ----------- | ------------------------------------- | ------------------------------------------------------- |
| Sandbox | `https://sandbox.data.blinkpay.co.nz` | `POST https://sandbox.data.blinkpay.co.nz/oauth2/token` |
| Production | `https://data.blinkpay.co.nz` | `POST https://data.blinkpay.co.nz/oauth2/token` |
## Getting Started
1. **Get Credentials** - Sign up at [merchants.blinkpay.co.nz](https://merchants.blinkpay.co.nz/); sandbox credentials are under **Settings > API Settings** (see [Getting API Credentials](/docs/shared/authentication#getting-api-credentials))
2. **Import Postman** - Download from [Postman workspace](https://www.postman.com/blinkpay/blinkpay-organisation-workspace/overview)
3. **Generate Token** - Use client credentials OAuth flow
4. **Test** - Try `GET /v1/meta` to view available banks
5. **Integrate** - Implement consent flows and data retrieval
6. **Go Live** - Select **Upgrade to Production** in the portal and, once approved, switch to production credentials (see [Going Live](/docs/shared/help/going-live))
## Next Steps
- **[Quick Start Guide](/docs/data/quick-start)** - Get started in minutes
- **[Data Retrieval](/docs/data/guides/data-retrieval)** - Complete API reference
# Quick Start (https://merchants.blinkpay.co.nz/docs/data/quick-start.md)
---
title: Quick Start
description: Get started with Blink Data API
---
# Quick Start
This guide demonstrates how to access customer account data using the Blink Data API.
## Requirements
- BlinkPay client account with Data API access
- API credentials (client_id and client_secret) from **Settings > API Settings** in the portal; see [Getting API Credentials](/docs/shared/authentication#getting-api-credentials)
- A redirect URI registered under **Whitelisted Redirect URLs** on the same page; see [Redirect URI Whitelisting](/docs/shared/authentication#redirect-uri-whitelisting)
## Environment URLs
| Environment | Base URL |
| -------------- | ------------------------------------- |
| **Sandbox** | `https://sandbox.data.blinkpay.co.nz` |
| **Production** | `https://data.blinkpay.co.nz` |
## Step 1: Get Access Token
**Request:**
```http
POST /oauth2/token HTTP/1.1
Host: sandbox.data.blinkpay.co.nz
Content-Type: application/x-www-form-urlencoded
grant_type=client_credentials&client_id={client_id}&client_secret={client_secret}
```
**Response:**
```json
{
"access_token": "eyJhbGc...",
"token_type": "Bearer",
"expires_in": 3600,
"scope": "manage:consents read:meta read:accounts read:balances read:transactions read:party"
}
```
Tokens last about 1 hour (`expires_in`). Cache the token and reuse it for every call until it expires; request a new one only when it has expired or the API returns 401, then retry the call. Don't request a new token per request. You don't request scopes: the token carries the scopes assigned to your API client.
## Step 2: Create Account Access Consent
**Request:**
```http
POST /v1/consents HTTP/1.1
Host: sandbox.data.blinkpay.co.nz
Authorization: Bearer {access_token}
Content-Type: application/json
idempotency-key: 6f1c2b8e-4a7d-4c1e-9b3f-2d5e8a9c0f14
{
"flow": {
"detail": {
"type": "redirect",
"bank": "PNZ",
"redirect_uri": "https://your-site/callback"
}
},
"permissions": [
"ReadAccounts",
"ReadBalances",
"ReadTransactions"
],
"start_date_time": "2025-10-01T00:00:00+13:00",
"end_date_time": "2026-12-31T23:59:59+13:00",
"expiration_date_time": "2026-12-31T23:59:59+13:00"
}
```
`start_date_time` and `end_date_time` set the window of data the consent covers: you can retrieve transactions and statements dated between them. `start_date_time` can't be in the future, `end_date_time` must be after today (New Zealand date), and the two must fall on different dates. Leave `end_date_time` out to read up to the latest available transaction, and change the example dates once they have passed. `expiration_date_time` is when access ends; it can't be on the day you create the consent or before `end_date_time`, and you can omit it for a consent that doesn't expire. See [Consent Duration](/docs/data/concepts/consent-lifecycle#consent-duration).
**Response:**
```json
{
"consent_id": "c8327a00-3f1a-4d10-a27a-aece83eadabc",
"redirect_uri": "{bank_authorisation_url}"
}
```
For the redirect flow, `redirect_uri` is the bank's authorisation URL. (A gateway consent returns the BlinkPay gateway URL instead, and a decoupled consent returns only `consent_id`.)
### Idempotency
Send an `idempotency-key` header with a UUID on each `POST /v1/consents`, and reuse the same key if you retry that request. The retry returns the original consent instead of creating a second one.
## Step 3: Redirect Customer
Redirect the customer to the `redirect_uri` to authorise data access at their bank. The customer chooses which accounts to share there, so a consent can cover more than one account.
**Test Bank (PNZ):**
- Username: `user01`
- Password: `password`
## Step 4: Handle Callback
The customer returns to your redirect URI with the consent ID in `cid`:
```
https://your-site/callback?cid=c8327a00-3f1a-4d10-a27a-aece83eadabc
```
If authorisation didn't succeed, BlinkPay adds `status` (`cancelled`, `rejected`, `timeout` or `error`; the Gateway Flow can also send `pending`) and `error`, a message you can show the customer:
```
https://your-site/callback?cid=c8327a00-3f1a-4d10-a27a-aece83eadabc&status=rejected&error=The+consent+has+been+rejected
```
There is no success value. Branch on `status`, never on `error`, and always confirm the outcome by checking the consent status (Step 5), whether or not `status` is present. The full table is in [Return Parameters](/docs/shared/flows/redirect-flow#return-parameters).
## Step 5: Check the Consent Status
**Request:**
```http
GET /v1/consents/{consent_id} HTTP/1.1
Host: sandbox.data.blinkpay.co.nz
Authorization: Bearer {access_token}
```
**Response:**
```json
{
"consent_id": "c8327a00-3f1a-4d10-a27a-aece83eadabc",
"status": "Authorised",
"status_update_date_time": "2026-10-07T10:15:30+13:00",
"creation_date_time": "2026-10-07T10:14:02+13:00",
"flow": {
"detail": {
"type": "redirect",
"bank": "PNZ",
"redirect_uri": "https://your-site/callback"
}
},
"permissions": ["ReadAccounts", "ReadBalances", "ReadTransactions"],
"start_date_time": "2025-10-01T00:00:00+13:00",
"end_date_time": "2026-12-31T23:59:59+13:00",
"expiration_date_time": "2026-12-31T23:59:59+13:00",
"approved_requests": []
}
```
`approved_requests` lists the data requests made under the consent so far, each with a `type` (`Account`, `Balance`, `Transaction`, `Statement` or `Party`), an `id` and a `creation_date_time`. The response also carries `hashed_customer_identifier` where the consent has one.
`Authorised` means you can retrieve data. If the status is `AwaitingAuthorisation` (or `GatewayAwaitingSubmission` in the Gateway Flow), the customer hasn't finished yet: check again every second until it changes. Every other status is final; create a new consent if the customer wants to try again. See [Consent Status](/docs/data/concepts/consent-lifecycle#consent-status) for the full list.
## Step 6: Retrieve Accounts
**Request:**
```http
GET /v1/accounts?consent_id={consent_id} HTTP/1.1
Host: sandbox.data.blinkpay.co.nz
Authorization: Bearer {access_token}
```
**Response:**
```json
{
"accounts": [
{
"account_id": "eyJhY2NvdW50SWQiOiIxMjM0NTY3ODkwIn0",
"name": "Everyday Account",
"type": "current",
"currency": "NZD",
"details": {
"number": "12-3456-7890123-00",
"name": "Everyday Transactional Account"
}
}
],
"pagination": {
"page": 1,
"size": 500,
"total_pages": 1,
"total_records": 1
}
}
```
## Step 7: Get Balances
**Request:**
```http
GET /v1/accounts/{account_id}/balances?consent_id={consent_id} HTTP/1.1
Host: sandbox.data.blinkpay.co.nz
Authorization: Bearer {access_token}
```
**Response:**
```json
{
"balances": [
{
"account_id": "eyJhY2NvdW50SWQiOiIxMjM0NTY3ODkwIn0",
"type": "current",
"amount": {
"amount": "1234.56000",
"currency": "NZD"
},
"direction": "in",
"date_time": "2026-10-07T10:00:00+13:00"
},
{
"account_id": "eyJhY2NvdW50SWQiOiIxMjM0NTY3ODkwIn0",
"type": "available",
"amount": {
"amount": "1734.56000",
"currency": "NZD"
},
"direction": "in",
"date_time": "2026-10-07T10:00:00+13:00"
}
],
"pagination": {
"page": 1,
"size": 500,
"total_pages": 1,
"total_records": 2
}
}
```
## Step 8: Get Transactions
**Request:**
```http
GET /v1/accounts/{account_id}/transactions?consent_id={consent_id}&from_booking_date_time=2026-09-01T00:00:00Z HTTP/1.1
Host: sandbox.data.blinkpay.co.nz
Authorization: Bearer {access_token}
```
Date filters take a full ISO 8601 date-time with an offset (`2026-09-01T00:00:00Z` or `2026-09-01T00:00:00+12:00`); a date on its own is rejected. The range must sit inside the consent's `start_date_time` to `end_date_time` window. Timestamps in responses are in New Zealand time (`+12:00` or `+13:00`).
**Response:**
```json
{
"transactions": [
{
"transaction_id": "txn-123",
"type": "POS",
"direction": "out",
"amount": {
"amount": "45.50000",
"currency": "NZD"
},
"status": "posted",
"date_time": "2026-09-15T14:23:00+12:00",
"description": "Coffee Shop",
"balance": {
"account_id": "eyJhY2NvdW50SWQiOiIxMjM0NTY3ODkwIn0",
"type": "current",
"amount": {
"amount": "1189.06000",
"currency": "NZD"
},
"direction": "in",
"date_time": "2026-09-15T14:23:00+12:00"
}
}
],
"pagination": {
"page": 1,
"size": 500,
"total_pages": 1,
"total_records": 1
}
}
```
`amount.amount` is never signed: `direction` tells you whether money went `in` or `out`. `transaction_id` is missing at some banks, and `type` is the bank's own transaction code, so its values differ by bank. See [Reading Transactions](/docs/data/guides/data-retrieval#reading-transactions) before you store or categorise transactions.
To fetch new data later, call these endpoints again with the same `consent_id`; the customer doesn't need to authorise again until the consent expires or is revoked. See [Refreshing Data](/docs/data/concepts/consent-lifecycle#refreshing-data).
## Sandbox Testing
**Test Bank:** PNZ (Payments NZ Mock Bank)
| Flow | Test Credentials |
| ------------- | ---------------------------------------- |
| **Redirect** | Username: `user01`, Password: `password` |
| **Decoupled** | Phone: `+64-259531933` (auto-approves) |
Any other mobile number is accepted but never authorises: the consent stays `AwaitingAuthorisation` until the bank's window ends, then becomes `Rejected`. See [Sandbox Test Values](/docs/data/testing#sandbox-test-values) for how to produce a decline and test revocation.
## Next Steps
- **[Data Retrieval Guide](/docs/data/guides/data-retrieval)** - Complete API reference with pagination and error handling
# Permissions (https://merchants.blinkpay.co.nz/docs/data/concepts/permissions.md)
---
title: Permissions
description: Understanding data access permissions
---
# Permissions
Permissions define what data can be accessed through an authorised consent. Request only the permissions you need - customers are more likely to approve minimal, relevant permissions.
## Available Permissions
| Permission | Data Access |
| ------------------ | --------------------------------------- |
| `ReadAccounts` | Account numbers, names, types, currency |
| `ReadBalances` | Current and available balances |
| `ReadTransactions` | Transaction history with payee info |
| `ReadStatements` | Account statements |
| `ReadParty` | Account holder name and contact details |
## Permissions and Endpoints
Each data endpoint needs the matching permission on the consent, which the customer approved when they authorised it:
| Permission | Endpoints |
| ------------------ | ------------------------------------------------------------------------------------------------------------------------------------------------- |
| `ReadAccounts` | `GET /v1/accounts`, `GET /v1/accounts/{account_id}` |
| `ReadBalances` | `GET /v1/accounts/{account_id}/balances` |
| `ReadTransactions` | `GET /v1/accounts/{account_id}/transactions` |
| `ReadStatements` | `GET /v1/accounts/{account_id}/statements`, `GET /v1/accounts/{account_id}/statements/{statement_id}`, `GET /v1/accounts/{account_id}/statements/{statement_id}/file` |
| `ReadParty` | `GET /v1/party`, `GET /v1/accounts/{account_id}/party` |
If the consent doesn't include the permission an endpoint needs, the call returns 403; create a new consent that includes it.
## Requesting Permissions
Include the permissions array when creating a consent:
```json
{
"permissions": ["ReadAccounts", "ReadBalances", "ReadTransactions"]
}
```
**Bank Support Varies**
Not all banks support all permissions: statements in particular are available at some banks only (see [Bank Coverage](/docs/shared/bank-coverage)). A redirect or decoupled consent that requests a permission the bank doesn't offer is rejected with 400; in the Gateway Flow the check happens when the customer chooses their bank. Use the metadata endpoint (`GET /v1/meta`) to check feature availability before requesting permissions.
## Permission Details
### ReadAccounts
Returns account identifiers and basic details:
- Account ID (used for subsequent API calls)
- Account number
- Account name and type
- Currency
### ReadBalances
Returns balance information:
- Current balance
- Available balance
- Balance timestamp
### ReadTransactions
Returns transaction history:
- Transaction ID and type
- Amount and direction (in/out)
- Date and description
- Running balance
Use `from_booking_date_time` and `to_booking_date_time` parameters to filter by date range.
### ReadStatements
Returns account statements, a single statement, and the statement file. Available at some banks only (see [Bank Coverage](/docs/shared/bank-coverage), or `features.statements` in `GET /v1/meta`).
### ReadParty
Returns account holder information:
- Name
- Contact details (where available)
# Consent Lifecycle (https://merchants.blinkpay.co.nz/docs/data/concepts/consent-lifecycle.md)
---
title: Consent Lifecycle
description: Understanding data consent states and management
---
# Consent Lifecycle
Data consents authorise ongoing access to customer account information. This page covers consent status, duration, and management.
## Consent Status
| Status | Description | Terminal? |
| --------------------------- | ----------------------------------------------------------------------------------------- | ------------- |
| `GatewayAwaitingSubmission` | Waiting for customer to begin approval | No |
| `AwaitingAuthorisation` | Waiting for customer approval at bank | No |
| `Authorised` | Customer approved - data can be accessed | No |
| `Consumed` | The consented action is complete: the consent period ended at its `expiration_date_time`. Retrieving data never consumes a Data consent | Yes |
| `GatewayTimeout` | Gateway session expired (after 15 minutes) before a bank was chosen | Yes (Failure) |
| `Rejected` | Declined by the customer or bank, or the authorisation window elapsed | Yes (Failure) |
| `Revoked` | Consent revoked by you (`DELETE`) or by the customer at their bank | Yes (Failure) |
### Status Changes
| From State | To State | Cause |
| --------------------------- | ----------------------- | -------------------------------------------------------------- |
| `GatewayAwaitingSubmission` | `AwaitingAuthorisation` | Customer chose their bank at the Gateway |
| `GatewayAwaitingSubmission` | `Rejected` | Customer declined at the Gateway |
| `GatewayAwaitingSubmission` | `GatewayTimeout` | Gateway session cutoff elapsed before bank selection |
| `AwaitingAuthorisation` | `Authorised` | Customer approved |
| `AwaitingAuthorisation` | `Rejected` | Customer or bank declined, or the authorisation window elapsed |
| `Authorised` | `Consumed` | `expiration_date_time` reached |
| `GatewayAwaitingSubmission` | `Revoked` | Revoked by you (`DELETE`) before the customer chose a bank |
| `AwaitingAuthorisation` | `Revoked` | Revoked by you (`DELETE`) before the customer finished |
| `Authorised` | `Revoked` | Revoked by you (`DELETE`) or by the customer at their bank |
Only Gateway Flow consents reach `GatewayAwaitingSubmission`.
Terminal statuses (`Consumed`, `GatewayTimeout`, `Rejected`, `Revoked`) are permanent. A terminal consent can't be used to access accounts or retrieve data, can't be reused and can't be recovered - create a new consent.
## Checking Status
```http
GET /v1/consents/{consent_id} HTTP/1.1
Host: sandbox.data.blinkpay.co.nz
Authorization: Bearer {access_token}
```
**Polling guidance:**
- **Gateway/Redirect flows:** Don't poll while the customer is at their bank. Check status once they return to your redirect URI, every second until it is terminal
- **Decoupled flow:** Poll every 5 seconds until terminal status, or wait for the `callback_url` and check then
The response carries `status`, `status_update_date_time`, `creation_date_time`, `flow`, `permissions`, the three date-time fields below, `approved_requests` and `hashed_customer_identifier`; see [Check the Consent Status](/docs/data/quick-start#step-5-check-the-consent-status) for an example.
## Consent Duration
Data consents use three date-time fields:
| Field | Description |
| ---------------------- | ------------------------------------------------------------------------------- |
| `start_date_time` | Start of the window of data the consent covers: the earliest transactions and statements you can retrieve |
| `end_date_time` | End of the window of data the consent covers: the latest transactions and statements you can retrieve |
| `expiration_date_time` | When access ends and the consent becomes `Consumed`. Optional; omit it for a consent that doesn't expire |
`start_date_time` and `end_date_time` limit which data you can read; `expiration_date_time` limits how long you can read it. Your transaction and statement date filters must sit inside the start-to-end window. How far back you can read transactions is set by `start_date_time`; if you leave it out, the customer's bank decides how much history it returns.
All date-time fields must be ISO 8601 format with timezone offset: `2026-03-20T15:30:00+13:00`. When you create a consent, `start_date_time` can't be in the future, `end_date_time` must be after today (New Zealand date; leave it out to read up to the latest available transaction), and the two must fall on different dates (New Zealand time). `expiration_date_time` can't fall on the day the consent is created, or before `start_date_time` or `end_date_time`. A consent that breaks one of these rules is rejected with 400; the codes are on the [Error Codes](/docs/data/error-codes#_400-bad-request) page.
**Duration Notes**
- Consents remain active until expiration unless revoked
- BlinkPay sets no maximum duration, but banks may apply their own limits. For example, BNZ accepts a `start_date_time` no more than 2 years back
- All times are stored and returned in NZST/NZDT
## Timeout Behaviour
| Flow | Timeout |
| -------------- | ------------------------------------------------------------------------------------------------------------------------------------------- |
| Gateway Flow | 15 minutes (by default) while the customer is still choosing a bank. Once they choose one, that bank's redirect or decoupled window applies |
| Redirect Flow | Set per bank, up to 10 minutes |
| Decoupled Flow | Set per bank, from about 4 minutes |
The redirect and decoupled windows are configured per bank and change as banks change their own limits, so treat them as per-bank values rather than hard-coding a timeout — see [Timeouts and Deadlines](/docs/shared/bank-coverage#timeouts-and-deadlines).
A consent that is never authorised at the bank ends as `Rejected`. A Gateway Flow consent abandoned before the customer picks a bank ends as `GatewayTimeout` instead.
## Refreshing Data
To read new data later, for example each night or whenever the customer opens your app, call the data endpoints again with the same `consent_id`. The customer doesn't need to do anything: an `Authorised` consent can be used as often as you need until it expires or is revoked. Transactions booked since the customer authorised are included, up to `end_date_time` if you set one; without it, new transactions keep becoming readable.
Once the consent is `Consumed` (its `expiration_date_time` has passed) or `Revoked`, or the bank ends it (data calls then fail with `403`), create a new consent and ask the customer to authorise it again.
## Expiry and Revocation
**When consent expires:**
Create a new consent. Attempting to use an expired consent returns a 403 error (BDT412).
**Detecting expiry or revocation:**
Retrieve the consent with `GET /v1/consents/{consent_id}` to see its current status. A data call on a consent that isn't `Authorised` fails with a code that says why (for example revoked or expired); create a new consent. See [403 Forbidden](/docs/data/error-codes#_403-forbidden) for the codes.
## Consent Management
You must provide customers with the ability to view and revoke active consents through the same channel(s) where consent was created:
- **Web channel:** Provide web interface to view and revoke
- **Mobile app channel:** Provide app interface to view and revoke
- **Phone/call centre:** Provide phone-based revocation method
**Revoke (cancel) a consent:**
```http
DELETE /v1/consents/{consent_id} HTTP/1.1
Host: sandbox.data.blinkpay.co.nz
Authorization: Bearer {access_token}
```
**Which statuses accept a revoke:**
A revoke applies to a consent that hasn't reached a final status (`GatewayAwaitingSubmission`, `AwaitingAuthorisation` or `Authorised`) and returns 204 No Content. A consent in a final status can't be revoked: the call returns an error and the status is unchanged. See [Error Codes](/docs/data/error-codes) for the codes.
# Data Retrieval (https://merchants.blinkpay.co.nz/docs/data/guides/data-retrieval.md)
---
title: Data Retrieval
description: Guide to retrieving account information through Blink Data APIs
---
# Data Retrieval
This guide covers retrieving account data through Blink Data APIs.
**Consent Required**
Before retrieving data, you must create and authorise a consent. See the [Quick Start](/docs/data/quick-start) guide for the complete flow.
Each data endpoint needs a permission on the consent, which the customer approved when they authorised it. See [Permissions](/docs/data/concepts/permissions) for the full mapping.
## Bank Metadata
Before retrieving data, use the metadata endpoint to discover which features each bank supports.
**Request:**
```http
GET /v1/meta HTTP/1.1
Host: sandbox.data.blinkpay.co.nz
Authorization: Bearer {access_token}
```
**Response:**
```json
[
{
"bank_id": "0b7a9c3e-5d2f-4e8a-9f61-2c4d8e7b1a05",
"name": "PNZ",
"features": {
"accounts": true,
"balances": true,
"transactions": true,
"statements": true,
"party": true
}
}
]
```
The response is a top-level array with one entry per bank enabled for your organisation. `bank_id` differs between sandbox and production, so match on `name` rather than hard-coding the ID.
**Why use metadata:**
- Banks continuously add new features
- Your application can adapt automatically
- No code changes needed when features become available
**Best practices:**
- Cache metadata response for 24 hours
- Check feature availability before creating consents
- Provide fallback workflows for unsupported features
## Accounts API
### List Accounts
**Request:**
```http
GET /v1/accounts?consent_id={consent_id} HTTP/1.1
Host: sandbox.data.blinkpay.co.nz
Authorization: Bearer {access_token}
```
**Required Permission:** `ReadAccounts`
The customer chooses which accounts to share at their bank, so the list can hold more than one account. It accepts `page` and `size` (see [Pagination](/docs/data/guides/data-retrieval#pagination)).
**Response:**
```json
{
"accounts": [
{
"account_id": "eyJhY2NvdW50SWQiOiIxMjM0NTY3ODkwIn0",
"name": "Everyday Account",
"type": "current",
"currency": "NZD",
"details": {
"number": "12-3456-7890123-00",
"name": "Everyday Transactional Account"
}
},
{
"account_id": "eyJhY2NvdW50SWQiOiIwOTg3NjU0MzIxIn0",
"name": "Savings Account",
"type": "savings",
"currency": "NZD",
"details": {
"number": "12-3456-7890123-01",
"name": "Savings Account"
}
}
],
"pagination": {
"page": 1,
"size": 500,
"total_pages": 1,
"total_records": 2
}
}
```
### Get an Account
```http
GET /v1/accounts/{account_id}?consent_id={consent_id} HTTP/1.1
Host: sandbox.data.blinkpay.co.nz
Authorization: Bearer {access_token}
```
**Required Permission:** `ReadAccounts`
Returns a single account object, in the same shape as an entry in the `accounts` list above.
## Balances API
### Get Account Balances
**Request:**
```http
GET /v1/accounts/{account_id}/balances?consent_id={consent_id} HTTP/1.1
Host: sandbox.data.blinkpay.co.nz
Authorization: Bearer {access_token}
```
**Required Permission:** `ReadBalances`
**Response:**
```json
{
"balances": [
{
"account_id": "eyJhY2NvdW50SWQiOiIxMjM0NTY3ODkwIn0",
"type": "current",
"amount": {
"amount": "1234.56000",
"currency": "NZD"
},
"direction": "in",
"date_time": "2026-10-07T10:30:00+13:00"
},
{
"account_id": "eyJhY2NvdW50SWQiOiIxMjM0NTY3ODkwIn0",
"type": "available",
"amount": {
"amount": "1734.56000",
"currency": "NZD"
},
"direction": "in",
"date_time": "2026-10-07T10:30:00+13:00"
}
],
"pagination": {
"page": 1,
"size": 500,
"total_pages": 1,
"total_records": 2
}
}
```
### Balance Types
The endpoint returns two balance types, `current` and `available`.
| Type | Description |
| ----------- | --------------------------------------------------------------------------------------------------------------------- |
| `current` | Cleared funds balance |
| `available` | Booked funds plus pending items. Includes an overdraft or credit limit only where the bank reports one on the account |
`date_time` is the point in time the balance was calculated at. Some banks calculate balances once a day, in which case `date_time` reads as midnight of the current day rather than the time of your request.
### Direction
| Value | Description |
| ----- | ---------------------------------- |
| `in` | Positive balance (money available) |
| `out` | Negative balance (overdraft) |
## Transactions API
### Get Transactions
**Request:**
```http
GET /v1/accounts/{account_id}/transactions?consent_id={consent_id}&from_booking_date_time={date}&to_booking_date_time={date}&page={page}&size={size} HTTP/1.1
Host: sandbox.data.blinkpay.co.nz
Authorization: Bearer {access_token}
```
**Required Permission:** `ReadTransactions`
**Parameters:**
| Parameter | Required | Description |
| ------------------------ | -------- | ------------------------------------------------- |
| `consent_id` | Yes | The consent ID |
| `from_booking_date_time` | Yes | Start of the range (ISO 8601 date-time, with offset) |
| `to_booking_date_time` | No | End of the range (ISO 8601 date-time, with offset) |
| `page` | No | Page number (default: 1) |
| `size` | No | Records per page (default: 500, max: 500) |
**Date filters:** send a full ISO 8601 date-time with an offset (`2026-09-01T00:00:00Z` or `2026-09-01T00:00:00+12:00`); a date on its own is rejected. The range must sit inside the consent's `start_date_time` to `end_date_time` window, the start can't be in the future and the end can't be after today. The same rules apply to the statement date filters. Timestamps in responses are in New Zealand time (`+12:00` or `+13:00`).
**Response:**
```json
{
"transactions": [
{
"transaction_id": "txn-123",
"type": "POS",
"direction": "out",
"amount": {
"amount": "45.50000",
"currency": "NZD"
},
"status": "posted",
"date_time": "2026-09-15T14:23:00+12:00",
"description": "Coffee Shop",
"balance": {
"account_id": "eyJhY2NvdW50SWQiOiIxMjM0NTY3ODkwIn0",
"type": "current",
"amount": {
"amount": "1189.06000",
"currency": "NZD"
},
"direction": "in",
"date_time": "2026-09-15T14:23:00+12:00"
},
"merchant": {
"name": "Coffee Shop",
"category": "5812"
}
},
{
"transaction_id": "txn-124",
"type": "DC",
"direction": "in",
"amount": {
"amount": "1500.00000",
"currency": "NZD"
},
"status": "posted",
"date_time": "2026-09-14T09:00:00+12:00",
"description": "Salary Payment",
"balance": {
"account_id": "eyJhY2NvdW50SWQiOiIxMjM0NTY3ODkwIn0",
"type": "current",
"amount": {
"amount": "2689.06000",
"currency": "NZD"
},
"direction": "in",
"date_time": "2026-09-14T09:00:00+12:00"
},
"reference": {
"from_party": {
"name": "ACME Corp",
"reference": {
"reference": "Payroll"
}
},
"to_party": {
"name": "J Smith",
"reference": {
"particulars": "Salary",
"code": "Sep",
"reference": "John Smith"
}
}
}
}
],
"pagination": {
"page": 1,
"size": 500,
"total_pages": 3,
"total_records": 1234
}
}
```
### Reading Transactions
`amount.amount` is a string that is never signed (up to 13 digits and 5 decimal places). The sign is carried by `direction`: `in` is money into the account and `out` is money out of it.
`transaction_id` is optional. Some banks don't send it, so don't use it as a unique key without a fallback. `type` is the bank's own transaction code, passed through unchanged; its format differs by bank (the values above are illustrative), so don't map on it across banks. `merchant` (name and MCC `category`), `card`, `from_account`, `to_account` and `reference` are optional; handle them being absent.
In `reference`, the parties are fixed by role, not by `direction`: `from_party` is the payer and `to_party` is the payee, each with the name and the particulars, code and reference on their side of the payment. For an incoming payment such as the salary above, the payer's name is in `from_party.name` and the details the payer entered for the account holder are usually in `to_party.reference`. For an outgoing payment, the account holder is the payer.
### Transaction Status
| Status | Description |
| --------- | --------------------------------- |
| `posted` | Transaction completed and cleared |
| `pending` | Transaction pending/processing |
## Statements API
Statements are available at some banks only: see [Bank Coverage](/docs/shared/bank-coverage), or check `features.statements` in `GET /v1/meta`. The PNZ test bank supports them. All three statement endpoints need the `ReadStatements` permission on the consent.
### List Statements
**Request:**
```http
GET /v1/accounts/{account_id}/statements?consent_id={consent_id}&from_statement_date_time=2026-01-01T00:00:00Z HTTP/1.1
Host: sandbox.data.blinkpay.co.nz
Authorization: Bearer {access_token}
```
**Required Permission:** `ReadStatements`
**Parameters:**
| Parameter | Required | Description |
| -------------------------- | -------- | ---------------------------------------------------- |
| `consent_id` | Yes | The consent ID |
| `from_statement_date_time` | Yes | Start of the range (ISO 8601 date-time, with offset) |
| `to_statement_date_time` | No | End of the range (ISO 8601 date-time, with offset) |
| `page` | No | Page number (default: 1) |
| `size` | No | Records per page (default: 500, max: 500) |
The date filters follow the same rules as [transactions](/docs/data/guides/data-retrieval#get-transactions).
**Response:**
```json
{
"statements": [
{
"statement_id": "stmt-001",
"date": "2026-09-01T00:00:00+12:00",
"type": "regular",
"description": "August 2026 Statement",
"period": {
"from": "2026-08-01T00:00:00+12:00",
"to": "2026-08-31T23:59:59+12:00"
},
"starting_balance": {
"amount": {
"amount": "2104.10000",
"currency": "NZD"
},
"direction": "credit"
},
"closing_balance": {
"amount": {
"amount": "1689.06000",
"currency": "NZD"
},
"direction": "credit"
}
}
],
"pagination": {
"page": 1,
"size": 500,
"total_pages": 1,
"total_records": 1
}
}
```
`type` is `regular` for a periodic statement or `interim` for one issued part-way through a period. `starting_balance` and `closing_balance` are optional; their `direction` is `credit` or `debit`.
### Get a Statement
```http
GET /v1/accounts/{account_id}/statements/{statement_id}?consent_id={consent_id} HTTP/1.1
Host: sandbox.data.blinkpay.co.nz
Authorization: Bearer {access_token}
```
**Required Permission:** `ReadStatements`
Returns a single statement object, in the same shape as an entry in the `statements` list above.
### Download Statement
**Request:**
```http
GET /v1/accounts/{account_id}/statements/{statement_id}/file?consent_id={consent_id} HTTP/1.1
Host: sandbox.data.blinkpay.co.nz
Authorization: Bearer {access_token}
```
**Required Permission:** `ReadStatements`
Returns the statement file as a download (`Content-Disposition: attachment`). Production banks provide a PDF (`application/pdf`); the PNZ test bank returns plain text (`text/plain`) instead, so read the `Content-Type` header rather than assuming a PDF.
## Party API
### Get Party Information
Two endpoints return a single party object. `GET /v1/party` returns the customer who authorised the consent; `GET /v1/accounts/{account_id}/party` returns the party for a specific account.
**Request:**
```http
GET /v1/party?consent_id={consent_id} HTTP/1.1
Host: sandbox.data.blinkpay.co.nz
Authorization: Bearer {access_token}
```
```http
GET /v1/accounts/{account_id}/party?consent_id={consent_id} HTTP/1.1
Host: sandbox.data.blinkpay.co.nz
Authorization: Bearer {access_token}
```
**Required Permission:** `ReadParty`
**Response:**
```json
{
"party_id": "a1b2c3d4-e5f6-7890-abcd-ef1234567890",
"name": "John Smith",
"party_type": "personal",
"email_address": "john@example.com",
"phone": "+6421234567",
"address": {
"street_address": "123 Main Street",
"suburb": "Central",
"city": "Auckland",
"post_code": "1010",
"country": "NZ"
}
}
```
`party_type` is `personal` (sole or joint holder) or `delegate`. `email_address`, `phone` and `address` are optional and depend on what the bank holds.
## Pagination
Accounts, balances, transactions and statements are paginated.
| Parameter | Default | Max | Description |
| --------- | ------- | --- | ---------------- |
| `page` | 1 | - | Page number |
| `size` | 500 | 500 | Records per page |
The response's `pagination` object holds `page`, `size`, `total_pages` and `total_records`.
**Use Returned Values**
Every page holds `size` records except the last. Stop at `total_pages`; a page past the end returns an empty list. If the result is too large to return (400 `BDT263`), narrow the date range.
# Testing Guide (https://merchants.blinkpay.co.nz/docs/data/testing.md)
---
title: Testing Guide
description: Sandbox testing and test scenarios for Blink Data integration
---
# Testing Guide
Testing your integration in the sandbox environment is essential before going live with Blink Data.
## Sandbox Environment
**Sandbox URL:** `https://sandbox.data.blinkpay.co.nz`
The sandbox environment provides:
- Full API functionality with mock bank (PNZ)
- Simulated data access flows
- All consent flows supported (Gateway, Redirect, Decoupled)
**Limitations:**
- Mock data only (not real customer data)
- PNZ is the only bank (see [Sandbox and Production Banks](/docs/data/testing#sandbox-and-production-banks))
- Some bank-specific behaviours simplified
### Getting Sandbox Credentials
Sandbox credentials are provisioned when you sign up at [merchants.blinkpay.co.nz](https://merchants.blinkpay.co.nz/). If **Settings > API Settings** shows no sandbox key, select **Request Sandbox API Key** there. See [Getting API Credentials](/docs/shared/authentication#getting-api-credentials).
## Sandbox and Production Banks
In the sandbox, test every flow with **PNZ**, the test bank; it supports every data type, including statements. The production banks (ANZ, ASB, BNZ, Westpac, Kiwibank and NZHL) are used in production, with their `bank` values, decoupled identifiers and statement availability listed on the [Bank Coverage](/docs/shared/bank-coverage) page. `GET /v1/meta` lists the banks enabled for your organisation in the environment you are calling. The `bank` value is case-sensitive; an unrecognised value is rejected with 400 (see [Error Codes](/docs/data/error-codes#_400-bad-request)).
## Try the Demo
To see the Data API in action before building your integration, visit our demo site:
**ACME Loans Demo:** [https://acme-loans-dev.blinkpay.co.nz](https://acme-loans-dev.blinkpay.co.nz)
This demonstrates the full data consent and retrieval experience.
## Sandbox Test Values
The sandbox has one test bank, PNZ: Payments NZ's API Centre test bank, and the only bank shown in the Gateway. Use these values for every flow:
| Item | Value |
| --- | --- |
| Test bank | **PNZ** (the only bank in the sandbox Gateway) |
| Redirect or Gateway login | Username `user01`, password `password` |
| Decoupled, auto-approve | Mobile number `+64-259531933`. In the Gateway, choose **Send to PNZ app**. The consent is approved automatically. |
| Decoupled, any other number | Accepted, but the consent never authorises: it stays `AwaitingAuthorisation` until the bank's authorisation window ends, then becomes `Rejected` (timeout). Other numbers do not simulate a decline. |
| Decline | On the PNZ login page, choose **Cancel** before logging in. The consent becomes `Rejected`. |
**Automated Testing**
The auto-approve number needs no customer interaction, which makes it the easiest way to drive consents to `Authorised` in automated tests.
## Test Scenarios
### 1. Happy Path - Redirect Flow
**Objective:** Verify end-to-end data access using Redirect Flow
**Steps:**
1. Create consent with redirect flow (PNZ bank)
2. Redirect user to bank URL
3. Complete authentication with `user01` / `password`
4. Handle redirect back to your application
5. Verify consent status is `Authorised`
6. Retrieve accounts list
7. Retrieve balances for each account
8. Retrieve transactions for an account
**Expected Results:**
- Consent status: `Authorised`
- Account data returned successfully
- Redirect back to your application
### 2. Happy Path - Decoupled Flow
**Objective:** Verify data access using Decoupled Flow
**Steps:**
1. Create consent with decoupled flow (PNZ bank, `+64-259531933`)
2. Poll the consent status every 5 seconds
3. Verify consent status is `Authorised`
4. Retrieve account data
**Expected Results:**
- The consent is authorised automatically; only `+64-259531933` does this, and any other number stays `AwaitingAuthorisation` until the window ends
- Account data retrieved successfully
### 3. Error Handling - Timeout
**Objective:** Verify timeout handling
**Steps:**
1. Create consent with redirect flow
2. Do not complete the bank authorisation
3. Wait out the bank's authorisation window (up to 10 minutes covers every bank)
4. Retrieve the consent and verify its status has changed to `Rejected`
5. Handle the timeout gracefully in your application
**Expected Results:**
- Consent status: `Rejected`
- Application shows appropriate error message
### 4. Error Handling - Rejection
**Objective:** Verify rejection handling
**Steps:**
1. Create consent with redirect flow
2. Redirect to bank
3. Choose **Cancel** on the PNZ login page, before logging in
4. Handle redirect back with rejection status
5. Verify consent status is `Rejected`
**Expected Results:**
- Consent status: `Rejected`
- Application handles rejection gracefully
### 5. Error Handling - Revocation
**Objective:** Verify revoked consent handling
**Steps:**
1. Create and authorise a consent (the auto-approve number is quickest)
2. Retrieve some account data successfully
3. Revoke the consent via `DELETE /v1/consents/{consent_id}` (204)
4. Attempt to retrieve account data again
5. Verify you receive 403 with code `BDT410`
6. Handle the revoked consent gracefully
**Expected Results:**
- Data retrieval fails with 403 `BDT410` after revocation, and revoking the consent again returns 409 `BDT702`
- Application detects revoked consent and prompts for new authorisation
### 6. Pagination Testing
**Objective:** Verify pagination implementation
**Steps:**
1. Create and authorise a consent
2. Retrieve transactions with `size=10`
3. Iterate through multiple pages using returned pagination values
4. Verify pagination metadata is correct
5. Test edge cases (last page, page beyond total)
**Expected Results:**
- All pages retrieved correctly
- Pagination metadata accurate
- Edge cases handled gracefully
## Producing Sandbox Errors
To test your error handling, you can deliberately produce each failure state:
| Error State | When It Occurs |
| ---------------- | ----------------------------------------------------------------------------------------------------------------- |
| `Rejected` | The customer chooses **Cancel** on the PNZ login page, or never completes authorisation before the bank's window elapses |
| `GatewayTimeout` | A Gateway Flow consent is abandoned before the customer selects a bank, and the 15-minute Gateway session cutoff elapses |
| `Revoked` | The consent is revoked after authorisation, via `DELETE /v1/consents/{consent_id}` |
For automated tests, drive each state yourself: authorise a consent with the auto-approve number and revoke it with `DELETE /v1/consents/{consent_id}` to exercise your `Revoked` handling, and choose **Cancel** on the PNZ login page for `Rejected`. Handle the remaining outcomes, such as expiry or a bank error, from the documented consent statuses and [error codes](/docs/data/error-codes).
## Next Steps
- **[Going Live](/docs/shared/help/going-live)** - Production checklist when testing is complete
# Error Codes Reference (https://merchants.blinkpay.co.nz/docs/data/error-codes.md)
---
title: Error Codes Reference
description: Blink Data (BDT) error codes, with the cause of each and how to fix it
---
# Error Codes Reference
This page lists the error codes the Blink Data API returns, with the cause of each and what to do. A classified error carries a `code` (format `BDTnnn`) and a `message`; the message often names the rejected value, so log it.
Some errors carry no `code`. A missing required field or query parameter, or a date that can't be parsed, returns 400 with only a `message`, so read `message` and check the request against the [Data Retrieval guide](/docs/data/guides/data-retrieval). A `consent_id` that doesn't exist, or that belongs to another organisation, returns 404: treat it as not found.
## Error Response Format
```json
{
"timestamp": "2026-10-15T10:30:00.000+13:00",
"path": "/v1/accounts/0e2b6c35-8f0a-4d5e-9c1b-2a7d4f6e8b90/transactions",
"status": 400,
"error": "400 BAD_REQUEST",
"message": "To date time must not be before from date time",
"code": "BDT237"
}
```
Branch on `status` and `code`. Don't parse `error`.
## Common Error Codes
### 400 Bad Request
| Code | Cause | Fix |
| ------ | ----- | --- |
| BDT211 | The `redirect_uri` is not whitelisted for your organisation | Add it under **Settings > API Settings** in the portal, in the row for the environment you are calling |
| BDT212 | The `redirect_uri` is malformed | Send an absolute URI |
| BDT213 | The bank is valid but not set up for your organisation, for example a production bank in the sandbox | Use `PNZ` in the sandbox; in production, contact BlinkPay to enable the bank |
| BDT228 | The decoupled `identifier_type` is not supported by that bank | Use an identifier the bank accepts (see [Sandbox and Production Banks](/docs/data/testing#sandbox-and-production-banks)) |
| BDT230 | The mobile number is not valid | Check the number the customer entered |
| BDT240 | `expiration_date_time` is before `start_date_time` | Set the expiry after the start |
| BDT241 | A permission the bank doesn't offer, for example `ReadStatements` at a bank without statements | Remove the permission for that bank; `GET /v1/meta` lists each bank's features |
| BDT242 | `permissions` is empty | Send at least one permission |
| BDT243 | The `bank` value is not recognised | Use an exact, case-sensitive value: `ANZ`, `ASB`, `BNZ`, `Westpac`, `Kiwibank`, `NZHL` or `PNZ` |
| BDT244 | `expiration_date_time` is before `end_date_time` | Set the expiry on or after the end |
| BDT245 | Unknown `flow.detail.type` | Use `gateway`, `redirect` or `decoupled` |
| BDT246 | Unknown `flow.flow_hint.type` | Use `redirect` or `decoupled` |
| BDT251 | `end_date_time` is not after today (New Zealand date) | Use a date from tomorrow onwards, or omit it |
| BDT252 | `start_date_time` is in the future | Use a start date-time that is now or earlier |
| BDT254 | The `idempotency-key` header is longer than 255 characters | Use a shorter key; a UUID is recommended |
| BDT255 | Both `idempotency-key` and the deprecated `x-idempotency-key` were sent | Send only `idempotency-key` |
| BDT257 | `start_date_time` and `end_date_time` fall on the same date (New Zealand time) | Make the data window span at least two dates |
| BDT258 | `expiration_date_time` falls on the date the consent is created (New Zealand time) | Set an expiry on a later date, or omit it for no expiry |
| BDT259 | A field has the wrong JSON type | Check the field named in `message` |
| BDT260 | A `flow_hint` has no `bank` | Add `bank` to the hint; Blink Data requires it |
| BDT261 | `flow.detail.type` is missing or empty | Set `type` to `gateway`, `redirect` or `decoupled` |
| BDT262 | `flow.flow_hint.type` is missing | Add `type` to the hint |
| BDT264–BDT268 | The decoupled `callback_url` is malformed, uses a scheme other than `http` or `https` (production requires `https`), or its host is not public or does not resolve | Use a public URL, `https` in production |
| BDT236 | The requested dates fall outside the consent's `start_date_time` to `end_date_time` window | Keep the date range within the consent's window |
| BDT237 | The to date is before the from date | Swap or correct the dates |
| BDT238 | The to date is after today | Use today or earlier, or omit it |
| BDT239 | The from date is in the future | Use a from date today or earlier |
| BDT263 | The bank's result is too large to return in one request | Narrow the request, for example the date range, and retry |
| BDT299 | The request body could not be read | Check the JSON body against the examples in the [Data Retrieval guide](/docs/data/guides/data-retrieval) |
### 403 Forbidden
| Code | Cause | Fix |
| ------ | ----- | --- |
| BDT401 | The redirect flow is not enabled for that bank | Use another flow (the gateway or decoupled) or contact BlinkPay |
| BDT402 | The decoupled flow is not enabled for that bank | Use another flow (the gateway or redirect) or contact BlinkPay |
| BDT403 | The gateway flow is not enabled for your organisation | Use the redirect or decoupled flow, or contact BlinkPay to enable the gateway |
| BDT409 | The consent was rejected | Create a new consent |
| BDT410 | The consent has been revoked | Create a new consent |
| BDT411 | The consent doesn't include the permission this endpoint needs | Create a new consent with the required permission |
| BDT412 | The consent has expired (its `expiration_date_time` has passed; it becomes `Consumed`) | Create a new consent |
| BDT413 | The consent is not yet authorised | Wait for the customer to finish authorising; check with `GET /v1/consents/{consent_id}` |
| BDT415 | The bank says the consent is no longer usable, for example because the customer revoked it at the bank | Create a new consent |
### 404 Not Found
| Code | Cause | Fix |
| ------ | ----- | --- |
| BDT101 | The consent doesn't exist, or belongs to another organisation | Check the consent ID, and that you are calling the environment the consent was created in |
### 409 Conflict
| Code | Cause | Fix |
| ------ | ----- | --- |
| BDT701 | The idempotency key was reused with a different request body | Use a new idempotency key for a different request |
| BDT702 | The consent has already been revoked | No action needed; access is already removed |
| BDT704 | A consent request with the same idempotency key is still in progress | Retry with the same key once the first request completes |
### 422 Unprocessable Entity
| Code | Cause | Fix |
| ------ | ----- | --- |
| BDT009 | Revoking a consent that has already ended (`Rejected`, `GatewayTimeout` or `Consumed`) | No action needed; create a new consent if you still need access |
| BDT013 | The consent timed out at the gateway (`GatewayTimeout`) | Create a new consent |
| BDT014 | A BNZ consent with `start_date_time` more than 2 years ago | Use a start date within the last 2 years |
### 502 Bad Gateway
| Code | Cause | Fix |
| ------ | ----- | --- |
| BDT603 | The bank could not accept the request at this time | Wait, then retry with backoff |
### 503 Service Unavailable
| Code | Cause | Fix |
| ------ | ----- | --- |
| BDT601 | The bank's service is down or not responding | Retry with backoff; check for bank maintenance |
| BDT602 | The bank rate-limited the request | Wait briefly, then retry with backoff |
| BDT604 | A temporary Blink Data problem | Retry shortly |
## Need Help?
For errors not listed here or for assistance troubleshooting:
1. Check the `message` field for specific details
2. Review the [Troubleshooting Guide](/docs/shared/help/troubleshooting)
3. Contact [support@blinkpay.co.nz](mailto:support@blinkpay.co.nz)